3.1 Page Configuration
3.1.1 Homepage Style 1
Frontend of Homepage-1 Layout Position
![]()
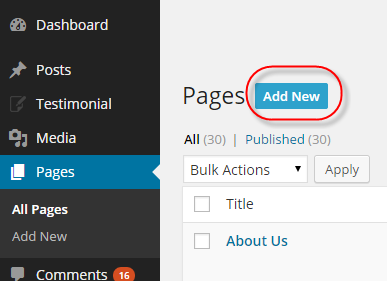
To configure this page, in the Admin Panel, navigate to CMS >> Pages. Create a new page in Page Management section.
Copy and paste the following code into the Content field:
<div class="home-default homestyle1">
<div class="wow fadeInUp">
<div class="static-image-1">
{{block type="cms/block" block_id="static-image-1"}}
</div>
</div>
<div class="wow fadeInUp">
<div class="slider-basic-wrapper box-content">
{{block type="basicproducts/list" name="basicproducts.slider.home" template="sm/basicproducts/basic-slider-home.phtml"}}
</div>
</div>
<div class="wow fadeInUp">
<div class="box-content listingtab-wrapper">
{{block type="listingtabs/list" name="listingtabs.list.default" template="sm/listingtabs/default.phtml"}}
</div>
</div>
<div class="wow fadeInUp">
<div class="full-wrapper full-wrapper-image center">
<div class="full-content">
{{block type="cms/block" block_id="static-image-2"}}
</div>
</div>
</div>
<div class="wow fadeInUp">
<div class="box-content listingtab-wrapper">
{{block type="listingtabs/list" name="listingtabs.list.default" template="sm/listingtabs/default.phtml"
listingtabs_title_text="Bed Room"
product_category="241,242,243,244,245,246,247,248,249"
}}
</div>
</div>
<div class="wow fadeInUp">
<div class="full-wrapper full-wrapper-custom center">
<div class="full-content">
{{block type="custom/list" template="sm/custom/default.phtml"}}
</div>
</div>
</div>
<div class="wow fadeInUp">
<div class="full-wrapper full-block box-content latest-post-wrapper">
<div class="container">
<div class="slider-latest-blog">
{{block type="blog/blog" name="latest_post" template="aw_blog/latest-post.phtml"}}
</div>
</div>
</div>
</div>
<div class="wow fadeInUp">
<div class="full-wrapper full-wrapper-counter">
<div class="container">
{{block type="cms/block" block_id="counter-block"}}
</div>
</div>
</div>
<div class="wow fadeInUp">
<div class="full-wrapper full-block box-content contact-full">
<div class="container">
{{block type="cms/block" block_id="contact-homepage"}}
</div>
</div>
</div>
<div class="wow fadeInUp">
<div class="brand-wrapper">
{{block type="cms/block" block_id="brand-block"}}
</div>
</div>
</div>
Copy and paste the following code into the Design field:
<reference name="full_top">
<block type="sm_cameraslider/slide_preview" name="sm_cameraslide" as="cameraslide" ></block>
</reference>
3.1.2 Homepage Style 2
Frontend of Homepage-1 Layout Position
![]()
To configure this page, in the Admin Panel, navigate to CMS >> Pages. Create a new page in Page Management section.
Copy and paste the following code into the Content field:
<div class="home-default homestyle2">
<div class="row">
<div class="col-lg-3 col-md-3 col-sidebar-home">
<div class="wow bounceInLeft">
{{block type="megamenu/list" template="sm/megamenu/megamenu-vertical.phtml"
title="Categories"
group_id="5"
theme="2"
}}
</div>
<div class="wow bounceInLeft">
{{block type="newsletter/subscribe" template="newsletter/subscribe.phtml"}}
</div>
<div class="wow bounceInLeft">
{{block type="blog/blog" name="latest_post" template="aw_blog/latest-post-index2.phtml"}}
</div>
<div class="wow bounceInLeft">
{{block type="cms/block" block_id="static-image-4"}}
</div>
<div class="wow bounceInLeft">
{{block type="twitterslider/list" template="sm/twitterslider/default.phtml"}}
</div>
<div class="wow bounceInLeft">
{{block type="instagramgallery/instagramusers_viewlist" name="instagramgallery" as="instagramgallery"}}
</div>
<div class="wow bounceInLeft">
{{block type="cms/block" block_id="what-client-say"}}
</div>
</div>
<div class="col-lg-9 col-md-9 col-main-home">
<div class="wow bounceInRight">
<div class="slider-basic-wrapper box-content">
{{block type="basicproducts/list" name="basicproducts.slider.home" template="sm/basicproducts/basic-slider-home.phtml"}}
</div>
</div>
<div class="wow bounceInRight">
<div class="box-content listingtab-wrapper">
{{block type="listingtabs/list" name="listingtabs.list.default" template="sm/listingtabs/default_index2.phtml"}}
</div>
</div>
<div class="wow bounceInRight">
<div class="box-content listingtab-wrapper">
{{block type="listingtabs/list" name="listingtabs.list.default" template="sm/listingtabs/default_index2.phtml"
listingtabs_title_text="Bed Room"
product_category="241,242,243,244,246"
}}
</div>
</div>
<div class="wow bounceInRight">
<div class="static-iamge-3">
{{block type="cms/block" block_id="static-image-3"}}
</div>
</div>
<div class="wow bounceInRight">
<div class="slider-deal-home">
{{block type="deal/list" name="deal.list.default" template="sm/deal/slider-deal.phtml"}}
</div>
</div>
</div>
</div>
<div class="wow fadeInUp">
<div class="full-wrapper full-wrapper-counter">
<div class="container">
{{block type="cms/block" block_id="counter-block"}}
</div>
</div>
</div>
<div class="wow fadeInUp">
<div class="full-wrapper full-block box-content contact-full">
<div class="container">
{{block type="cms/block" block_id="contact-homepage"}}
</div>
</div>
</div>
<div class="wow fadeInUp">
<div class="brand-wrapper">
{{block type="cms/block" block_id="brand-block"}}
</div>
</div>
</div>
Copy and paste the following code into the Design field:
<reference name="full_top">
<block type="sm_cameraslider/slide_preview" name="sm_cameraslide" as="cameraslide" ></block>
<block type="cms/block" name="static-categories">
<action method="setBlockId"><block_id>static-categories</block_id></action>
</block>
</reference>
3.2 Configure Mega Menu
- Step 3: In order to add menu items, Go to SM Mega Menu >> Menu Items Manager to add items as you want.
3.2.1 Horizontal Mega Menu:
![Horizontal-mega-menu]()
Horizontal Mega Menu’s backend ![]()
Home
Frontend Appearance ![]()
- Link shows Home’s backend. Please click Here to view.
Features
Frontend Appearance ![]()
- Link shows Features Menu’s backend. Please click Here to view.
- Link shows Dropdown Features’ backend. Please click Here to view.
Copy and paste the following code chain into the content:
<div class="home-menu-dropdown">
<ul class="item-home-store layout-home">
<li class="title-menu-home">Layouts</li>
<li><a title="Home Style 1" href="{{store url="?___store=default&___from_store=french"}}">Home Style 1</a></li>
<li><a title="Home Style 2" href="{{store url="?___store=french&___from_store=default"}}">Home Style 2</a></li>
<li><a title="Boxed Layout" href="{{store url="?___store=somaliland&___from_store=default"}}">Boxed Layout</a></li>
</ul>
<ul class="item-home-store theme-color">
<li class="title-menu-home">Color Styles</li>
<li class="green"><a title="Green" href="{{store url="?___store=german&___from_store=default"}}">Green</a></li>
<li class="cyan"><a title="Cyan" href="{{store url="?___store=argentina&___from_store=default"}}">Cyan</a></li>
<li class="orange"><a title="Orange" href="{{store url="?___store=bolivia&___from_store=default"}}">Orange</a></li>
</ul>
<ul class="item-home-store header-home">
<li class="title-menu-home">Headers</li>
<li><a title="Header Type 1" href="{{store url="?___store=default&___from_store=french"}}">Header Type 1</a></li>
<li><a title="Header Type 2" href="{{store url="?___store=french&___from_store=default"}}">Header Type 2</a></li>
<li><a title="Megamenu" href="{{store url="?___store=default&___from_store=french"}}">Megamenu</a></li>
<li><a title="Css Menu" href="{{store url="?___store=barbados&___from_store=french"}}">Css Menu</a></li>
</ul>
<ul class="item-home-store detail-home">
<li class="title-menu-home">Product Detail Layouts</li>
<li><a title="Product Detail - Full" href="{{store url="shop/sazen-kutemas.html"}}">Product Detail - Full</a></li>
<li><a title="Product Detail - Left Sidebar" href="{{store url="shop/sazen-kutemas.html?detail_style=2&thumbstyle=1"}}">Product Detail - Left Sidebar</a></li>
<li><a title="Product Detail - Right Sidebar" href="{{store url="shop/sazen-kutemas.html?detail_style=3&thumbstyle=1"}}">Product Detail - Right Sidebar</a></li>
<li><a title="Thumbnail - Horizontal" href="{{store url="shop/sazen-kutemas.html?thumbstyle=1"}}">Thumbnail - Horizontal</a></li>
<li><a title="Thumbnail - Vertical" href="{{store url="shop/sazen-kutemas.html?thumbstyle=2"}}">Thumbnail - Vertical</a></li>
</ul>
<ul class="item-home-store detail-home">
<li class="title-menu-home">Zoom Types</li>
<li><a title="Product Page Inner Zoom" href="{{store url="shop/sazen-kutemas.html/?___store=default&___from_store=argentina"}}">Product Page Inner Zoom</a></li>
<li><a title="Product Page Outer Zoom" href="{{store url="shop/sazen-kutemas.html/?___store=andorra&___from_store=default"}}">Product Page Outer Zoom</a></li>
<li><a title="Product Page Lens Zoom" href="{{store url="shop/sazen-kutemas.html/?___store=bolivia&___from_store=default"}}">Product Page Lens Zoom</a></li>
</ul>
<div style="clear:both;"></div>
<ul class="item-home-store layout-home">
<li class="title-menu-home">Listing Layouts</li>
<li><a title="Without Sidebar" href="{{store url="shop.html?___store=german&___from_store=default&mode=grid"}}">Without Sidebar</a></li>
<li><a title="Left Sidebar" href="{{store url="shop.html?___store=default&___from_store=german&mode=grid"}}">Left Sidebar</a></li>
<li><a title="Right Sidebar" href="{{store url="shop.html?___store=argentina&___from_store=default&mode=grid"}}">Right Sidebar</a></li>
<li><a title="Left - Right Sidebar" href="{{store url="shop.html?___store=bolivia&___from_store=default&mode=grid""}}">Left - Right Sidebar</a></li>
<li><a title="2 Product Columns" href="{{store url="shop.html?___store=andorra&___from_store=default&mode=grid"}}">2 Product Columns</a></li>
<li><a title="3 Product Columns" href="{{store url="shop.html?___store=default&___from_store=benin&mode=grid"}}">3 Product Columns</a></li>
<li><a title="4 Product Columns" href="{{store url="shop.html?___store=belgium&___from_store=default&mode=grid"}}">4 Product Columns</a></li>
<li><a title="5 Product Columns" href="{{store url="shop.html?___store=benin&___from_store=default&mode=grid"}}">5 Product Columns</a></li>
<li><a title="6 Product Columns" href="{{store url="shop.html?___store=german&___from_store=default&mode=grid"}}">6 Product Columns</a></li>
</ul>
<ul class="item-home-store layout-home">
<li class="title-menu-home">About Us Layouts</li>
<li><a title="About Us Style 1" href="{{store url="about-us.html/?___store=default&___from_store=argentina"}}">About Us Style 1</a></li>
<li><a title="About Us Style 2" href="{{store url="about-us.html/?___store=french&___from_store=default"}}">About Us Style 2</a></li>
<li><a title="About Us Style 3" href="{{store url="about-us.html/?___store=german&___from_store=default"}}">About Us Style 3</a></li>
<li><a title="About Us Style 4" href="{{store url="about-us.html/?___store=argentina&___from_store=default"}}">About Us Style 4</a></li>
</ul>
<ul class="item-home-store layout-home">
<li class="title-menu-home">Contact Us Layouts</li>
<li><a title="Contact Us Style 1" href="{{store url="contact-us.html/?___store=default&___from_store=argentina"}}">Contact Us Style 1</a></li>
<li><a title="Contact Us Style 2" href="{{store url="contact-us.html/?___store=french&___from_store=default"}}">Contact Us Style 2</a></li>
<li><a title="Contact Us Style 3" href="{{store url="contact-us.html/?___store=german&___from_store=default"}}">Contact Us Style 3</a></li>
<li><a title="Contact Us Style 4" href="{{store url="contact-us.html/?___store=argentina&___from_store=default"}}">Contact Us Style 4</a></li>
</ul>
<ul class="item-home-store layout-home">
<li class="title-menu-home">404 Page Layout</li>
<li><a title="404 Page Style 1" href="{{store url="404page"}}">404 Page Style 1</a></li>
</ul>
<ul class="item-home-store detail-home">
<li class="title-menu-home">Effect Hover Product</li>
<li><a title="Simple" href="{{store url="shop.html?___store=default&___from_store=german&mode=grid"}}">Simple</a></li>
<li><a title="Display Second Image" href="{{store url="shop.html?___store=benin&___from_store=german&mode=grid"}}">Display Second Image</a></li>
<li><a title="Display Slider Image" href="{{store url="shop.html?___store=barbados&___from_store=german&mode=grid"}}">Display Slider Image</a></li>
</ul>
</div>
Shop Menu
Frontend Appearance![]()
- Link shows Shop Menu’s backend. Please click Here to view.
- Link shows Backend of Group 1 in Shop Menu. Please click Here to view.
- Link shows Backend of Item Accesories in Group 1 Please click Here to view.
- Link shows Backend of Item named ‘Image Bottom’ in Shop Menu Please click Here to view.
Copy and paste the following code chain into the content:
<div class="static-bottom-link">
<a title="Static Image" href="#"><img src="{{media url="wysiwyg/image-megamenu/image-1.jpg"}}" alt="Static Image" /></a>
</div>
Note: Other items in Shop Menu are configured the same as above items.
Bedrooms Menu
Frontend Appearance![]()
- Link shows Bedrooms Menu’s backend. Please click Here to view.
- Link shows Backend of Item ‘Categories’ in Bedrooms Menu. Please click Here to view.
- Link shows Backend of Item ‘Beds Category’ in ‘Categories’. Please click Here to view.
- Link shows Backend of Item ‘Beds’ in ‘Beds Category’. Please click Here to view.
- Link shows Backend of Item named ‘Image Bottom’ in ‘Categories’. Please click Here to view.
Copy and paste the following code chain into the content:
<div class="static-bottom-link static-bottom-link-2">
<a title="Static Image" href="#"><img src="{{media url="wysiwyg/image-megamenu/image-2.jpg"}}" alt="Static Image" /></a>
</div>
Note: Other items in ‘Categories’ are configured the same as above items.
- Link shows Backend of Item ‘Featured Products’ in Bedrooms Menu. Please click Here to view.
Copy and paste the following code chain into the content:
<div class="basicproduct-content-menu">
{{block type="basicproducts/list" name="basicproducts.list.default" template="sm/basicproducts/basic-megamenu.phtml"
product_source="catalog"
product_category="208"
product_order_by="best_sales"
product_limitation="1"
product_addcart_display="1"
product_addwishlist_display="1"
product_addcompare_display="1"
}}
</div>
About Us
Frontend Appearance ![]()
- Backend Settings of About Us Menu Please click Here to view.
- Item Dropdown About’s backend. Please click Here to view.
Copy and paste the following code chain into the content:
<ul class="item-about-contact">
<li><a title="About Us Style 1" href="{{store url="about-us.html/?___store=default&___from_store=argentina"}}">About Us Style 1</a></li>
<li><a title="About Us Style 2" href="{{store url="about-us.html/?___store=french&___from_store=default"}}">About Us Style 2</a></li>
<li><a title="About Us Style 3" href="{{store url="about-us.html/?___store=german&___from_store=default"}}">About Us Style 3</a></li>
<li><a title="About Us Style 4" href="{{store url="about-us.html/?___store=argentina&___from_store=default"}}">About Us Style 4</a></li>
</ul>
Contact Us
Frontend Appearance ![]()
- Backend Settings of Contact Us Menu Please click Here to view.
- Item Dropdown Contact’s Backend. Please click Here to view.
Copy and paste the following code chain into the content:
<ul class="item-about-contact">
<li><a title="Contact Us Style 1" href="{{store url="contact-us.html/?___store=default&___from_store=argentina"}}">Contact Us Style 1</a></li>
<li><a title="Contact Us Style 2" href="{{store url="contact-us.html/?___store=french&___from_store=default"}}">Contact Us Style 2</a></li>
<li><a title="Contact Us Style 3" href="{{store url="contact-us.html/?___store=german&___from_store=default"}}">Contact Us Style 3</a></li>
<li><a title="Contact Us Style 4" href="{{store url="contact-us.html/?___store=argentina&___from_store=default"}}">Contact Us Style 4</a></li>
</ul>
3.2.2 Vertical Mega Menu (Only in Hompage Style 2)
Vertical Mega Menu includes 9 items:
- Daybeds
- Sectionals
- Sleeper Sofas
- Dining Chairs
- Gliders & Rocking Chairs
- High Chairs & Boosters
- Infant Chairs
- Living Room
- Kitchen
Frontend Appearance
![]()
Backend Appearance
![]()
Daybeds
Frontend Appearance ![]()
Backend Settings of Item ‘Daybeds’ Please click Here to view.
Sectionals
![]()
Tree of Sectionals:
![]()
Note: To configure sub-items inside this category, we do as following tasks:
Note: Copy & paste the following code chain into ‘Content’ tab of Item ‘Image’:
<div class="static-image-menu">
<a title="Static Image" href="#">
<img src="{{media url="wysiwyg/image-megamenu/image-menu-5.jpg"}}" alt="Static Image" />
</a>
</div>
Sleeper Sofas
![]()
Tree of Sleeper Sofas:
![]()
Note: To configure sub-items inside this category, we do as following tasks:
Note: Copy & paste the following code chain into ‘Content’ tab of Item ‘Image’:
<ul class="image-list">
<li><a title="Static Image" href="#"><img src="{{media url="wysiwyg/image-megamenu/image-menu-1.jpg"}}" alt="Static Image" /></a></li>
<li><a title="Static Image" href="#"><img src="{{media url="wysiwyg/image-megamenu/image-menu-2.jpg"}}" alt="Static Image" /></a></li>
<li><a title="Static Image" href="#"><img src="{{media url="wysiwyg/image-megamenu/image-menu-3.jpg"}}" alt="Static Image" /></a></li>
<li><a title="Static Image" href="#"><img src="{{media url="wysiwyg/image-megamenu/image-menu-4.jpg"}}" alt="Static Image" /></a></li>
</ul>
Dining Chairs
![]()
Backend Settings of Dining Chairs
Popular Products Menu Backend Settings
Note: Copy & paste the following code chain into ‘Content’ tab of ‘Popular Products’:
<div class="basicproduct-content-menu">
{{block type="basicproducts/list" name="basicproducts.list.default" template="sm/basicproducts/basic-megamenu.phtml"
product_source="catalog"
product_category="202"
product_order_by="lastest_product"
product_limitation="3"
}}
</div>
High Chairs & Boosters
![]()
Tree of High Chairs & Boosters:
![]()
Note: To configure sub-items inside this category, we do as following tasks:
Note: Copy & paste the following code chain into ‘Content’ tab of Item ‘Best Seller’:
{{block type="basicproducts/list" name="basicproducts.list.default" template="sm/basicproducts/basic-megamenu.phtml"
product_source="catalog"
product_category="230"
product_limitation="1"
}}
Note: Copy & paste the following code chain into ‘Content’ tab of Item’Image’:
<div class="static-image-menu">
<a title="Static Image" href="#">
<img src="{{media url="wysiwyg/image-megamenu/image-menu-6.jpg"}}" alt="Static Image" />
</a>
</div>
Infant Chairs
![]()
Backend Settings of Infant Chairs
Dropdown Menu Backend Settings
Note: Copy & paste the following code chain into ‘Content’ tab of Item ‘Dropdown’:
<div class="static-categories">
	<div class="row">
		<div class="col-lg-4 col-md-4 item-category">
			<div class="img-category">
				<a title="Category" title="View Category" href="#">
					<img src="{{media url="wysiwyg/image-megamenu/img-cat-1.jpg"}}" alt="Category" />
					<span class="view-cat"><span>View Category</span></span>
				</a>
			</div>

			<div class="info-category">
				<h3 class="name-category">
					<a title="Duis aute irure dolor in reprehen" href="#">Duis aute irure dolor in reprehen</a>
				</h3>
			</div>
		</div>

		<div class="col-lg-4 col-md-4 item-category">
			<div class="img-category">
				<a title="Category" title="View Category" href="#">
					<img src="{{media url="wysiwyg/image-megamenu/img-cat-2.jpg"}}" alt="Category" />
					<span class="view-cat"><span>View Category</span></span>
				</a>
			</div>

			<div class="info-category">
				<h3 class="name-category">
					<a title="Duis aute irure dolor in reprehen" href="#">Duis aute irure dolor in reprehen</a>
				</h3>
			</div>
		</div>

		<div class="col-lg-4 col-md-4 item-category">
			<div class="img-category">
				<a title="Category" title="View Category" href="#">
					<img src="{{media url="wysiwyg/image-megamenu/img-cat-3.jpg"}}" alt="Category" />
					<span class="view-cat"><span>View Category</span></span>
				</a>
			</div>

			<div class="info-category">
				<h3 class="name-category">
					<a title="Duis aute irure dolor in reprehen" href="#">Duis aute irure dolor in reprehen</a>
				</h3>
			</div>
		</div>
	</div>
</div>
Note: Other items in Vertical Menu are configured the same as above items.
3.3 Configure Extensions
The SM Supershop front-page has been integrated with extensions in the Theme as following list:
I. SM Custom
- Position: SM Custom
- Frontend Appearance
![]()
![]()
- Backend of SM Custom: Click Here
- Position: SM Mega Menu
- Frontend Appearance
![]()
- Backend of SM Mega Menu: Click Here
III. SM CartPro
- Position: SM CartPro
- Frontend Appearance
![]()
- Backend of SM CartPro: Click Here
- Go Here to readmore about the SM CartPro module.
IV. SM Camera Slider
- Position: SM Camera Slider
- Frontend Appearance
![]()
- Backend of SM Camera Slider: Click Here
- Go Here to readmore about the SM Camera Slide module.
V. SM Basic Products
- Position: SM Basic Products
- Frontend Appearance
![]()
- Backend of SM Basic Products: Click Here
VI. SM Listing Tabs
- Position: SM Listing Tabs
- Frontend Appearance
![]()
![]()
- Backend of Listing Tabs : Click Here
- Go Here to readmore about the SM Listing Tabs module.
- Position: SM Twitter
- Frontend Appearance
![]()
- Backend of SM Twitter: Click Here
- Go Here to readmore about the SM Twitter module.
VIII. SM Instagram Gallery
- Position: SM Instagram Gallery
- Frontend Appearance
![]()
- Backend of SM Instagram Gallery: Click Here
- Go Here to readmore about the SM Instagram Gallery module.
IX. SM Deal
- Position: SM Deal
- Frontend Appearance
![]()
- Backend of SM Deal: Click Here
-
Note: Choose ‘French’ as your Store View in Backend to get Frontend like our demo in Homepage Style 2.
- Go Here to readmore about the SM Deal module.
3.4 Configure Static Blocks
The SM Handmade front-page has static blocks in the Theme:
To create a new static block, go to CMS >> Static Blocks >> Add new block
1.Static Block: static-image-1
To create the static block, go to CMS >> Static Blocks with Identifier * : “static-image-1″
Frontend
![]()
Backend Setting
2.Static Block: static-image-2
To create the static block, go to CMS >> Static Blocks with Identifier * : “static-image-2″
Frontend
![]()
Backend Setting
3.Static Block: counter-block
To create the static block, go to CMS >> Static Blocks with Identifier * : “counter-block”
Frontend
![]()
Backend Setting
- Copy & paste the code chain in Content Tab:
<div class="count-up">
				<div class="row">
					<div class="col-lg-3 col-md-3 col-sm-3 col-xs-6">
						<div class="count-up-item">
							<div class="icon-count-up icon-customer">
								<span>Happy Customers</span>
							</div>

							<div class="numscroller"><span class="counter">12686</span></div>

							<p>Happy Customers</p>
						</div>
					</div>

					<div class="col-lg-3 col-md-3 col-sm-3 col-xs-6">
						<div class="count-up-item">
							<div class="icon-count-up icon-item">
								<span>Items</span>
							</div>

							<div class='numscroller'><span class="counter">2686</span></div>

							<p>Items</p>
						</div>
					</div>

					<div class="col-lg-3 col-md-3 col-sm-3 col-xs-6">
						<div class="count-up-item">
							<div class="icon-count-up icon-view">
								<span>Views</span>
							</div>

							<div class='numscroller'><span class="counter">1808</span></div>

							<p>Views</p>
						</div>
					</div>

					<div class="col-lg-3 col-md-3 col-sm-3 col-xs-6">
						<div class="count-up-item">
							<div class="icon-count-up icon-sale">
								<span>Sales</span>
							</div>

							<div class='numscroller'><span class="counter">14560</span></div>

							<p>Sales</p>
						</div>
					</div>
				</div>

				<script>
					jQuery(document).ready(function( $ ) {
						$('.counter').counterUp({
							delay: 10,
							time: 1500
						});
					});
				</script>
			</div>
4.Static Block: contact-homepage
To create the static block, go to CMS >> Static Blocks with Identifier * : “contact-homepage”
Frontend
![]()
Backend Setting
- Copy & paste the code chain in Content Tab:
<div class="contact-form-wrapper">
				<div class="contact-content">
					<div class="title-contact-index">
						<h2>Contact Us</h2>
						<p>We Will Give You the Answer You Expect.</p>
					</div>

					<div class="contact-form-add">
						<div class="row">
							<div class="col-lg-6 col-md-6 col-sm-6 add-contact">
								<ul class="list-contact-info">
									<li class="item-contact-info">
										<div class="icon-contact-info">
											<div class="fa fa-map-marker"><span class="hidden">Address</span></div>
										</div>

										<div class="info-contact-item">
											<h3>Address</h3>
											<p>10700 World Trade Blvd, Raleigh City, North Carolina </p>
										</div>
									</li>

									<li class="item-contact-info">
										<div class="icon-contact-info">
											<div class="fa fa-phone"><span class="hidden">Address</span></div>
										</div>

										<div class="info-contact-item">
											<h3>Phone / Fax</h3>
											<p>+1 325 1152 325 - +1 325 1152 325</p>
										</div>
									</li>

									<li class="item-contact-info">
										<div class="icon-contact-info">
											<div class="fa fa-envelope-o"><span class="hidden">Address</span></div>
										</div>

										<div class="info-contact-item">
											<h3>Email</h3>
											<p>Contact@supershop.com /  Sales@supershop.com</p>
										</div>
									</li>

									<li class="item-contact-info">
										<div class="icon-contact-info">
											<div class="fa fa-clock-o"><span class="hidden">Address</span></div>
										</div>

										<div class="info-contact-item">
											<h3>Office Hours</h3>
											<p>Mon / Friday 09:00 - 13.00 / 14:00 - 18:00</p>
										</div>
									</li>
								</ul>
							</div>

							<div class="col-lg-6 col-md-6 col-sm-6 form-contact">
								{{block type="core/template" name="contactForm" template="contacts/form-home.phtml"}}
							</div>
						</div>
					</div>
				</div>

			</div>
5.Static Block: brand-block
To create the static block, go to CMS >> Static Blocks with Identifier * : “brand-block”
Frontend
![]()
Backend Setting
To create the static block, go to CMS >> Static Blocks with Identifier * : “about-us-footer”
Frontend
![]()
Backend Setting
- Copy & paste the code chain in Content Tab:
<img src="{{media url="wysiwyg/footer/footer-logo.png"}}" alt="Supershop - Responsive Magento Theme for Multipurpose" />
<p>Excepteur sint occaecat cupidatat non proident, sunt in culpa qui officia deserunt mollit anim id est laborum. Sed ut<br>perspiciatis unde omnis iste natus error sit voluptatem accusantium doloremque laudantium</p>
7.Static Block: support-links
To create the static block, go to CMS >> Static Blocks with Identifier * : “support-links”
Frontend
![]()
Backend Setting
8.Static Block: fatured-categories
To create the static block, go to CMS >> Static Blocks with Identifier * : “fatured-categories”
Frontend
![]()
Backend Setting
To create the static block, go to CMS >> Static Blocks with Identifier * : “payment-footer”
Frontend
![]()
Backend Setting
3.5 How To Edit Copyright in Admin Panel
Frontend Appearance
![]()
In the Administrator page, Please navigate to SM Supershop Setting; find SM Supershop Setting Module to configure the “Custom Copyright” parameter as image below:
![]()
Advanced Style
- Show Cpanel – Allow to Enable/Disable Cpanel
- Show Go to Top – Allow to Enable/Disable Go to Top
- Use Add to Cart – Allow to Enable/Disable Cart
- Use Add to Wishlist – Allow to Enable/Disable Wishlist
- Use Add to Compare – Allow to Enable/Disable Compare
- Enable Custom Copyright – Allow to Enable/Disable Custom Copyright
- Copyright – If you select “Yes”, please custom Copyright here, or else “No” will display the default Copyright of Magento.
- Custom Css – Allow to custom css
- Custom Javascript – Allow to custom Javascript
3.6 How To Customize the Social symbols in admin panel
Frontend Appearance
![]()
In the Administrator page, Please navigate to SM Supershop Setting; find SM Supershop Setting Module to configure the “Social Style” parameter as image below:
![]()
 When you are done, click the ‘Next’ button.


/upload1.png)


 button in the right corner to “ADD NEW MODULE”.


 .
. .
.


3.7 Social Share