Quantcast
Channel: MagenTech Documentation Area
Viewing all 239 articles
Browse latest View live

SM Gallery 3D

$
0
0
This guide will help you install SM Gallery 3D – Version 1.0.0 step by step.


1REQUIREMENT – Back to top

At the basic level, this module will require the following conditions:

  • Support Magento 1.7.x; 1.8.x and 1.9.x

2INSTALLATION – Back to top

2.1 Extension Installation

2.1.1 Preparation

  • Back Up Database and Media Before installing any extensions, either through Magento Connect or FTP, you should back up your database and media. Please go to System >> Tools >> Backup in your Magento admin area.
  • Disable Cache: You should make sure to disable the cache before starting the process.Please go to System >> Cache Management, click ‘Sellect All’ button, then choose ‘Disable’ and click ‘Submit’ button to complete the action.

There are two ways to install extension:

2.1.2 Extension Installation through uploading folders to your Web server’s root

  • Step 1: Download and unzip the extension content on your computer, then go inside the extracted folder.
  • Step 2: Upload folders skin and app from the download package to your Web server’s document root (from here on, referenced as {docroot}). You should see a directory layout like this:

    {docroot} /magento/

    app/
    index.php
    js/
    lib/
    LICENSE.txt
    media/
    pear/
    skin/
    var/
  • Step 3: Login your Magento Admin (If you are logged in the previous steps, please log out and then log in again)
  • Step 4: Navigate to System => Configuration => find SM Gallery 3D module (in the left of column) and click on the extension’s name tab to go to its configuration page

2.1.3 Extension Installation through Magento Connect

Step 1: In the Administrator page, go to System >> Magento Connect >> Magento Connect Management

Step 2: Click Browse and Upload package file


The new extension will be downloaded and installed automatically.

Note:

  • In the second way, after installing the extension, you should logout first and then login the Admin Panel again to ensure all functions work normally.

2.2 How to enable this extension

You could follow one of these methods as following:

2.2.1 Editing XML in a new page

Step 1: Go to CMS >> Pages.


Step 2: Create a new page in Page Management section.

Copy and paste the following code into the Layout Update XML field in Design Tab:

<reference name="content">
<block type="gallery3d/list" name="gallery3d" template="sm/gallery3d/default.phtml"></block>
</reference>

2.2.2 Editing content in a new page

Step 1: Go to CMS >> Pages.


Step 2: Create a new page in Page Management section.

Copy and paste the following code into the Content field:

SM Gallery 3D - Demo 1

{{block type="gallery3d/list" name="gallery3d.list.default" template="sm/gallery3d/default.phtml" autoplay="0"}}
SM Gallery 3D - Demo 2

{{block type="gallery3d/list" name="gallery3d.list.default" product_description_display="0" img_height="150" product_price_display="0" product_reviews_count="0" product_addcart_display="0" product_addwishlist_display="0" product_title_display="0" pretext="" product_addcompare_display="0" template="sm/gallery3d/default.phtml"}}

2.2.3 Editing content in any page

  • If you want to display this module in any page that you want, please go to CMS >> Page >>Choose your desire page >> Tab Content and add this code:
<reference name="content">
<block type="gallery3d/list" name="gallery3d" template="sm/gallery3d/default.phtml"></block>
</reference>

Note: Please notice that there are many ways to enable an extension. However, in this document, we have just introduced some simple and suitable methods for the SM Gallery 3D module.

3EXTENSION CONFIGURATION – Back to top

3.1 Module Appearance

3.2 Module Configuration

Note:We use the images of module’s installtion on Magento 1.9.x to illustrate

After installing, go to System -> Configuration and find SM Gallery 3D (in the left of column) to configure.
All parameters are divided into the following groups:

    • General Settings
    • Source Options
    • Product Options
    • Image Options
    • Effect Options
    • Advanced Options

Let’s look at the parameters in detail:

General settings

  • Enabled Extension – Allow to enable/disable the module.
  • Display Title – Allow to display the title of the module or Not.
  • Title – You can enter the title of the module here.
  • Link target – Choose the target appearance when opening links:
    • New window – Open the link in the new window/tab.
    • Same window – Open the link in the same window/tab.
    • Popup window – Open links in new pop-up window.

Source Options

  • Select Source – Allow you to select kinds of sources to show. You could choose some kinds of sources, such as: Catalog, Media, Product IDs.
    • Catalog – Add items from catalog source to show in the gallery.
    • Media Source – Add items from media source to show in the gallery.
    • Product IDs – Add items from product’s IDs source to show in the gallery.
  • Select Category – Allow you to select the Category of products
  • Child Category Products: Include or Exclude the Products from Child Categories.
  • Category Depth: Allow to select the number of child category levels to return.
  • Featured Products: Allow to Show/Hide/Only Featured Products.
  • Product Field to Order By: Allow to set the Product Field to Order By.
  • Ordering Direction: Allow to sort in the ascending/descending order.
  • Product Limitation: Allow to set the product limitation.

Product Options

  • Products Title
    • Display Title – Allow you display title of product or NOT.
    • Max Length – Allow to set maximum length of title.
  • Products Description
    • Display – Allow you display Description of Product or NOT.
    • Max length – Allow you set maximum length of the product description.
  • Others
    • Display Price – Allow to show the price or Not.
    • Display Reviews Summary – Allow to display the Reviews Summary or Not.
    • Display Add To Cart – Allow to show ‘Add To Cart’ button or not.
    • Display Add Wishlist – Allow to show ‘Add To Cart’ button or not.
    • Display Add Compare – Allow to show ‘Add To Cart’ button or not.
Image Options
  • Get Image from Product Image 
    • Product Image – Allow to display image of Product or NOT.
  • Get Image from Product Description 
    • Product Description – Allow to display description of Product or NOT.
    • Order to Get – Allow to order to get image with options such as “product_image, product_description”.
    • Resize – Allow you resize product image or NOT.
    • Image Width – Allow you set the image width of the products to show in the gallery.
    • Image Height – Allow you set the image height of the products in the gallery.
    • Constrain Only – If the “constrainOnly” parameter is set to be true. In this case, the images which are smaller than specified value will be not enlarged by Magento. Only border of such images will increase..
    • Keep Aspect Ratio: Allow to keep aspect ratio. If the “keepAspectRatio” parameter is set to be true, the proportions of the image will not be modified.
    • Keep Frame: The “keepFrame” parameter guarantees that the image will be not cropped. When “keepAspectRatio” is false, the “keepFrame” will not work.
    • Keep Transparency: The “keepTransparency” parameter is set to maintain the transparent background of the images.
    • Background Color: Allow to set background color.
    • Image Replacement: Only when the product has no image, the module will take photos from placeholder to replace.

Effect Options

  • Auto Play – Allow to Enable/Disable autoplay mode.
  • Current Item – Allow to enter th index of the current item .
  • Interval – Allow to set the time between transitions.

Advanced Options

  • Include jQuery – Use jQuery from this module or not.
  • Pre-text – Allow to enter the pre-text of the module.
  • Post-text – Allow to enter the post-text of the module.
  • Caching – Allow to cache the content of the module or not.

4SUPPORT – Back to top

Thank you so much for using this extension, your support is truly appreciated. If you have any questions that are beyond the scope of this document, please feel free to contact us via our Support Tickets System


SW Toppy

$
0
0

1GETTING STARTED

1.1 Introduction

First of all, we would like to thank you for purchasing this theme, your support is truly appreciated. This document covers the installation and use of this theme, reveals some answers to common problems and issues. We encourage you to read this document throughtly if you are experiencing any difficulties. If you have any questions that are beyond the scope of document, please feel free to contact us via our Support Tickets System.

1.2 System Requirements

At the basic level, this theme will require the following conditions:

  • Apache 2.x or Microsoft IIS 7
  • PHP 5.3.x
  • MySQL 5.0.4 or higher
  • WordPress 4.0+

Note: Recommended PHP Configuration Limits In several cases, you may deal with problems related to low PHP configuration limits, such as: white screen, demo content fails when importing, empty page content and other similar issues. The solution is to increase the PHP limits. You can do this on your own by editing the following lines in php.ini file in your root directory. This is not a file that comes with WordPress so if you are unfamiliar with it you should contact your web host about increasing those limits to a minimum as follows:

  • max_execution_time 360
  • memory_limit 128M
  • post_max_size 32M
  • upload_max_filesize 32M

2INSTALLATION

2.1 Files Structure

At first, you need to download the package to your computer and then unzip it. The package gives you all the files listed as follows

  • Data folder
    • Slider revolution folder: Contains the “slideshow-1.zip” file, “slideshow-2.zip” file
    • “media.xml” file
  • Theme installation files, including:
    • sw_toppy_theme_v1.0.0.zip file (The newest version)
    • sw_toppy-child-theme.zip file (The child theme is a recommended way of modifying your existing theme.)

2.2 Theme Installation

When you are ready to install a theme, you must first upload the theme files and then activate the theme itself. The theme files can be uploaded in two ways:

  • FTP Upload:
  • WordPress Upload:

Note: If the theme files’ size is larger than 8M, please upload via FTP (File Transfer Protocol).

2.2.1 Theme Installation via FTP

To add the new Theme to your WordPress installation, follow these basic steps:

  • Download the Theme archive and extract the file named themename_version.zip, for example here: sw_toppy_theme_version1.0.0.zip. You may need to preserve the directory structure in the archive when extracting these files.
  • Load your FTP client, such as FileZilla.
  • Use your FTP program to access your host web server, create a directory to save your Theme in the wp-content/themes directory provided by WordPress.For example, the theme named SW Toppy Version 1.0.0 should be in wp-content/themes/sw_toppy_theme_version1.0.0. The theme may provide this directory as part of the archive.
  • Upload the Theme files to the new directory on your host server

To select the Theme for your site:

  • Log in to the WordPress Administration Panels
  • Select the Appearance panel, then Themes to find the new theme uploaded.
  • From the Themes panel, roll over the Theme thumbnail image for the Theme you are interested in to see options for that theme.
  • You can view more information about any theme by clicking Theme Details.
  • A live preview of any Theme (using your blog’s content) can be seen by clicking Live Preview.
  • To activate the Theme click the Activate button.

Your selection will immediately become active.

Note: If the Theme preview is blank, do not activate the new Theme without investigating further. Your site may not be displayed correctly, otherwise.

2.2.2 Theme Installation via WordPress Admin Panel

Step 1 – Open the wp-admin panel (Navigate through web browser to the folder where you have installed the WordPress, for example: www.your_domain.com/wp-admin/).

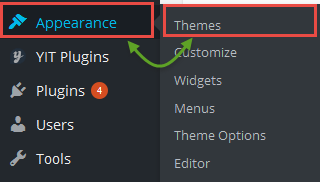
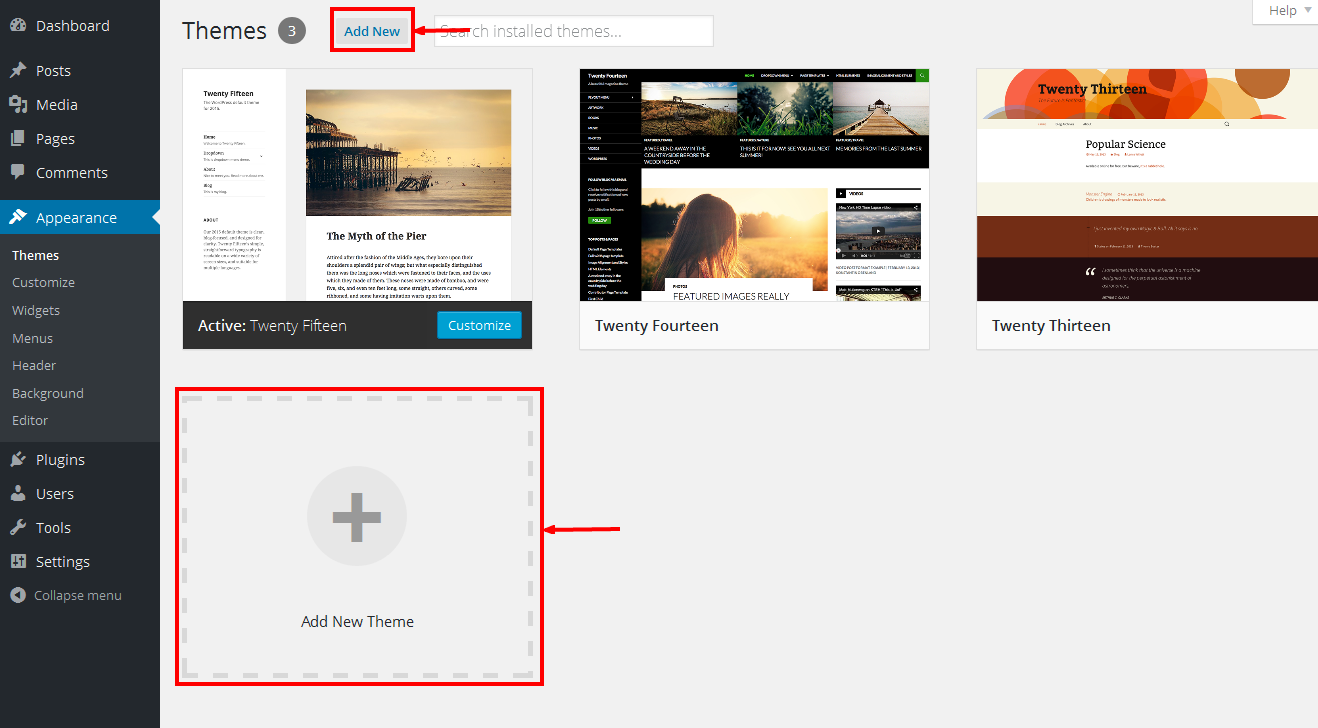
Step 2 – Login to your WordPress Dashboard and navigate to Appearance >> Themes. At the top of the page, click the Add New button.

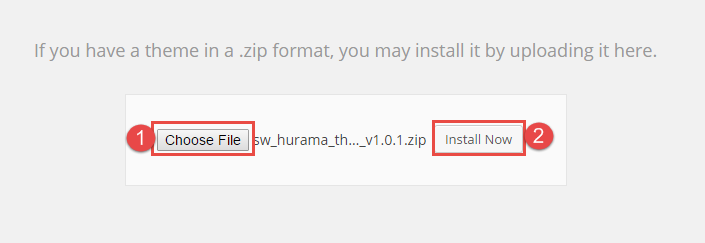
Step 3 – Click the Upload Theme button >> Choose File to import the theme from your computer. Select your sw_toppy_theme_v1.0.0.zip file and click Install Now.

Step 4 – You have a few minutes to wait till you see the message announcing that Theme installed successfully.

Step 5 – After that, you will be able to activate the theme.

Step 6 – Press “Save Changes” to complete the theme activation.


Once theme is installed, you need to install Required Plugins to get full features working.

2.3 Required Plugins Installation

    Step 1 – After installing and activating the theme, you will see a yellow popup at the top of the page. The message notices that: “This theme requires the following plugins…”, and you need to click the ‘Begin Installing plugins’ link.

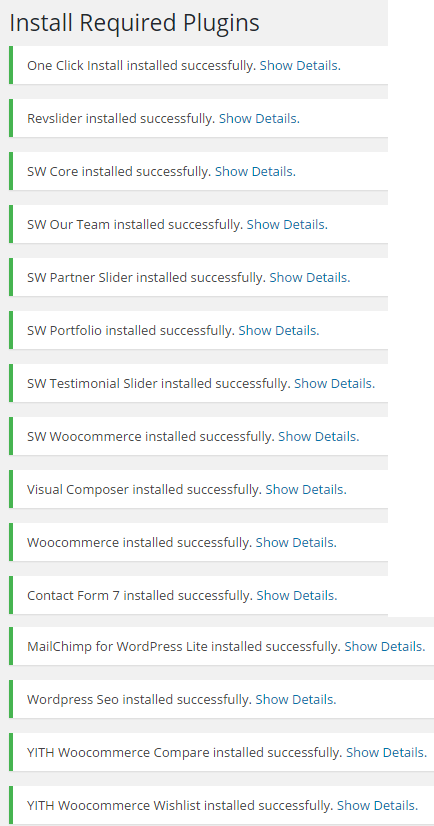
    Step 2 – You will be redirected to ‘Install Required Plugins’ page, here you will find all of the required plugins. To install these plugins, just check all of them to choose, and select Installin the dropdown menu to install what you have chosen.


    A message will be displayed to denote that you have just installed the required plugins successfully as following:

  • Note: When installing plugins, if you see a notice that some plugins have unsuccessful installation, please choose each plugin to install again. This case usually occurs as you select all plugins to install at once.

  • Step 3 – After installing required plugins successfully, you will see a yellow popup at the top of the page noticing that you need to activate the plugins.

    Step 4 – You will be redirected to ‘Install Required Plugins’ page, here you will find all of the required plugins. To activate these plugins, just check all of them to choose, and select Activatein the dropdown menu to activate what you have chosen.

    A message will be displayed to denote that you have just activated the required plugins successfully as following:

  • Note: After activating the plugins successfully, please go to the Dashboard to see the changes in the Admin Panel and to continue styling your website.

  • 2.4 Change Product Image Sizes

You can change the image size in “Woocommerce > Settings > Products > Display” section.

woocommerce

After change the images sizes, you should regenerate all the thumbnails. For this, you should install and activate “Regenerate Thumbnails” plugin.

2.5 Import Demo Data

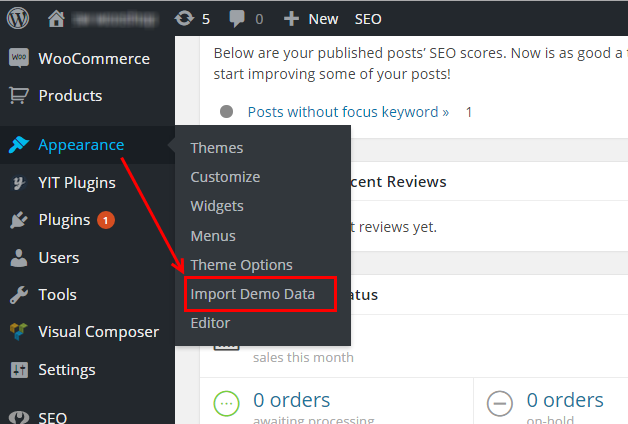
Step 1 - In the Administrator page, please navigate to Appearance >> Import Demo Data.

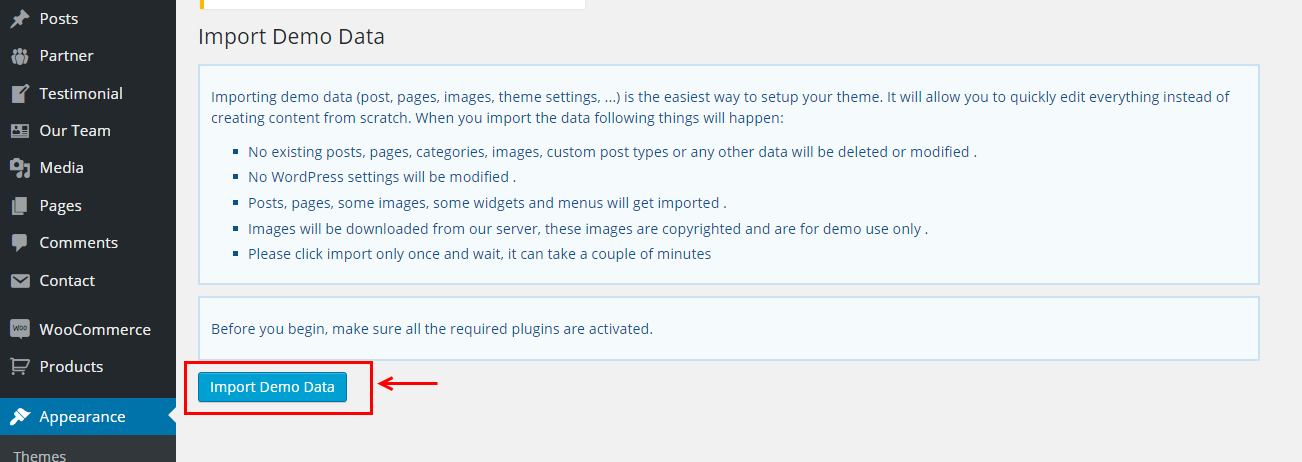
Step 2 - Please click “Import Demo Data” button.

The process will take a couple of minutes. After receiving a message which shows “Importing all done!”, please follow the next part of this document to import “media.xml” file.

2.6 Import Media file

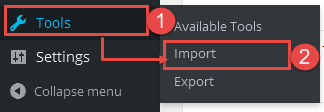
Step 1 - In the Administrator page, please navigate to Tools >> Import.

import

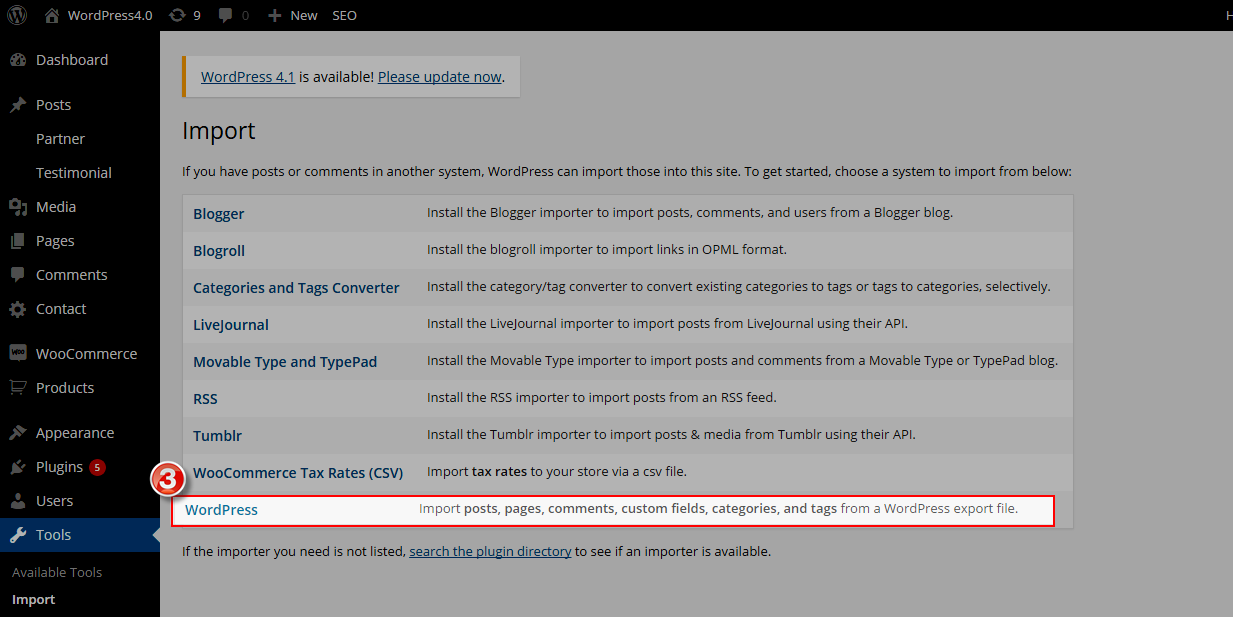
Step 2 - Please choose "WordPress" to import.

wordpress

Step 3 - In Import WordPress page, click "choose file" button to select file "media.xml" to upload.

import-media-file

2.7 Import Revolution Slider

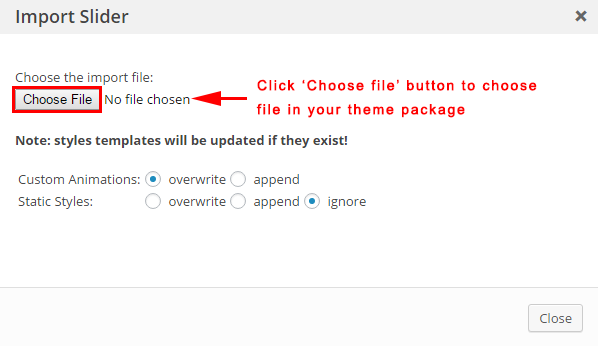
Step 1 – In the Administrator page, please navigate to Revolution Slider >> Revolution Slider and click Import Slider button.


Step 2 – You will have a pop-up window like the following image:

Step 3 – In the window, please choose the “slideshow-1.zipfile (in the Slider revolution folder) and pressImport Slider button.

Note: Do the same to import “slideshow-2.zip” file. After importing sliders completely, you could see the result like this:

2.8 MailChimp for WordPress

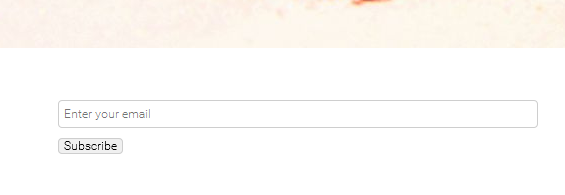
SW Toppy This theme uses MailChimp Plugin.

Frontend Appearance

Backend Settings

1. In your Administrator page, please navigate to MailChimp for WP >> Forms

2. And copy the code here to the Form mark-up field in the page.

<p>
	<input type="email" name="EMAIL" placeholder="Enter Your Email" required />
	<input type="submit" value="Subscribe"/>
</p>

You can click Here to read more about this plugin.

SW Matrix

$
0
0

1GETTING STARTED

1.1 Introduction

First of all, we would like to thank you for purchasing this theme, your support is truly appreciated. This document covers the installation and use of this theme, reveals some answers to common problems and issues. We encourage you to read this document throughtly if you are experiencing any difficulties. If you have any questions that are beyond the scope of document, please feel free to contact us via our Support Tickets System.

1.2 System Requirements

At the basic level, this theme will require the following conditions:

  • Apache 2.x or Microsoft IIS 7
  • PHP 5.3.x
  • MySQL 5.0.4 or higher
  • WordPress 4.0+

Note: Recommended PHP Configuration Limits In several cases, you may deal with problems related to low PHP configuration limits, such as: white screen, demo content fails when importing, empty page content and other similar issues. The solution is to increase the PHP limits. You can do this on your own by editing the following lines in php.ini file in your root directory. This is not a file that comes with WordPress so if you are unfamiliar with it you should contact your web host about increasing those limits to a minimum as follows:

  • max_execution_time 360
  • memory_limit 128M
  • post_max_size 32M
  • upload_max_filesize 32M

2INSTALLATION

2.1 Files Structure

At first, you need to download the package to your computer and then unzip it. The package gives you all the files listed as follows

  • Data folder
    • Slider revolution folder: Contains the “slider-home-page1.zip” file, “slider-home-page2.zip” file, and “slider-home-page3.zip” file.
    • “media.xml” file
  • Theme installation files, including:
    • sw_matrix_theme_v1.0.0.zip file (The newest version)
    • sw_matrix-child-theme.zip file (The child theme is a recommended way of modifying your existing theme.)

2.2 Theme Installation

When you are ready to install a theme, you must first upload the theme files and then activate the theme itself. The theme files can be uploaded in two ways:

  • FTP Upload:
  • WordPress Upload:

Note: If the theme files’ size is larger than 8M, please upload via FTP (File Transfer Protocol).

2.2.1 Theme Installation via FTP

To add the new Theme to your WordPress installation, follow these basic steps:

  • Download the Theme archive and extract the file named themename_version.zip, for example here: sw_matrix_theme_version1.0.0.zip. You may need to preserve the directory structure in the archive when extracting these files.
  • Load your FTP client, such as FileZilla.
  • Use your FTP program to access your host web server, create a directory to save your Theme in the wp-content/themes directory provided by WordPress.For example, the theme named SW Matrix Version 1.0.0 should be in wp-content/themes/sw_matrix_theme_version1.0.0. The theme may provide this directory as part of the archive.
  • Upload the Theme files to the new directory on your host server

To select the Theme for your site:

  • Log in to the WordPress Administration Panels
  • Select the Appearance panel, then Themes to find the new theme uploaded.
  • From the Themes panel, roll over the Theme thumbnail image for the Theme you are interested in to see options for that theme.
  • You can view more information about any theme by clicking Theme Details.
  • A live preview of any Theme (using your blog’s content) can be seen by clicking Live Preview.
  • To activate the Theme click the Activate button.

Your selection will immediately become active.

Note: If the Theme preview is blank, do not activate the new Theme without investigating further. Your site may not be displayed correctly, otherwise.

2.2.2 Theme Installation via WordPress Admin Panel

Step 1 – Open the wp-admin panel (Navigate through web browser to the folder where you have installed the WordPress, for example: www.your_domain.com/wp-admin/).

Step 2 – Login to your WordPress Dashboard and navigate to Appearance >> Themes. At the top of the page, click the Add New button.

Step 3 – Click the Upload Theme button >> Choose File to import the theme from your computer. Select your sw_matrix_theme_v1.0.0.zip file and click Install Now.

Step 4 – You have a few minutes to wait till you see the message announcing that Theme installed successfully.

Step 5 – After that, you will be able to activate the theme.

Step 6 – Press “Save Changes” to complete the theme activation.


Once theme is installed, you need to install Required Plugins to get full features working.

2.3 Required Plugins Installation

    Step 1 – After installing and activating the theme, you will see a yellow popup at the top of the page. The message notices that: “This theme requires the following plugins…”, and you need to click the ‘Begin Installing plugins’ link.

    Step 2 – You will be redirected to ‘Install Required Plugins’ page, here you will find all of the required plugins. To install these plugins, just check all of them to choose, and select Installin the dropdown menu to install what you have chosen.


    A message will be displayed to denote that you have just installed the required plugins successfully as following:

  • Note: When installing plugins, if you see a notice that some plugins have unsuccessful installation, please choose each plugin to install again. This case usually occurs as you select all plugins to install at once.

  • Step 3 – After installing required plugins successfully, you will see a yellow popup at the top of the page noticing that you need to activate the plugins.

    Step 4 – You will be redirected to ‘Install Required Plugins’ page, here you will find all of the required plugins. To activate these plugins, just check all of them to choose, and select Activatein the dropdown menu to activate what you have chosen.

    A message will be displayed to denote that you have just activated the required plugins successfully as following:

  • Note: After activating the plugins successfully, please go to the Dashboard to see the changes in the Admin Panel and to continue styling your website.

  • 2.4 Change Product Image Sizes

    You can change the image size in “Woocommerce > Settings > Products > Display” section.

    woocommerce

    After change the images sizes, you should regenerate all the thumbnails. For this, you should install and activate “Regenerate Thumbnails” plugin.

    2.5 Import Demo Data

    Step 1 - In the Administrator page, please navigate to Appearance >> Import Demo Data.

    Step 2 - Please click “Import Demo Data” button.

    The process will take a couple of minutes. After receiving a message which shows “Importing all done!”, please follow the next part of this document to import “media.xml” file.

    2.6 Import Media file

    Step 1 - In the Administrator page, please navigate to Tools >> Import.

    import

    Step 2 - Please choose "WordPress" to import.

    wordpress

    Step 3 - In Import WordPress page, click "choose file" button to select file "media.xml" to upload.

    import-media-file

    2.7 Import Revolution Slider

    Step 1 – In the Administrator page, please navigate to Revolution Slider >> Revolution Slider and click Import Slider button.


    Step 2 – You will have a pop-up window like the following image:

    Step 3 – In the window, please choose the “slider-home-page1.zipfile (in the Slider revolution folder) and pressImport Slider button.

    Note: Do the same to import “slider-home-page2.zip” file and “slider-home-page3.zip” file. After importing sliders completely, you could see the result like this:

    2.8 MailChimp for WordPress

    SW Matrix This theme uses MailChimp Plugin.

    Frontend Appearance

    Backend Settings

    In your Administrator page, please navigate to MailChimp for WP >> Forms to configure the plugins

    • Form Fields: Please click Here to view
    • You could copy the code here to the field in the page.

    <div><input class="ipt-email" name="EMAIL" required="" type="email" placeholder="Enter your email address" /></div>
    <div><button class="btn-subscribe" type="submit" value="">Subscribe</button></div>

  • Form Messages: Please click Here to view
  • Form Settings: Please click Here to view
  • Form Appearance: Please click Here to view
  • Please go Here if you would like to read more about this plugin.

SP Matrix

$
0
0

1GETTING STARTED

1.1 Introduction

Firstly, a huge thanks for purchasing this theme, your support is truly appreciated!

This document covers the installation and use of this theme, reveals some answers to common problems and issues. We encourage you to read this document throughtly if you are experiencing any difficulties. If you have any questions that are beyond the scope of document, please feel free to contact us via our Support Tickets System.

1.2 System Requirements

Please make sure your hosting server meets the PrestaShop requirements:

  • Supported operating system: Windows, Mac and Linux.
  • Wamp (for Windows) or Xampp (for Windows and Mac)
  • Web server: Apache Web server 1.3 or later, Microsoft’s IIS Web server 6.0 or later.
  • PHP 5.2* or later.
  • MySQL 5.0 or later.
  • At least 32 Mb of RAM on your server (64 Mb is comfortable, the more the better).

Note: If you can not import the theme/module file to your server due to the maximum upload and PHP memory limit, you need to increase the parameter “memory_limit=200M”; “max_execution_time=300″; “max_execution_time=1000″ & “upload_max_filesize=20M” in the file php.ini.

1.3 PrestaShop Guide

If you are not familiar with Prestashop, please read its guide first: http://doc.prestashop.com/display/PS16/Getting+Started

2INSTALLATION

There are two ways to install SP Matrix Theme

  • Quickstart Installation: By using this package, you will set the theme exactly like our Demo with sample data.
  • Manual Installation : Include of Theme layout Installation Packages. Please unzip the package and you would see the following folders:
    • module folder
    • override folder
    • sp_matrix_template_p16_v1.0.0.zip file

2.1 Quickstart Installation

We provide Quickstart package for each theme which aims to ease the installation for users. It will help you save much time of installing and configuring if you plan to start your site from the beginning. Please following steps below:

  • Step 1: Download the quickstart package of SP Matrix theme
  • Step 2: Extract the downloaded package named “sp_matrix_quickstart_p16_v1.0.0.zip” in your localhost (or your hosting) folder. In Quickstart folder you will see the extracted folder that include all sample data
  • Step 3: Start installation by opening browser and navigate to your URL (where the Quickstart uploaded) to load default Prestashop installer. Please follow these steps of the Installer so that the installation process can be set.
    • Installation Assistant (Choose your language)

Please select the installation language

Please note: The installation language option will not affect your store language. By default PrestaShop is offered in English. You can install additional localization packages to change the store language.

When you are done, click the ‘Next’ button.

    • Installation Assistant (License agreements)

Please check the license agreement.

When you are done, click the ‘Next’ button.

    • System Compatibility

Check the PHP settings and directory permissions. In case of any errors, please contact your hosting provider for further assistance.

If everything is correct, click the ‘Next’ button.

    • Store Information

Now add required information for your store: Shop name, Main activity, Country, Shop timezone and add the account info: first name, last name, email and password. Click “Next” to next step.

When you are done, click the ‘Next’ button.

    • System Configuration

Here is the database configuration panel, we need to create database first.

Access your database panel and create database for your site. Add database name and then click “Create” button.

When the database is created successfully, copy and paste its name into the “Database name” field, then click the “Test your database connection now!” button to make sure that the entered settings are correct. If they are, you will see a Database is connected message. After that, you could click the “Next” button to move to next steps.

    • Finish installation: This process could take a few minutes

Note: For security reasons you need to delete the install/ directory on your hosting server.

And finally, go to the Frontend or Backend as you want:

2.2 Theme Installation

Note: Before installing theme, you must disable the cache. In your back office, please go to ADVANCED PARAMETERS >> Performance >> find “Cache” parameter >> Set “No” to disable cache >> Click “Save”.

SP Matrix Layout1 Theme Installation

Note: Here we will introduce you How To Install SP Matrix layout1 Theme, with layout2 do the same.

Firstly, you must EXTRACT the “sp_matrix_layout1_theme_p16_v1.0.0.zip” package and open the extracted folder. Here you will see:

  • module folder: contain of the smartblog.zip file, smartblogcategories.zip file and themeinstallator.zip file.
  • override folder: contain of FrontController.php” file in the folder URL: \override\classes\controller\ .
  • and the sp_matrix_template_p16_v1.0.0.zip file.

STEP 1: Install “smartblog.zip”, “smartbloghomelatestnews.zip” and“smartblogcategories.zip” Module.

1. Login to your Prestashop admin panel and navigate to MODULES -> Modules. At the top of the page click the Add a new module button.

2. Choose “smartblog.zip” file and click “Upload this module” button

3. There is a message-box “The module was successfully downloaded.”

4. Please find to the uploaded module and click “Install” button to run it.

5. When a pop-up window displays, please click “Proceed with the installation” button.

6. Finally, Module(s) installed successfully.

Note: Do the same with the “smartblogcategories.zip” and “smartbloghomelatestnews.zip” module’s installation

STEP 2: Install “themeinstallator” Module.

1. Login to your Prestashop admin panel and navigate to MODULES -> Modules. At the top of the page click the Add a new module button.

2. Select your file named “themeinstallator.zip” and click “Upload this module” button

3. The uploading process will be started. You will see the message that the module has been successfully downloaded.

4. The new module is located in the modules list, so you can Search its name and click Install button to start the module.

5. Finally, you will see a notice message: "Module(s) installed successfully".


STEP 3: Install the “sp_matrix_template_p16_v1.0.0.zip” file.

1. In the your Prestashop admin panel and navigate to MODULES >> Modules. Find to the module that you have installed and clicked on Configure button to configure the module.

2. Navigate to “Import from your computer>> choose the zip theme file as named “sp_matrix_template_p16_v1.0.0.zip>> Next.

3. You will see a message that You are going to install the following theme SP Matrix version 1.0.0, please click “Next” button to continue.

4. Select the module that you want to install/disable >> click “Next” button to continue the installation process.

5. After that, a list of the installed/disabled modules will be showed out and you could click “Finish” button to finish the theme installation.

STEP 4: Override folder: copy the "FrontController.php" file into the installation folder with the URL: override\classes\controller.

3SP THEME CONFIGURATION

3.1 General Settings

1. In your Prestashop Admin Dashboard, navigate to Modules and Services >> Modules and Services >> go to MODULES LIST section, search for “SP Theme configurator” module then click on Configure.

2. In the SP Theme Settings, choose “General” to configure the parameters in this section. After finishing, you could go to the front-end to view the changes.

3.2 Layout Settings

1. In your Prestashop Admin Dashboard, navigate to Modules and Services >> Modules and Services >> go to MODULES LIST section, search for “SP Theme configurator” module then click on Configure.

2. In the SP Theme Settings, choose “Layout” to configure the parameters in this section. After finishing, you could go to the front-end to view the changes.

3.3 Fonts

1. In your Prestashop Admin Dashboard, navigate to Modules and Services >> Modules and Services >> go to MODULES LIST section, search for “SP Theme configurator” module then click on Configure.

2. In the SP Theme Settings, choose “Fonts” to configure the parameters in this section. After finishing, you could go to the front-end to view the changes.

Note: Please copy and paste the following line into Font Selector tab:
1.

body, h5.product-name, .sp-megamenu .navbar-nav  li .dropdown-menu ul li a

2.

.sp-megamenu .navbar-nav  li  a, .sp-megamenu a.home, .sp-megamenu .menu-title

3.

h1,h2,h3,h4,h5, .backtohome, .pricing .button-bottom .signup

4.

.pricing, .pricing h2, .pricing h3

3.4 Category Pages

1. In your Prestashop Admin Dashboard, navigate to Modules and Services >> Modules and Services >> go to MODULES LIST section, search for “SP Theme configurator” module then click on Configure.

2. In the SP Theme Settings, choose “Category Pages” to configure the parameters in this section. After finishing, you could go to the front-end to view the changes.

3.5 Product Pages

1. In your Prestashop Admin Dashboard, navigate to Modules and Services >> Modules and Services >> go to MODULES LIST section, search for “SP Theme configurator” module then click on Configure.

2. In the SP Theme Settings, choose “Product Pages” to configure the parameters in this section. After finishing, you could go to the front-end to view the changes.

3.6 Bonus Pages

1. In your Prestashop Admin Dashboard, navigate to Modules and Services >> Modules and Services >> go to MODULES LIST section, search for “SP Theme configurator” module then click on Configure.

2. In the SP Theme Settings, choose “Bonus Pages” to configure the parameters in this section. After finishing, you could go to the front-end to view the changes.

3.7 Advanced Settings

1. In your Prestashop Admin Dashboard, navigate to Modules and Services >> Modules and Services >> go to MODULES LIST section, search for “SP Theme configurator” module then click on Configure.

2. In the SP Theme Settings, choose “Advanced” to configure the parameters in this section. After finishing, you could go to the front-end to view the changes.

3.8 Social Accounts

1. In your Prestashop Admin Dashboard, navigate to Modules and Services >> Modules and Services >> go to MODULES LIST section, search for “SP Theme configurator” module then click on Configure.

2. In the SP Theme Settings, choose “Social Accounts” to configure the parameters in this section. After finishing, you could go to the front-end to view the changes.

1. To configure Logo for your store, navigate to PREFERENCES > Themes in your Prestashop Admin Dashboard. Go to Logo tab to set up your logo. Click “Add File” to upload the logo image as you want and “Save”.

2. Please check the front-end to view the changes.

3.10 Image Size Adjustment

In your Prestashop admin dashboard, navigate to: PREFERENCES >> Images to configure the image size for category, manufacturer, supplier, product, etc that fit your layout best.

1. Image size - You can choose the image size types that suit your products best.

2. Image quality - You can set image quality in use on your site.

3. Regenerate thumbnails - To see the changes after you update the image sizes, image quality; you need to re-generate the images used in your site. Select option then click Regenerate thumbnails button.

Frontend Appearance:

To edit Copyright, please follow these steps:
1. In your Prestashop Admin Dashboard, navigate to Modules and Services >> Modules and Services >> go to MODULES LIST section, search for “SP Theme configurator” module then click on Configure.

2. In the SP Theme Settings, choose “General” to configure the parameter named “Copyright” in this section. After finishing, you could go to the front-end to see the changes.

3.12 Edit Pop-up

Frontend Appearance:
When click on this button in the homepage, you could see a pop-up appear like the following image:

To edit this pop-up, please follow these steps:
In your Website’s Directory, go to themes\sp_matrix folder. To change the text in this pop-up, in this folder, you could open the file named login_myaccount_header.tpl by your editor program.
Find and change the text from the line 27 to line 74 in this file as you want:

<!-- Form Login -->
<div class="modal" id="login_popup" tabindex="-1" role="dialog">
  <div class="modal-dialog" role="document">
    <div class="modal-content col-xs-12">
      <div class="modal-header">
      	<h3 class="page-subheading">{l s='Sign in or register'}</h3>
        <button type="button" class="close" data-dismiss="modal" aria-label="Close"><span aria-hidden="true">×</span></button>
      </div>
      <div class="modal-body col-xs-12 row">
		<div class="bgr_login col-xs-6">
			<form action="{$link->getPageLink('authentication', true)|escape:'html':'UTF-8'}" method="post" id="login_form" class="box">
				
				<div class="form_content clearfix">
					<div class="form-group email">
						<input class="is_required validate account_input form-control" data-validate="isEmail" placeholder="Email Address" type="email" id="email" name="email" value="{if isset($smarty.post.email)}{$smarty.post.email|stripslashes}{/if}" />
					</div>
					<div class="form-group pass">
						<input class="is_required validate account_input form-control" placeholder="Password" type="password" data-validate="isPasswd" id="passwd" name="passwd" value="" />
					</div>
					<p class="lost_password form-group"><a href="{$link->getPageLink('password')|escape:'html':'UTF-8'}" title="{l s='Recover your forgotten password'}" rel="nofollow">{l s='Forgot your password?'}</a></p>
					<p class="submit">
						{if isset($back)}<input type="hidden" class="hidden" name="back" value="{$back|escape:'html':'UTF-8'}" />{/if}
						<button type="submit" id="SubmitLogin" name="SubmitLogin" class="button btn btn-default button-medium">
							<span>
								<i class="fa fa-lock"></i>{l s='Login'}
							</span>
						</button>
					</p>
				</div>
			</form>
		</div>
		<div class="custom_creat col-xs-6">
			 <h3>New Here?</h3>
			 <p class="note-reg">Registration is free and easy!</p>
			 <ul class="list-log">
			  <li>Faster checkout</li>
			  <li>Save multiple shipping addresses</li>
			  <li>View and track orders and more</li>
			 </ul>
			 <div class="submit">
				<a class="btn-reg-popup" title="Register" href="{$base_dir}my-account">Create an account</a>
			</div>
		</div>
      </div>
      
    </div>
  </div>
</div>


3. After finishing, you could go to the front-end to see the changes.

4SP MEGA MENU CONFIGURATION

displayMenu: SP Mega Menu


1. Navigate to Modules -> Modules >> look for SP Mega Menu >> Click the Configure button to access the module configuration page.

2. In the SP Mega Menu Panel, you could configure Add New Module by click on the button like the following image:

3. In the configuration page of new module, you could configure General Options as follows

4. In the configuration page of new module, you could configure Menu Information as follows

5. In order to add menu items, to add items as you want, you need to click this button.

6. Menu list of Mega Menu You need to look at the menu list to configure easily.

7. To configure each item, you need to click “Edit” button as follows:

Go Here to readmore about the SP Mega Menu module.

Note: In the next steps, when editing items in the menus, the items (in a menu) having same level could have same configuration. Therefore, we encourage you read throughtly and find out the item’s level to configure it without any errors.

Home
Frontend Appearance

  • Backend Settings : Please click Here to view.
  • Backend Settings of Item ‘Layout’: Please click Here to view.

Note: You could do the same with these items having same level in this menu: Layout, Color Styles, Headers, Page, Contact Us

  • Backend Settings of Item ‘Home Style 1′: Please click Here to view.

Note: You could do the same with the items having same level in this menu

Eletronics
Frontend Appearance

  • Backend Settings : Please click Here to view.

Mobiles
Frontend Appearance

  • Backend Settings : Please click Here to view.
  • Backend Settings of Item ‘Mobiles’: Please click Here to view.
  • Backend Settings of Item ‘Product’: Please click Here to view.
  • Backend Settings of Item ‘Product 2′: Please click Here to view.

Computers
Frontend Appearance

  • Backend Settings : Please click Here to view.
  • Backend Settings of Item ‘Sub Computers’: Please click Here to view.
  • Backend Settings of Item ‘Product’: Please click Here to view.

    Copy and paste the following code into the content:
    &lt;p&gt;&lt;img src="../themes/sp_matrix/img/cms/static-mega.jpg" alt="" /&gt;&lt;/p&gt;

Blog
Frontend Appearance

  • Backend Settings : Please click Here to view.
  • Backend Settings of Item ‘Listing Layouts’: Please click Here to view.

Note: You could do the same with these items having same level in this menu: Grid Layouts, Large Image Layouts

About Us
Frontend Appearance

  • Backend Settings : Please click Here to view.

Contact Us
Frontend Appearance

  • Backend Settings : Please click Here to view.
  • Backend Settings of Item ‘Contact Page 1′ : Please click Here to view.

Note: You could do the same with these items having same level in this menu: Contact Page 2, Contact Page 3, Contact Page 4

5SP VERTICAL MEGA MENU CONFIGURATION

displayLeftmenu: SP Vertical MegaMenu

Vertical-menu
1. Navigate to Modules -> Modules >> look for SP Vertical Megamenu >> Click the Configure button to access the module configuration page.

2. In the SP Vertical Megamenu Panel, you could configure Settings as follows

3. In the SP Vertical Megamenu Panel, you could configure Menu Information as follows

4. In order to add menu items, to add items as you want, you need to click this button.

5. Menu list of Vertical Megamenu You need to look at the menu list to configure easily.

6. To configure each item, you need to click “Edit” button as follows:

Go Here to readmore about the SP Vertical Megamenu module.

Note: In the next steps, when editing items in the menus, the items (in a menu) having same level could have same configuration. Therefore, we encourage you read throughtly and find out the item’s level to configure it without any errors.

Eletronics
Frontend Appearance

  • Backend Settings : Please click Here to view.

Computer
Frontend Appearance

  • Backend Settings : Please click Here to view.
  • Backend Settings of Item ‘Feature Product’: Please click Here to view.
  • Backend Settings of Item ‘Sub Category’: Please click Here to view.
  • Backend Settings of Item ‘Cycling’: Please click Here to view.

Note: You could do the same with these items having same level such as: Hiking, Sports, Running

  • Backend Settings of Item ‘Laptops & Tablets’: Please click Here to view.

Note: You could do the same with the items having same level as this item.

Mobile
Frontend Appearance

  • Backend Settings : Please click Here to view.

Note: You could do the same with these items having same level in the vertical megamenu: Health & Beauty, Toy & Hobbies, Sports & Outdoors, Cameras & Lens, Sport & Fitness, Motosport, Dining Chairs

Networking
Frontend Appearance

  • Backend Settings : Please click Here to view.
  • Backend Settings of Item ‘Storage’: Please click Here to view.

Note: You could do the same with the item having same level named as Cookware

  • Backend Settings of Item ‘Western Digital’: Please click Here to view.

Note: You could do the same with the items having same level as this item in the Networking menu.

  • Backend Settings of Item ‘Poroduct Feature’: Please click Here to view.

    Copy and paste the following code into the content:
    &lt;p&gt;&lt;img src="../themes/sp_matrix/img/cms/img-cart-item.jpg" alt="" /&gt;&lt;/p&gt;

6EXTENSIONS CONFIGURATION

6.1 SP Matrix Layout 1

home-default

displayTopSocial

SP Theme Configuration

Frontend Appearance:

Backend Settings:
1. In your Prestashop Admin Dashboard, navigate to Modules and Services >> Modules and Services >> go to MODULES LIST section, search for “SP Theme configurator” module then click on Configure.

2. In the SP Theme Settings, choose “Social Accounts” to configure the parameters in this section. After finishing, you could go to the front-end to view the changes.

displayTop 1

SP Custom HTML
Frontend Appearance:

Backend Settings:

Step 1: In the Pretashop Admin Panel, navigate to Modules and Services >> Modules and Services >> look for “SP Custom HTML” module >> click “Configure” button to configure.

Step 2: In the “SP Custom HTML” configuration page, click button in the right corner to “ADD NEW MODULE”.

Step 3: You could configure this module like the following image.


Copy and paste the following code into the content:

<div class="header_account">
<div class="account"><a href="../login">My Account </a></div>
<ul class="list-link">
<li><a href="../order-history">My Orders</a></li>
<li><a href="../addresses">My addresses</a></li>
<li><a href="../order-follow">My merchandise returns</a></li>
<li><a href="../identity">Manage my personal information</a></li>
</ul>
</div>

displayTopNav

1. SP Block Languages

Frontend Appearance:

Backend Settings:

Step 1: To add language as you want. For example: To add “Arabic” language, in your Admin Panel >> navigate to LOCALIZATION >> Languages >> click button in the right corner to “ADD NEW”.

Step 2: Fill information into the required field (*) as below:

Step 3: Click “Save” button and view shop to see the changes.

Note: When you add any language as you want, for example: Arabic language as above. At the frontend , some images will display “?” image as following:

.

To resolve this error, please make the steps following:

1. In your administator, please find to position of this module, for example: Position – displayBottom2: Banner Center; Module: SP Custom HTML.

.

2. And click source code to add “../” at before the image url >> Click “OK”.

.

3. Click “Save” button and go to the frontend to view the changes.

2. SP Block Currencies

Frontend Appearance:

Backend Settings:

In the Pretashop Admin Panel, navigate to Modules and Services >> Modules and Services >> look for “SP Currency Block>> click “Enable” button to enable this module.

Frontend Appearance:

Backend Settings:
Go Here to see the backend settings.

SP Search Block

Frontend Appearance:

Backend Settings:

Step 1: In the Pretashop Admin Panel, navigate to Modules and Services >> Modules and Services >> look for “SP Search Pro” module >> click “Configure” button to configure.

Step 2: In the “SP Search Pro” configuration page, click button in the right corner to “ADD NEW MODULE”.

Step 3: You could configure this module like the following image.

displayCart

SP Cart Block

Frontend Appearance:

Backend Settings:

Step 1: In the Pretashop Admin Panel, navigate to Modules and Services >> Modules and Services >> look for “SP Cart Block” module >> click “Configure” button to configure.

Step 2: In the “SP Cart Block” configuration page, click button in the right corner to “ADD NEW MODULE”.

Step 3: You could configure this module like the following image.

displaySlideShow1

Sp slider for your homepage

Frontend Appearance:

Backend Settings:

Step 1: In the Pretashop Admin Panel, navigate to Modules and Services >> Modules and Services >> look for “SP Home Slider” module >> click “Configure” button to configure.

Step 2: In the “SP Slider For Your Homepage” configuration page, click button in the right corner to “ADD NEW MODULE”.

Step 3: You could configure this module like the following image.

Step 4: In the last part named Slides List of this configuration page, click button in the right corner to add new slide and edit slide’s information as follows:

  • Sample 1:
    Copy and paste the following code into the content:
    <h4><a href="#">Memorable Moments</a></h4>
    <h3><a href="#">Wherever</a></h3>
    <div class="shopnow"><a href="#">Shop Now</a></div>
  • Sample 2:
    Copy and paste the following code into the content:
    <h4><a href="#">Our New Range Of</a></h4>
    <h3><a href="#">Headphones</a></h3>
    <div class="shopnow"><a href="#">Shop Now</a></div>
  • Sample 3:
    Copy and paste the following code into the content:
    <h4><a href="#">Best Choice of this week</a></h4>
    <h3><a href="#">Collection</a></h3>
    <div class="shopnow"><a href="#">Shop Now</a></div>

displayBottom1

SP Custom HTML – Bonus Menu
Frontend Appearance:

Backend Settings:

Step 1: In the Pretashop Admin Panel, navigate to Modules and Services >> Modules and Services >> look for “SP Custom HTML” module >> click “Configure” button to configure.

Step 2: In the “SP Custom HTML” configuration page, click button in the right corner to “ADD NEW MODULE”.

Step 3: You could configure this module like the following image.


Copy and paste the following code into the content:

<div class="col-sm-4">
<div class="item shipping list-image-static">
<div class="border-eff">
<div class="inner">
<div class="icon"> </div>
<div class="text">
<h3><a href="#">Unique Design</a></h3>
<p>Praesent non tempus lorem</p>
</div>
</div>
</div>
</div>
</div>
<div class="col-sm-4">
<div class="item money list-image-static">
<div class="border-eff">
<div class="inner">
<div class="icon"> </div>
<div class="text">
<h3><a href="#">Free Shipping</a></h3>
<p>Praesent non tempus lorem</p>
</div>
</div>
</div>
</div>
</div>
<div class="col-sm-4">
<div class="item order list-image-static">
<div class="border-eff">
<div class="inner">
<div class="icon"> </div>
<div class="text">
<h3><a href="#">Free Shipping</a></h3>
<p>Praesent non tempus lorem</p>
</div>
</div>
</div>
</div>
</div>

displayBottom2

1. SP Deal – Today’s Deals
Frontend Appearance:

Backend Settings:

Step 1: In the Pretashop Admin Panel, navigate to Modules and Services >> Modules and Services >> look for “SP Deal” module.

Step 2: In the “SP Deal” configuration page, click button in the right corner to “ADD NEW MODULE”.

Step 3: You could configure this module like the following image.

2. SP Custom HTML – Banner Center
Frontend Appearance:

Backend Settings:

Step 1: In the Pretashop Admin Panel, navigate to Modules and Services >> Modules and Services >> look for “SP Custom HTML” module >> click “Configure” button to configure.

Step 2: In the “SP Custom HTML” configuration page, click button in the right corner to “ADD NEW MODULE”.

Step 3: You could configure this module like the following image.


Copy and paste the following code into the content:

<div class="banner-center list-image-static clearfix">
<ul>
<li class="item-first col lg-4 col-md-4 col-sm-4 col-xs-4">
<div class="border-eff">
<div class="inner"><a class="first" href="#"> <img src="../themes/sp_matrix/img/cms/static-image-home-1.jpg" alt="image" /> </a></div>
</div>
</li>
<li class="b-center col lg-4 col-md-4 col-sm-4 col-xs-4">
<div class="border-eff">
<div class="inner"><a class="first" href="#"> <img src="../themes/sp_matrix/img/cms/static-image-home-2.jpg" alt="image" /> </a></div>
</div>
<div class="border-eff">
<div class="inner"><a class="last" href="#"> <img src="../themes/sp_matrix/img/cms/static-image-home-3.jpg" alt="image" /> </a></div>
</div>
</li>
<li class="item-last col lg-4 col-md-4 col-sm-4 col-xs-4">
<div class="border-eff">
<div class="inner"><a href="#"> <img src="../themes/sp_matrix/img/cms/static-image-home-4.jpg" alt="image" /> </a></div>
</div>
</li>
</ul>
</div>

3. SP Super Category – Sp Super Category Bottom2

Frontend Appearance:

Backend Settings:

Step 1: In the Pretashop Admin Panel, navigate to Modules and Services >> Modules and Services >> look for “SP Super Category” module.

Step 2: In the “SP Super Category” configuration page, click button in the right corner to “ADD NEW MODULE”.

Step 3: You could configure this module like the following image.

displayBottom6

1. SP Extra Slide – Top Sellers
Frontend Appearance:

Backend Settings:

Step 1: In the Pretashop Admin Panel, navigate to Modules and Services >> Modules and Services >> look for “SP Extra Slide” module.

Step 2: In the “SP Extra Slide” configuration page, click button in the right corner to “ADD NEW MODULE”.

Step 3: You could configure this module like the following image.

2. SP Custom HTML – Testimonials
Frontend Appearance:

Backend Settings:

Step 1: In the Pretashop Admin Panel, navigate to Modules and Services >> Modules and Services >> look for “SP Custom HTML” module >> click “Configure” button to configure.

Step 2: In the “SP Custom HTML” configuration page, click button in the right corner to “ADD NEW MODULE”.

Step 3: You could configure this module like the following image.


Copy and paste the following code into the content:

<div class="our_clients">
<ul class="say_list">
<li>
<div class="content">
<div class="image"><a href="#"><img src="../themes/sp_matrix/img/cms/clien1.jpg" alt=" alt=" width="100" height="100" /></a></div>
<div class="text">
<p>"Suspendisse fringilla tincidunt on laoreet. Fusce dignissim diam at dictum vulputate. Nulla ac lorem enim."</p>
<h4 class="client-name">Interaction Designer</h4>
</div>
</div>
</li>
<li>
<div class="content">
<div class="image"><a href="#"><img src="../themes/sp_matrix/img/cms/clien2.jpg" alt="" width="100" height="100" /></a></div>
<div class="text">
<p>"Suspendisse fringilla tincidunt on laoreet. Fusce dignissim diam at dictum vulputate. Nulla ac lorem enim."</p>
<h4 class="client-name">Interaction Designer</h4>
</div>
</div>
</li>
<li>
<div class="content">
<div class="image"><a href="#"><img src="../themes/sp_matrix/img/cms/clien3.jpg" alt="" width="100" height="100" /></a></div>
<div class="text">
<p>"Suspendisse fringilla tincidunt on laoreet. Fusce dignissim diam at dictum vulputate. Nulla ac lorem enim."</p>
<h4 class="client-name">Interaction Designer</h4>
</div>
</div>
</li>
</ul>
</div>

displayBottom7

SP Product Tab – Product Tabs
Frontend Appearance:

Backend Settings:

Step 1: In the Pretashop Admin Panel, navigate to Modules and Services >> Modules and Services >> look for “SP SP Product Tab” module >> click “Configure” button to configure.

Step 2: In the “SP Product Tab” configuration page, click button in the right corner to “ADD NEW MODULE”.

Step 3: You could configure this module like the following image.

displayHomeLeft

SP Custom HTML – Home Image Left
Frontend Appearance:

Backend Settings:

Step 1: In the Pretashop Admin Panel, navigate to Modules and Services >> Modules and Services >> look for “SP Custom HTML” module >> click “Configure” button to configure.

Step 2: In the “SP Custom HTML” configuration page, click button in the right corner to “ADD NEW MODULE”.

Step 3: You could configure this module like the following image.


Copy and paste the following code into the content:

<div class="list-image-static">
<div class="border-eff">
<div class="inner"><a href="#"><img src="../themes/sp_matrix/img/cms/static-image-home-5.jpg" alt="" /></a></div>
</div>
</div>

displayBottom3

SP Manufacture Slider – Shop Brands
Frontend Appearance:

Backend Settings:

Step 1: In the Pretashop Admin Panel, navigate to Modules and Services >> Modules and Services >> look for “SP Custom HTML” module >> click “Configure” button to configure.

Step 2: In the “SP Custom HTML” configuration page, click button in the right corner to “ADD NEW MODULE”.

Step 3: You could configure this module like the following image.

displayBottom4

SP SmartBlog Home Lastest
Frontend Appearance:

Backend Settings:

Step 1: In the Pretashop Admin Panel, navigate to Modules and Services >> Modules and Services >> look for “SmartBlog Home Lastest” module.

Step 2: You could configure this module like the following image.

displayBottom5

SP Newsletter Block
Frontend Appearance:

Backend Settings:

Step 1: In the Pretashop Admin Panel, navigate to Modules and Services >> Modules and Services >> look for “SP Newsletter Block” module.

Step 2: You could configure its settings like the following image.


To edit the text in this module, please follow these steps:
In your Website’s Directory, go to themes\sp_matrix\modules\spblocknewsletter folder. To change the text in this module, in this folder, you could open the file named blocknewsletter.tpl by your editor program.
Find and change the text you want to edit, such as: Join the matrix store , Sign up for daily update, ENTER YOUR EMAIL ADDRESS

displayFooter2

SP Custom HTML – About Us
Frontend Appearance:

Backend Settings:

Step 1: In the Pretashop Admin Panel, navigate to Modules and Services >> Modules and Services >> look for “SP Custom HTML” module >> click “Configure” button to configure.

Step 2: In the “SP Custom HTML” configuration page, click button in the right corner to “ADD NEW MODULE”.

Step 3: You could configure this module like the following image.

  • Module Class Suffix:
    about_us  box-footer col-lg-3 col-md-3 col-sm-6  col-xs-6
  • Copy and paste the following code into the content:
    <div class="logo-bottom"><a href="#">logo</a>
    <p>Lorem ipsum dolor sit amet, consectetur adipisicing elit. Voluptates sunt eligendi deserunt vitae magnam necessitatibus rem laudantium iusto corporis commodi veniam inventore libero, porro! Tempora, modi molestiae neque!</p>
    </div>

Contact Information Block
Frontend Appearance:

Backend Settings:

Step 1: In the Pretashop Admin Panel, navigate to Modules and Services >> Modules and Services >> look for “Contact Information Block” module.

Step 2: You could configure this module like the following image.

displayFooter3

SP Custom HTML – Information
Frontend Appearance:

Backend Settings:

Step 1: In the Pretashop Admin Panel, navigate to Modules and Services >> Modules and Services >> look for “SP Custom HTML” module >> click “Configure” button to configure.

Step 2: In the “SP Custom HTML” configuration page, click button in the right corner to “ADD NEW MODULE”.

Step 3: You could configure this module like the following image.

  • Module Class Suffix:
    info-info box-footer col-lg-3 col-md-3 col-sm-6 col-xs-6
  • Copy and paste the following code into the content:
    <h4 class="title_block">Information</h4>
    <ul>
    <li><a href="content/4-about-us">About Us</a></li>
    <li><a href="index.php?controller=contact">Contact Us</a></li>
    <li><a href="#">My account</a></li>
    <li><a href="#">Infomation</a></li>
    <li><a href="#">Privacy</a></li>
    <li><a href="#">Policy</a></li>
    <li><a href="#">Terms & conditions</a></li>
    <li><a href="#">Site Map</a></li>
    </ul>

displayBlockTag2

SP Custom HTML – Popular Tags
Frontend Appearance:

Backend Settings:

Step 1: In the Pretashop Admin Panel, navigate to Modules and Services >> Modules and Services >> look for “SP Custom HTML” module >> click “Configure” button to configure.

Step 2: In the “SP Custom HTML” configuration page, click button in the right corner to “ADD NEW MODULE”.

Step 3: You could configure this module like the following image.

  • Module Class Suffix:
    block tags_block box-footer col-lg-3 col-md-3 col-sm-6
  • Copy and paste the following code into the content:
    <p class="block_content"><a class="item" href="#">Vivamus</a> <a class="item" href="#">Tempus</a> <a class="item" href="#">Vulput</a> <a class="item" href="#">Suspen</a> <a class="item" href="#">Mauri etile</a> <a class="item" href="#">Nullam</a> <a class="item" href="#">Fusce vel</a> <a class="item" href="#">Vulputate</a> <a class="item" href="#">Pellent</a> <a class="item" href="#">Habitasse</a> <a class="item" href="#">Elementum</a> <a class="item" href="#">Morbi</a></p>

SP Theme Configuration
Frontend Appearance:

Backend Settings:
Go Here to see the backend settings.

SP Theme Configuration

Frontend Appearance:

Backend Settings:
Go Here to see the backend settings.

6.2 SP Matrix Layout 2

home-layout2

displayTop3

SP Custom HTML – Hotline
Frontend Appearance:

Backend Settings:

Step 1: In the Pretashop Admin Panel, navigate to Modules and Services >> Modules and Services >> look for “SP Custom HTML” module >> click “Configure” button to configure.

Step 2: In the “SP Custom HTML” configuration page, click button in the right corner to “ADD NEW MODULE”.

Step 3: You could configure this module like the following image.


Copy and paste the following code into the content:

<p>HOTLINE: 0148 456 2868</p>

displayTop2

SP Custom HTML – Link Top
Frontend Appearance:

Backend Settings:

Step 1: In the Pretashop Admin Panel, navigate to Modules and Services >> Modules and Services >> look for “SP Custom HTML” module >> click “Configure” button to configure.

Step 2: In the “SP Custom HTML” configuration page, click button in the right corner to “ADD NEW MODULE”.

Step 3: You could configure this module like the following image.


Copy and paste the following code into the content:

<ul>
<li class="item-mn-c new"><a href="#">New Arrivals</a></li>
<li class="item-mn-c deal"><a href="#">Today Deals</a></li>
<li class="item-mn-c gift"><a href="#">Gifts</a></li>
<li class="item-mn-c about"><a href="#">About us</a></li>
<li class="item-mn-c proin"><a href="#">Proin lobortis</a></li>
</ul>

displaySlideShow2

Sp slider for your homepage
Frontend Appearance:

Backend Settings:

Step 1: In the Pretashop Admin Panel, navigate to Modules and Services >> Modules and Services >> look for “SP Home Slider” module >> click “Configure” button to configure.

Step 2: In the “SP Slider For Your Homepage” configuration page, click button in the right corner to “ADD NEW MODULE”.

Step 3: You could configure this module like the following image.

Step 3: You could configure this module like the following image.

Step 4: In the last part named Slides List of this configuration page, click button in the right corner to add new slide and edit slide’s information as follows:

  • Sample 4:
    Copy and paste the following code into the content:
    <h4><a href="#">Our new range off</a></h4>
    <h3><a href="#">Headphones</a></h3>
    <div class="shopnow"><a href="#">Shop Now</a></div>
  • Sample 5:
    Copy and paste the following code into the content:
    <h4><a href="#">Best Choice of this week</a></h4>
    <h3><a href="#">Collection</a></h3>
    <div class="shopnow"><a href="#">Shop Now</a></div>
  • Sample 6:
    Copy and paste the following code into the content:
    <h4><a href="#">Memorable Moments</a></h4>
    <h3><a href="#">Wherever</a></h3>
    <div class="shopnow"><a href="#">Shop Now</a></div>

displayBottom8

SP Custom HTML – Banner Top 2
Frontend Appearance:

Backend Settings:

Step 1: In the Pretashop Admin Panel, navigate to Modules and Services >> Modules and Services >> look for “SP Custom HTML” module >> click “Configure” button to configure.

Step 2: In the “SP Custom HTML” configuration page, click button in the right corner to “ADD NEW MODULE”.

Step 3: You could configure this module like the following image.


Copy and paste the following code into the content:

<div class="banner-center list-image-static clearfix">
<ul>
<li class="item-first col-lg-3 col-md-3 col-sm-3 col-xs-3">
<div class="border-eff">
<div class="inner"><a class="first" href="#"> <img src="../themes/sp_matrix/img/cms/static-image-homepage2-1.jpg" alt="image" /> </a></div>
</div>
</li>
<li class="b-center col-lg-6 col-md-6 col-sm-6 col-xs-6">
<div class="border-eff">
<div class="inner"><a href="#"> <img src="../themes/sp_matrix/img/cms/static-image-homepage2-2.jpg" alt="image" /> </a></div>
</div>
</li>
<li class="item-last col-lg-3 col-md-3 col-sm-3 col-xs-3">
<div class="border-eff">
<div class="inner"><a href="#"> <img src="../themes/sp_matrix/img/cms/static-image-homepage2-3.jpg" alt="image" /> </a></div>
</div>
</li>
</ul>
</div>

displayDeal

SP Deal – Today’s Deal
Frontend Appearance:

Backend Settings:

Step 1: In the Pretashop Admin Panel, navigate to Modules and Services >> Modules and Services >> look for “SP Deal” module.

Step 2: In the “SP Deal” configuration page, click button in the right corner to “ADD NEW MODULE”.

Step 3: You could configure this module like the following image.

displayBottom9

SP Custom HTML – Banner Center 2
Frontend Appearance:

Backend Settings:

Step 1: In the Pretashop Admin Panel, navigate to Modules and Services >> Modules and Services >> look for “SP Custom HTML” module >> click “Configure” button to configure.

Step 2: In the “SP Custom HTML” configuration page, click button in the right corner to “ADD NEW MODULE”.

Step 3: You could configure this module like the following image.


Copy and paste the following code into the content:

<div class="list-image-static clearfix">
<div class="border-eff">
<div class="inner"><a href="#"><img src="../themes/sp_matrix/img/cms/static-image-homepage2-4.jpg" alt="" /></a></div>
</div>
</div>

displayExtra2

SP Extra Slider – New Arrivals
Frontend Appearance:

Backend Settings:

Step 1: In the Pretashop Admin Panel, navigate to Modules and Services >> Modules and Services >> look for “SP Extra Slide” module.

Step 2: In the “SP Extra Slide” configuration page, click button in the right corner to “ADD NEW MODULE”.

Step 3: You could configure this module like the following image.

displayNewsletter

SP Newsletter Block
Frontend Appearance:

Backend Settings:

Step 1: In the Pretashop Admin Panel, navigate to Modules and Services >> Modules and Services >> look for “SP Newsletter Block” module.

Step 2: You could configure its settings like the following image.


To edit the text in this module, please follow these steps:
In your Website’s Directory, go to themes\sp_matrix\modules\spblocknewsletter folder. To change the text in this module, in this folder, you could open the file named blocknewsletter_v2.tpl by your editor program.
Find and change the text you want to edit, such as: Subscribe to Our Newsletter, Sign up with your email to get news and fresh updates, Email Address…

displayProductTab

SP Listing Tabs –
Frontend Appearance:

Backend Settings:

Step 1: In the Pretashop Admin Panel, navigate to Modules and Services >> Modules and Services >> look for “SP Listing Tabs” module.

Step 2: In the “SP Listing Tabs” configuration page, click button in the right corner to “ADD NEW MODULE”.

Step 3: You could configure this module like the following image.

6.3 SP Matrix Layout 3

home-layout3

displayTop4

SP Custom HTML – Bonus Menu 2
Frontend Appearance:

Backend Settings:

Step 1: In the Pretashop Admin Panel, navigate to Modules and Services >> Modules and Services >> look for “SP Custom HTML” module >> click “Configure” button to configure.

Step 2: In the “SP Custom HTML” configuration page, click button in the right corner to “ADD NEW MODULE”.

Step 3: You could configure this module like the following image.


Copy and paste the following code into the content:

<ul>
<li class="item freeship">
<div class="icon"> </div>
<div class="text"><a class="name" href="#">Free Shipping</a>
<p>On All Products</p>
</div>
</li>
<li class="item money-back">
<div class="icon"> </div>
<div class="text"><a class="name" href="#">Money Back</a>
<p>Guarantee</p>
</div>
</li>
<li class="item special">
<div class="icon"> </div>
<div class="text"><a class="name" href="#">Special weekly</a>
<p>Offer</p>
</div>
</li>
</ul>

displaySlideShow3

Sp slider for your homepage
Frontend Appearance:

Backend Settings:

Step 1: In the Pretashop Admin Panel, navigate to Modules and Services >> Modules and Services >> look for “SP Home Slider” module >> click “Configure” button to configure.

Step 2: In the “SP Slider For Your Homepage” configuration page, click button in the right corner to “ADD NEW MODULE”.

Step 3: You could configure this module like the following image.

Step 3: You could configure this module like the following image.

Step 4: In the last part named Slides List of this configuration page, click button in the right corner to add new slide and edit slide’s information as follows:

  • Sample 7:
    Copy and paste the following code into the content:
    
    		
  • Sample 8:
    Copy and paste the following code into the content:
    
    		
  • Sample 9:
    Copy and paste the following code into the content:


displayHome

SP Custom HTML – Home content
Frontend Appearance:

Backend Settings:

Step 1: In the Pretashop Admin Panel, navigate to Modules and Services >> Modules and Services >> look for “SP Custom HTML” module >> click “Configure” button to configure.

Step 2: In the “SP Custom HTML” configuration page, click button in the right corner to “ADD NEW MODULE”.

Step 3: You could configure this module like the following image.


Copy and paste the following code into the content:

<div class="list-image-static clearfix">
<ul class="content-content">
<li class="banner-content-1">
<div class="border-eff">
<div class="inner"><a><img src="../themes/sp_matrix/img/cms/static-image-homepage3-1.jpg" alt="" /></a></div>
</div>
</li>
<li class="banner-content-2">
<div class="border-eff">
<div class="inner"><a><img src="../themes/sp_matrix/img/cms/static-image-homepage3-2.jpg" alt="" /></a></div>
</div>
</li>
</ul>
</div>

displayProTab2

SP Product Tab – Product Tabs 3
Frontend Appearance:

Backend Settings:

Step 1: In the Pretashop Admin Panel, navigate to Modules and Services >> Modules and Services >> look for “SP SP Product Tab” module >> click “Configure” button to configure.

Step 2: In the “SP Product Tab” configuration page, click button in the right corner to “ADD NEW MODULE”.

Step 3: You could configure this module like the following image.

displayBottom14

SP Custom HTML – Banner Center 3
Frontend Appearance:

Backend Settings:

Step 1: In the Pretashop Admin Panel, navigate to Modules and Services >> Modules and Services >> look for “SP Custom HTML” module >> click “Configure” button to configure.

Step 2: In the “SP Custom HTML” configuration page, click button in the right corner to “ADD NEW MODULE”.

Step 3: You could configure this module like the following image.


Copy and paste the following code into the content:

<div class="list-image-static clearfix">
<div class="border-eff">
<div class="inner"><a href="#"><img src="../themes/sp_matrix/img/cms/static-image-homepage3-3.jpg" alt="" /></a></div>
</div>
</div>

displaySuperCat

SP Super Category – Sp Super Category Slider1

Frontend Appearance:

Backend Settings:

Step 1: In the Pretashop Admin Panel, navigate to Modules and Services >> Modules and Services >> look for “SP Super Category” module.

Step 2: In the “SP Super Category” configuration page, click button in the right corner to “ADD NEW MODULE”.

Step 3: You could configure this module like the following image.

displayBottom11

SP Custom HTML – Image Left Home 3
Frontend Appearance:

Backend Settings:

Step 1: In the Pretashop Admin Panel, navigate to Modules and Services >> Modules and Services >> look for “SP Custom HTML” module >> click “Configure” button to configure.

Step 2: In the “SP Custom HTML” configuration page, click button in the right corner to “ADD NEW MODULE”.

Step 3: You could configure this module like the following image.


Copy and paste the following code into the content:

<div class="list-image-static">
<div class="border-eff">
<div class="inner"><a href="#"><img src="../themes/sp_matrix/img/cms/static-image-homepage3-4.jpg" alt="" /></a></div>
</div>
</div>

displayBottom15

SP Custom HTML – Banner Center 4
Frontend Appearance:

Backend Settings:

Step 1: In the Pretashop Admin Panel, navigate to Modules and Services >> Modules and Services >> look for “SP Custom HTML” module >> click “Configure” button to configure.

Step 2: In the “SP Custom HTML” configuration page, click button in the right corner to “ADD NEW MODULE”.

Step 3: You could configure this module like the following image.


Copy and paste the following code into the content:

<div class="banner-center list-image-static clearfix">
<ul>
<li class="item-first col-lg-6 col-md-6 col-sm-6 col-xs-6">
<div class="border-eff">
<div class="inner"><a class="first" href="#"> <img src="../themes/sp_matrix/img/cms/static-image-homepage3-5.jpg" alt="image" /> </a></div>
</div>
</li>
<li class="b-center col lg-6 col-md-6 col-sm-6 col-xs-6">
<div class="border-eff">
<div class="inner"><a href="#"> <img src="../themes/sp_matrix/img/cms/static-image-homepage3-6.jpg" alt="image" /> </a></div>
</div>
</li>
</ul>
</div>

displayBottom12

SP Custom HTML – Testimonials
Frontend Appearance:

Backend Settings:

Step 1: In the Pretashop Admin Panel, navigate to Modules and Services >> Modules and Services >> look for “SP Custom HTML” module >> click “Configure” button to configure.

Step 2: In the “SP Custom HTML” configuration page, click button in the right corner to “ADD NEW MODULE”.

Step 3: You could configure this module like the following image.


Copy and paste the following code into the content:

<div class="our_clients">
<ul class="say_list">
<li>
<div class="content">
<div class="image"><a href="#"><img src="../themes/sp_matrix/img/cms/clien2.jpg" alt=" alt=" width="100" height="100" /></a></div>
<div class="text">
<h4 class="client-name">Shara Tibken</h4>
<p>"Suspendisse fringilla tincidunt on laoreet. Fusce dignissim diam at dictum vulputate. Nulla ac lorem enim."</p>
</div>
</div>
</li>
<li>
<div class="content">
<div class="image"><a href="#"><img src="../themes/sp_matrix/img/cms/clien1.jpg" alt="" width="100" height="100" /></a></div>
<div class="text">
<h4 class="client-name">Shara Tibken</h4>
<p>"Suspendisse fringilla tincidunt on laoreet. Fusce dignissim diam at dictum vulputate. Nulla ac lorem enim."</p>
</div>
</div>
</li>
<li>
<div class="content">
<div class="image"><a href="#"><img src="../themes/sp_matrix/img/cms/clien3.jpg" alt="" width="100" height="100" /></a></div>
<div class="text">
<h4 class="client-name">Shara Tibken</h4>
<p>"Suspendisse fringilla tincidunt on laoreet. Fusce dignissim diam at dictum vulputate. Nulla ac lorem enim."</p>
</div>
</div>
</li>
</ul>
</div>

displaySuperCat2

SP Super Category – Sp Super Category Slider2

Frontend Appearance:

Backend Settings:

Step 1: In the Pretashop Admin Panel, navigate to Modules and Services >> Modules and Services >> look for “SP Super Category” module.

Step 2: In the “SP Super Category” configuration page, click button in the right corner to “ADD NEW MODULE”.

Step 3: You could configure this module like the following image.

displayBlockTag

SP Custom HTML – Popular Tags
Frontend Appearance:

Backend Settings:

Step 1: In the Pretashop Admin Panel, navigate to Modules and Services >> Modules and Services >> look for “SP Custom HTML” module >> click “Configure” button to configure.

Step 2: In the “SP Custom HTML” configuration page, click button in the right corner to “ADD NEW MODULE”.

Step 3: You could configure this module like the following image.


Copy and paste the following code into the content:

<p class="block_content"><a class="item" href="#">Nullam</a> <a class="item" href="#">Pellentesque</a> <a class="item" href="#">Turpis</a> <a class="item" href="#">Proin pretium</a> <a class="item" href="#">Morbi</a> <a class="item" href="#">Sodalesmi</a> <a class="item" href="#">Montes</a> <a class="item" href="#">Vestibulumrus</a> <a class="item" href="#">Proinpretium</a> <a class="item" href="#">Viverra</a> <a class="item" href="#">Finibus</a> <a class="item" href="#">Suscipit</a> <a class="item" href="#">Curabitur</a> <a class="item" href="#">Massa</a> <a class="item" href="#">Elementum</a> <a class="item" href="#">Lacus</a></p>

displayBottom16

SP Custom HTML – Banner Center 5
Frontend Appearance:

Backend Settings:

Step 1: In the Pretashop Admin Panel, navigate to Modules and Services >> Modules and Services >> look for “SP Custom HTML” module >> click “Configure” button to configure.

Step 2: In the “SP Custom HTML” configuration page, click button in the right corner to “ADD NEW MODULE”.

Step 3: You could configure this module like the following image.


Copy and paste the following code into the content:

<div class="banner-center list-image-static clearfix">
<ul>
<li class="item-first col-lg-6 col-md-6 col-sm-6 col-xs-6">
<div class="border-eff">
<div class="inner"><a class="first" href="#"> <img src="../themes/sp_matrix/img/cms/static-image-homepage3-7.jpg" alt="image" /> </a></div>
</div>
</li>
<li class="b-center col lg-6 col-md-6 col-sm-6 col-xs-6">
<div class="border-eff">
<div class="inner"><a href="#"> <img src="../themes/sp_matrix/img/cms/static-image-homepage3-8.jpg" alt="image" /> </a></div>
</div>
</li>
</ul>
</div>

displayBottom13

SP Custom HTML – Image Left Home 4
Frontend Appearance:

Backend Settings:

Step 1: In the Pretashop Admin Panel, navigate to Modules and Services >> Modules and Services >> look for “SP Custom HTML” module >> click “Configure” button to configure.

Step 2: In the “SP Custom HTML” configuration page, click button in the right corner to “ADD NEW MODULE”.

Step 3: You could configure this module like the following image.


Copy and paste the following code into the content:

<div class="list-image-static">
<div class="border-eff">
<div class="inner"><a href="#"><img src="../themes/sp_matrix/img/cms/img-sidebar-view.jpg" alt="" /></a></div>
</div>
</div>

displaySlider3

1. SP Extra Slider – Recomended
Frontend Appearance:

Backend Settings:

Step 1: In the Pretashop Admin Panel, navigate to Modules and Services >> Modules and Services >> look for “SP Extra Slide” module.

Step 2: In the “SP Extra Slide” configuration page, click button in the right corner to “ADD NEW MODULE”.

Step 3: You could configure this module like the following image.

2. SP Extra Slider – Specials
Frontend Appearance:

Backend Settings:

Step 1: In the Pretashop Admin Panel, navigate to Modules and Services >> Modules and Services >> look for “SP Extra Slide” module.

Step 2: In the “SP Extra Slide” configuration page, click button in the right corner to “ADD NEW MODULE”.

Step 3: You could configure this module like the following image.

3. SP Extra Slider – Feature
Frontend Appearance:

Backend Settings:

Step 1: In the Pretashop Admin Panel, navigate to Modules and Services >> Modules and Services >> look for “SP Extra Slide” module.

Step 2: In the “SP Extra Slide” configuration page, click button in the right corner to “ADD NEW MODULE”.

Step 3: You could configure this module like the following image.

7SUPPORT

  • SUPPORT – If you have any questions that are beyond the scope of this help file, please feel free to send us via: Support Tickets System
  • FAQs – Go to Here to view more the Frequently Asked Questions.

SW Hurama

$
0
0

1GETTING STARTED

1.1 Introduction

    First of all, I would like to thank you for purchasing this theme, your support is truly appreciated.
    SW Hurama is a modern and beautiful WordPress Theme. Both developers and non-trained users can use it easily. This document covers the installation and use of this theme, reveals some answers to common problems and issues. We encourage you to read this document throughtly if you are experiencing any difficulties. If you have any questions that are beyond the scope of document, please feel free to contact us via our Support Tickets System.

1.2 System Requirements

At the basic level, this theme will require the following conditions:

  • Apache 2.x or Microsoft IIS 7
  • PHP 5.3.x
  • MySQL 5.0.4 or higher
  • WordPress 3.9+, 4.0+

Note: Recommended PHP Configuration Limits In several cases, you may deal with problems related to low PHP configuration limits, such as: white screen, demo content fails when importing, empty page content and other similar issues. The solution is to increase the PHP limits. You can do this on your own by editing the following lines in php.ini file in your root directory. This is not a file that comes with WordPress so if you are unfamiliar with it you should contact your web host about increasing those limits to a minimum as follows:

  • max_execution_time 360
  • memory_limit 128M
  • post_max_size 32M
  • upload_max_filesize 32M

2INSTALLATION

2.1 Files Structure

At first, you need to download the package to your computer and then unzip it. The package gives you all the files listed as follows

  • Data folder
    • Slider revolution folder: Contains the “slider-home-page1.zip” file, “slider-home-page2.zip” file
    • “media.xml” file
  • Theme installation files, including:
    • sw_hurama_theme_v1.0.0.zip file (The newest version)
    • sw_hurama-child-theme.zip file (The child theme is a recommended way of modifying your existing theme.)

2.2 Theme Installation

When you are ready to install a theme, you must first upload the theme files and then activate the theme itself. The theme files can be uploaded in two ways:

  • FTP Upload:
  • WordPress Upload:

Note: If the theme files’ size is larger than 8M, please upload via FTP (File Transfer Protocol).

2.2.1 Theme Installation via FTP

To add the new Theme to your WordPress installation, follow these basic steps:

  • Download the Theme archive and extract the file named themename_version.zip, for example here: sw_hurama_theme_version1.0.0.zip. You may need to preserve the directory structure in the archive when extracting these files.
  • Load your FTP client, such as FileZilla.
  • Use your FTP program to access your host web server, create a directory to save your Theme in the wp-content/themes directory provided by WordPress.For example, the theme named SW Hurama Version 1.0.0 should be in wp-content/themes/sw_hurama_theme_version1.0.0. The theme may provide this directory as part of the archive.
  • Upload the Theme files to the new directory on your host server

To select the Theme for your site:

  • Log in to the WordPress Administration Panels
  • Select the Appearance panel, then Themes to find the new theme uploaded.
  • From the Themes panel, roll over the Theme thumbnail image for the Theme you are interested in to see options for that theme.
  • You can view more information about any theme by clicking Theme Details.
  • A live preview of any Theme (using your blog’s content) can be seen by clicking Live Preview.
  • To activate the Theme click the Activate button.

Your selection will immediately become active.

Note: If the Theme preview is blank, do not activate the new Theme without investigating further. Your site may not be displayed correctly, otherwise.

2.2.2 Theme Installation via WordPress Admin Panel

Step 1 – Open the wp-admin panel (Navigate through web browser to the folder where you have installed the WordPress, for example: www.your_domain.com/wp-admin/).

Step 2 – Login to your WordPress Dashboard and navigate to Appearance >> Themes. At the top of the page, click the Add New button.

Step 3 – Click the Upload Theme button >> Choose File to import the theme from your computer. Select your sw_hurama_theme_v1.0.0.zip file and click Install Now.

Step 4 – You have a few minutes to wait till you see the message announcing that Theme installed successfully.

Step 5 – After that, you will be able to activate the theme.

Step 6 – Press “Save Changes” to complete the theme activation.


Once theme is installed, you need to install Required Plugins to get full features working.

2.3 Required Plugins Installation

Step 1 – After installing and activating the theme, you will see a yellow popup at the top of the page. The message notices that: “This theme requires the following plugins…”, and you need to click the ‘Begin Installing plugins’ link.

Step 2 – You will be redirected to ‘Install Required Plugins’ page, here you will find all of the required plugins. To install these plugins, just check all of them to choose, and select Installin the dropdown menu to install what you have chosen.


A message will be displayed to denote that you have just installed the required plugins successfully as following:

Note: When installing plugins, if you see a notice that some plugins have unsuccessful installation, please choose each plugin to install again. This case usually occurs as you select all plugins to install at once.

Step 3 – After installing required plugins successfully, you will see a yellow popup at the top of the page noticing that you need to activate the plugins.

Step 4 – You will be redirected to ‘Install Required Plugins’ page, here you will find all of the required plugins. To activate these plugins, just check all of them to choose, and select Activatein the dropdown menu to activate what you have chosen.

A message will be displayed to denote that you have just activated the required plugins successfully as following:

Note: After activating the plugins successfully, please go to the Dashboard to see the changes in the Admin Panel and to continue styling your website.

2.4 Change Product Image Sizes

You can change the image size in “Woocommerce > Settings > Products > Display” section.

woocommerce

After change the images sizes, you should regenerate all the thumbnails. For this, you should install and activate “Regenerate Thumbnails” plugin.

2.5 Import Demo Data

Step 1 - In the Administrator page, please navigate to Appearance >> Import Demo Data.

Step 2 - Please click “Import Demo Data” button.

The process will take a couple of minutes. After receiving a message which shows “Importing all done!”, please follow the next part of this document to import “media.xml” file.

2.6 Import Media file

Step 1 - In the Administrator page, please navigate to Tools >> Import.

import

Step 2 - Please choose "WordPress" to import.

wordpress

Step 3 - In Import WordPress page, click "choose file" button to select file "media.xml" to upload.

import-media-file

2.7 Import Revolution Slider

Step 1 – In the Administrator page, please navigate to Revolution Slider >> Revolution Slider and click Import Slider button.


Step 2 – You will have a pop-up window like the following image:

Step 3 – In the window, please choose the “slider-home-page1.zipfile (in the Slider revolution folder) and pressImport Slider button.

Note: Do the same to import “slider-home-page2.zip” file and “slider-home-page3.zip” file.

2.8 Widget Installation

Step 1 – In the Administrator page, please navigate to Tools >> Widget Importer & Exporter.

Step 2 – After that choose “widget_data.wie” file >> press Import Widgets button.

2.9 MailChimp for WordPress

SW Hurama This theme uses MailChimp Plugin.

Frontend Appearance

Backend Settings

In your Administrator page, please navigate to MailChimp for WP >> Forms to configure the plugins

  • Form Fields: Please click Here to view
  • You could copy the code here to the field in the page.

<div class="newsletter-content">
	<input type="email" id="mc4wp_email" class="newsletter-email" name="EMAIL" placeholder="Enter your email" required />

<input class="newsletter-submit" type="submit" value="Subscribe" />
</div>


  • Form Messages: Please click Here to view
  • Form Settings: Please click Here to view
  • Form Appearance: Please click Here to view
  • Please go Here if you would like to read more about this plugin.

    3.1.1 Existing Menu

    Step 1: Go to Appearance > Menus

    Step 2: In the Manage Locations area, choose an assigned menu, which appropriates to Theme Locations. Click Save Changes

    3.1.2 Create A New Menu

    Step 1: Go to to Appearance > Menus

    Step 2: Click Create a new menu. Enter a menu’s name and click Create Menu

    Step 3: Check the menu item in the boxes in the left column, click Add to Menu to add items to the menu and drag/drop to arrange them.

    Step 4: Click Save Menu

    Step 5: Now assign the created menu to the appropriate location

    3.1.3 Edit A Menu

    Step 1: Go to to Appearance > Menus

    Step 2: Click Edit Menus. Select a menu’s name in the dropdown menu and click Select to choose a menu to edit. Edit a menu Here

    Step 3: Edit the menu and its items in Menu Structure

    Step 4: Click Save Menu to save your changes

    Note: When editing items in these menus, the items (in a menu) having same level could have same configuration. Therefore, we encourage you read throughtly and find out the item’s level to configure it without any errors.

    3.2 Primary Menu

    In your Administrator Page, please go to Appearance > Menus and select the menu to configure its structure.

    3.2.1 Home

    The Frontend Appearance:

    The Backend Settings:

    1. We call Parent Level Menu Level 0. Then, next levels are Level 1, Level 2,etc.

    2. Click on the first Menu Level 0 (Parent Level Menu ) item and select Dropdown Size = “3″ in the selection box.

    3. Click “Save” button

    Description of parameters in Advanced Menu Configuration:

    • Active mega menu: Allow to activate/inactivate Mega Menu
    • Icon: Using icon-* class to display Icon for any menu item with intergrated Font Awesome.
    • Dropdown Size: Set the width of dropdown menu. (ex: min = 1 (= 150px); max = 6 (= 900px)).
    • Dropdown Align

    - Only for menu items level 0 – If you need a dropdown align by right direction, configure it to "Right" instead of "Left" or "Default" – "Default" means that no class can be added to dropdown, everything follows the default css. – "Left" / "Right": add to dropdown an utility class and float it left/ right, make it align as your desire .

    • Show Description as Subtitle

    - Show a short description – It is an essential attribute of a menu item. You may need to select to show it in the metabox screen.

    • Hide Title

    - When you would like to hide the title of menu, please select "Yes" value. In this case, you need to configure Icon, Subtitle or Advanced Content.

    • Disable Link: Allow to disable link.
    • Advanced:

    - Several advanced functions are placed here. – "Default": NOOP, do nothing. Sure, it is not advanced – "Use as Divider": Show any icon, title, subtitle, content. Divider style only. – "Append Advanced Content": Append content after menu title block (icon+title+subtitle) – "Append Advanced Content with Shortcode": as above, but "do_shortcode" with this before append.

    • Advanced content: Insert content, such as HTML, image, etc (not include: js & css)
    • Menu Thumbnail: Allow to upload thumbnail for menu

    3.2.2 Shop

    The Frontend Appearance:

    The Backend Settings: Please click Here to view

    3.2.3 What’s New

    The Frontend Appearance:

    The Backend Settings: Please click Here to view

    3.2.4 Blog

    The Frontend Appearance:

    The Backend Settings: Please click Here to view

    3.2.5 Portfolios

    The Frontend Appearance:

    The Backend Settings: Please click Here to view

    The Frontend Appearance:

    The Backend Settings: Please click Here to view

    4THEME OPTIONS

    In your Admin Panel, go to Appearance >> Theme Options to configure.


    4.1 General

    general

    • Color Scheme – Choose your desire color
    • Background Image – Browse to select image file to be your website’s background image.
    • Color Option – Choose a color validation in the field type
    • Background Repeat – Choose to repeat background image or not (Used for boxed layout).
    • Favicon Icon - Use the Upload button to upload the new favicon and get URL of the favicon.
    • Note:This option is compatible with one for WordPress Version 4.2 or previous versions. To add a Favicon in WordPress 4.3 or later versions, please go to Appearance >> Customize >> Site Identity >> Site Icon to set a favicon icon

    • Responsive Support – Support responsive layout (If you do not want to use this function, please uncheck)
    • Logo Image - Use the Upload button to upload the new logo and get URL of the logo. You could browse to the wp-content/themes/sw_lovefashion/assets/img folder to get the image named logo-default.png like the demo. logo-default.png

    4.2 Layout

    layout

    • Footer Style – Select Footer Style.
    • Box Layout – Select Layout Box or Wide.
    • Background Box Image – Browse to select image that you want. You could browse to the wp-content/uploads/2015/10 folder to get the image named new-york-540807_1920.jpg like the demo.
    • Left Sidebar Expand – Select width of left sidebar.
    • Right Sidebar Expand – Select width of right sidebar medium desktop.
    • Left Sidebar Medium Desktop Expand – Select width of left sidebar medium desktop.
    • Right Sidebar Medium Desktop Expand – Select width of right sidebar.
    • Left Sidebar Tablet Expand - Select width of left sidebar tablet.
    • Right Sidebar Tablet Expand – Select width of right sidebar tablet.

    4.3 Header

    header

    • Header Style – Select Header style: Style1 / Style2 / Style 3.
    • Popular search text – Each keyword separated by commas

    4.4 Navbar Options

    navbar

    • Menu Type – Select “Mega Menu” or “Dropdown Menu” type.
    • Theme Location – Select theme location to active mega menu.
    • Responsive Menu Visible – Select option to show responsive menu visible.
    • Select Menu Style – Allow to select menu style: Default / Fixed Menu.

    4.5 Blog Options

    navbar

    • Sidebar Blog Layout – Select style sidebar blog: Full Layout / Left Sidebar / Right Sidebar / Left Right Sidebar.
    • Layout blog – Select style layout blog: Default / Right Sidebar / Grid Layout.
    • Blog column – Select style number column blog: 2 colums / 3 columns / 4 columns.

    4.6 Product Options

    product-options

    • Product Listing column Desktop – Select number of column on Desktop Screen.
    • Product Listing column Medium Desktop – Select number of column on Medium Desktop Screen.
    • Product Listing column Tablet – Select number of column on Tablet Screen.
    • Sidebar Product Layout – Select style sidebar product.
    • Layout product – Select style layout product

    4.7 Typography

    typo

    • Use Google Webfont – Insert font style that you actually need on your webpage.
    • Webfont Weight – For weight, see Google Fonts to custom for each font style.
    • Webfont Assign to – Select the place will apply the font style headers, every where or custom.
    • Webfont Custom Selector – Insert the places will be custom here, after selected custom Webfont assign.

    4.8 Social Share

    Turn on/turn off sharing buttons appearing in Home page

    social

    • Social share – Enable Social share button.
    • Facebook – Enable Facebook Share button.
    • Twitter – Enable Twitter Share button.
    • Linked_in – Enable LinkedIn Share button.
    • Google+ – Enable Google+ Share button.

    4.9 Advanced

    advanced

    • Show cPanel – Turn on/off Cpanel.
    • Widget Advanced – Turn on/off Widget Advanced.
    • Developer Mode – Turn on/off preset.
    • Back to top - Turn on/off back to top
    • Active sticky menu – Turn on/off sticky menu.
    • Direction – Left To Right / Right To Left.
    • Active Effect Scroll – Check to active effect scroll in hompage .
    • Custom CSS/JS – Insert your own CSS into this block. This overrides all default styles located throughout the theme.

    5PAGES

    5.1 How To Create A New Page

    Step 1 - go to Pages in your admin sidebar and click Add New option.

    Step 2 – Input a new name for your page, then find the Page Attributes box on right side.

    Step 3 – Set your Parent page. It’s usually set to No Parent.

    Step 4 – Set your page template from the Template dropdown list. See list of page templates below.

    Step 5 - Content for your page goes in the editing field, use the Visual or Text editor.

    Here is a screenshot that shows you the various areas and descriptions of the page settings described above.

    5.2 Setting Up Home Page

    Setting up your home page is the same as setting up any other regular pages, except that you need to specify in the settings which page will be your Main Home Page.

    How To Set Your Home Page

    Step 1 - go to Settings >> Reading tab.

    Step 2 – Select A Static Page option.

    Step 3 – Choose the page you want as your home page from the Front Page dropdown list.

    Step 4 – Choose the blog page as the Posts page.

    5.3 Page Templates

    SW Hurama includes several page templates to choose from, and you will need to choose the page template that suits your needs. For example, if you want a page that is Contact Us Page of the browser window, then you would select the Contact page template. All of this is done in the Pages section of your WordPress admin.

    There are Page Templates, each of them along with a description.

      • About Us Page – This is the About Us page template. Choose this template when you want to give the customers the information about yourself website.
      • Contact Us Page – This is the Contact page template that you should choose when you make your contact page with Google Map & a contact form.
      • FAQ Page - This is the FAQ page template. Choose this template when you make your FAQ page.
      • Comming Soon – This page uses shortcode to show countdown time for any products comming soon.
      • 404 – This is the 404 page template. Choose this template when you need to inform the error 404 (Page not found).

    5.4 Edit Page with Visual Composer

    The SW Hurama Theme uses the Visual Composer Plugin. The most powerful feature of the Visual Composer is that it gives you an easy drag and drop page builder that can be used from the standard WordPress page/post edit area or directly from the frontend.

    For example:

    • Step 1: you need to click on the “Edit with Visual Composer” link at the frontend editor.

    • Step 2: Edit Text Block by click “pencil” icon.

    • &nbsp

    • Step 3: Edit content as you want at General tab of Text Block Settings.

    6THEME CONFIGURATION WITH VISUAL COMPOSER

    6.1 SW Hurama – Layout1

    Revolution Slider

    Frontend Editor – After opening the homepage with Visual Composer, click on “pencil” symbol at center of this part to configure its backend settings

    banner-row

    The pop-up window will display the backend settings, so you can configure the item as you want:

    banner-row-general

    Raw HTML – Freeshipping

    Frontend Editor – After opening the homepage with Visual Composer, click on “pencil” symbol at center of this part to configure its backend settings

    revolution-slider

    The pop-up window will display the backend settings , so you can configure the item as you want:

    • Generalbanner-row-general
    • Design Optionsbanner-row-design

    Copy and paste the Code into editor:

    <div class="text-banner">
              <p>Last day! <span>Freeshipping</span> on all order over <span>$12.00</span> with code wordpress</p>
    </div>


    Raw HTML

    Frontend Editor – After opening the homepage with Visual Composer, click on “pencil” symbol at center of this part to configure its backend settings

    banner-row

    The pop-up window will display the backend settings, so you can configure the item as you want:

    • Generalbanner-row-general
    • Design Optionsbanner-row-design

    Copy and paste the Code into editor:

    <div class="banner-1">
               <div class="item1"><a href="#"><img src="http://dev.ytcvn.com/ytc_templates/wordpress/sw_hurama/wp-content/uploads/2015/11/banner1.png" title="banner 1" alt="banner 1"></a></div>
               <div class="item2"><a href="#"><img src="http://dev.ytcvn.com/ytc_templates/wordpress/sw_hurama/wp-content/uploads/2015/11/baner2.png" title="banner 2" alt="banner 2"></a></div>
    </div>


    YA Woo Slider – What’s New

    Frontend Editor – After opening the homepage with Visual Composer, click on “pencil” symbol at center of this part to configure its backend settings

    countdown-slider

    The pop-up window will display the backend settings, so you can configure the item as you want:

    countdown-slider-backend

    Raw HTML

    Frontend Editor – After opening the homepage with Visual Composer, click on “pencil” symbol at center of this part to configure its backend settings

    banner-content

    The pop-up window will display the backend settings, so you can configure the item as you want:

    • Generalbanner-content-general
    • Design Optionsbanner-content-design

    Copy and paste the Code into editor:

    <div class="banner3"><a href="#"><img src="http://dev.ytcvn.com/ytc_templates/wordpress/sw_hurama/wp-content/uploads/2015/11/banner3.jpg" title="banner 3" alt="banner 3"></a></div>


    Woocommerce Tab Slider – Our Products

    Frontend Editor – After opening the homepage with Visual Composer, click on “pencil” symbol at center of this part to configure its backend settings

    eletronics-frontend

    The pop-up window will display the backend settings, so you can configure the item as you want:

    eletronics-backend

    Raw HTML – Explore More

    Frontend Editor – After opening the homepage with Visual Composer, click on “pencil” symbol at center of this part to configure its backend settings

    banner2

    The pop-up window will display the backend settings, so you can configure the item as you want:

    • Generalbanner2-general
    • Design Optionsbanner2-design

    Copy and paste the Code into editor:

    <div class="explore">
               <div class="block-title">
    			<div class="page-title-slider">explore more</div>
    			<div class="page-description-slider">explore THE LATEST BY hurama</div>
    	   </div>
               <div class="rows">
                           <div class="item1 col-lg-6 col-md-6 col-sm-12">
                                       <div class="item-img">
                                                  <img src="http://dev.ytcvn.com/ytc_templates/wordpress/sw_hurama/wp-content/uploads/2015/11/im1.jpg" title="img 1" alt="img 1">
                                       </div>
                                       <div class="item-content">
                                                  <span class="entry">the nature</span>
                                                  <h3><a href="#">Ultra-fine Clinique Skinny Stick™</a></h3>
                                                  <div class="des">Sed ut perspiciatis unde omnis iste natus error sit voluptatem </div>
                                                   <div class="bottom"><a href="#">Continue</a></div>
                                       </div>  
                           </div>
    
                           <div class="item2 col-lg-6 col-md-6 col-sm-12">
                                       <div class="item-img">
                                                  <img src="http://dev.ytcvn.com/ytc_templates/wordpress/sw_hurama/wp-content/uploads/2015/11/im2.jpg" title="img 2" alt="img 2">
                                       </div>
                                       <div class="item-content">
                                                  <span class="entry">the nature</span>
                                                  <h3><a href="#">Ultra-fine Clinique Skinny Stick™</a></h3>
                                                  <div class="des">Sed ut perspiciatis unde omnis iste natus error sit voluptatem </div>
                                                    <div class="bottom"><a href="#">Continue</a></div>
                                       </div>
                           </div>
    
                           <div class="item3 col-lg-6 col-md-6 col-sm-12">
                                       <div class="item-content">
                                                  <span class="entry">the nature</span>
                                                  <h3><a href="#">Ultra-fine Clinique Skinny Stick™</a></h3>
                                                  <div class="des">Sed ut perspiciatis unde omnis iste natus error sit voluptatem </div>
                                                  <div class="bottom"><a href="#">Continue</a></div>
                                       </div>
                                       <div class="item-img">
                                                  <img src="http://dev.ytcvn.com/ytc_templates/wordpress/sw_hurama/wp-content/uploads/2015/11/im3.jpg" title="img 2" alt="img 2">
                                       </div>
                           </div>
    
                           <div class="item4 col-lg-6 col-md-6 col-sm-12">
                                       <div class="item-content">
                                                  <span class="entry">the nature</span>
                                                  <h3><a href="#">Ultra-fine Clinique Skinny Stick™</a></h3>
                                                  <div class="des">Sed ut perspiciatis unde omnis iste natus error sit voluptatem </div>
                                                  <div class="bottom"><a href="#">Continue</a></div>
                                       </div>
                                       <div class="item-img">
                                                  <img src="http://dev.ytcvn.com/ytc_templates/wordpress/sw_hurama/wp-content/uploads/2015/11/im4.jpg" title="img 2" alt="img 2">
                                       </div>
                           </div> 
               </div>
    </div>


    YTC-Posts – Latest Blogs

    Frontend Editor – After opening the homepage with Visual Composer, click on “pencil” symbol at center of this part to configure its backend settings

    fashion-frontend

    The pop-up window will display the backend settings, so you can configure the item as you want:
    banner2-general

    YA Partner Slider – Our Brands

    Frontend Editor – After opening the homepage with Visual Composer, click on “pencil” symbol at center of this part to configure its backend settings

    testimonial-frontend

    The pop-up window will display the backend settings, so you can configure the item as you want:

    testimonial-backend

    6.2 SW Hurama – Layout2

    Revolution Slider

    Frontend Editor – After opening the homepage with Visual Composer, click on “pencil” symbol at center of this part to configure its backend settings

    countdown-slider2

    The pop-up window will display the backend settings, so you can configure the item as you want:

    banner-header-design

    Text Block

    Frontend Editor – After opening the homepage with Visual Composer, click on “pencil” symbol at center of this part to configure its backend settings

    revolution-slider

    The pop-up window will display the backend settings , so you can configure the item as you want:

    • Generalbanner-row-general
    • Design Optionsbanner-row-design

    Copy and paste the Code into editor:

    <a href="http://dev.ytcvn.com/ytc_templates/wordpress/sw_hurama/wp-content/uploads/2015/11/bn6.png"><img class="alignnone size-full wp-image-7735" src="http://dev.ytcvn.com/ytc_templates/wordpress/sw_hurama/wp-content/uploads/2015/11/bn6.png" alt="bn6" width="370" height="240" /></a>


    Raw HTML

    Frontend Editor – After opening the homepage with Visual Composer, click on “pencil” symbol at center of this part to configure its backend settings

    revolution-slider

    The pop-up window will display the backend settings , so you can configure the item as you want:

    • Generalbanner-row-general
    • Design Optionsbanner-row-design

    Copy and paste the Code into editor:

    <div class="shipping">
               <div class="row">
               <div class="item item1 col-lg-4 col-md-4 col-sm-4">
                           <div class="item-img pull-left"><img src="http://dev.ytcvn.com/ytc_templates/wordpress/sw_hurama/wp-content/uploads/2015/11/ecommerce_dollar.png" title="dollar" alt="dollar">
                           </div>
                           <div class="item-content">
                                      <h3><a href="#">100% MONEY BACK</a></h3>
                                      <div class="des">GUARANTEE</div>
                           </div>
               </div>
    
                <div class="item item2 col-lg-4 col-md-4 col-sm-4">
                           <div class="item-img pull-left"><img src="http://dev.ytcvn.com/ytc_templates/wordpress/sw_hurama/wp-content/uploads/2015/11/ecommerce_gift.png" title="gift" alt="gift">
                           </div>
                           <div class="item-content">
                                      <h3><a href="#">free shipping</a></h3>
                                      <div class="des">when order over $150</div>
                           </div>
               </div>
    
                <div class="item item3 col-lg-4 col-md-4 col-sm-4">
                           <div class="item-img pull-left"><img src="http://dev.ytcvn.com/ytc_templates/wordpress/sw_hurama/wp-content/uploads/2015/11/basic_anticlockwise.png" title="anticlockwise" alt="anticlockwise">
                           </div>
                           <div class="item-content">
                                      <h3><a href="#">24-Hours</a></h3>
                                      <div class="des">life time support</div>
                           </div>
               </div>
               </div>
    </div>


    YA Woocommerce Countdown Slider – Hot deasl

    Frontend Editor – After opening the homepage with Visual Composer, click on “pencil” symbol at center of this part to configure its backend settings

    eletronics-frontend

    The pop-up window will display the backend settings, so you can configure the item as you want:

    eletronics-backend

    Frontend Editor – After opening the homepage with Visual Composer, click on “pencil” symbol at center of this part to configure its backend settings

    revolution-slider

    The pop-up window will display the backend settings , so you can configure the item as you want:

    • Generalbanner-row-general
    • Design Optionsbanner-row-design

    Copy and paste the Code into editor:

    <div class="banner-index2">
               <div class="item1"><a href="#"><img src="http://dev.ytcvn.com/ytc_templates/wordpress/sw_hurama/wp-content/uploads/2015/11/banner9.jpg" title="banner 1" alt="banner 1"></a></div>
               <div class="item2"><a href="#"><img src="http://dev.ytcvn.com/ytc_templates/wordpress/sw_hurama/wp-content/uploads/2015/11/banner8.jpg" title="banner 2" alt="banner 2"></a></div>
    </div>


    YA Woo Slider – Chair

    Frontend Editor – After opening the homepage with Visual Composer, click on “pencil” symbol at center of this part to configure its backend settings

    eletronics-frontend

    The pop-up window will display the backend settings, so you can configure the item as you want:

    eletronics-backend

    7 Other items

    Cart

    In your Administrator Page, please go to Appearance > Widgets and select the menu to configure its structure.

    The Backend Settings: Please click Here to view

    In your Administrator Page, please go to Appearance > Widgets and select the menu to configure its structure.

    The Backend Settings: Please click Here to view

    USD

    In your Administrator Page, please go to Appearance > Widgets and select the menu to configure its structure.

    The Backend Settings: Please click Here to view

    English

    In your Administrator Page, please go to Appearance > Widgets and select the menu to configure its structure.

    The Backend Settings: Please click Here to view
    Copy & Paste the code into your editor:

    <div id="lang_sel">
    	<ul class="nav">
    		<li>
    			<a class="lang_sel_sel icl-en" href="#">
    				<img class="iclflag" title="English" alt="en" src="[bloginfo]/wp-content/themes/sw_hurama/assets/img/en.png">
    				 English
    			</a>
    			<ul>
    				<li class="icl-en">
    					<a href="[get_url]&amp;direction=ltr">
    						<img class="iclflag" title="English" alt="en" src="[bloginfo]/wp-content/themes/sw_hurama/assets/img/en.png">
    						 English
    					</a>
    				</li>
    				<li class="icl-ar">
    					<a href="[get_url]&amp;direction=rtl">
    						<img class="iclflag" title="Arabic" alt="ar" src="[bloginfo]/wp-content/themes/sw_hurama/assets/img/ar.png">
    						Arabic
    					</a>
    				</li>
    			</ul>
    		</li>
    	</ul>
    </div>


    My Account

    In your Administrator Page, please go to Appearance > Widgets and select the menu to configure its structure.

    The Backend Settings: Please click Here to view

    Newsletter

    In your Administrator Page, please go to Appearance > Widgets and select the menu to configure its structure.

    The Backend Settings: Please click Here to view
    Copy and paste the Code into editor:

    <div class="newsletters">
               <div class="des">
                          At vero eos et accusamus et iusto odio 
    dignissimos ducimus qui blanditiis 
               </div>
                [mc4wp_form]
    </div>


    Follow Us

    In your Administrator Page, please go to Appearance > Widgets and select the menu to configure its structure.

    The Backend Settings: Please click Here to view
    Copy and paste the Code into editor:

    <div class="shop-social">
                         <ul>
                                  <li><a href="https://www.facebook.com/flytheme"><i class="fa fa-facebook"></i></a></li>
    
                                  <li><a href="https://twitter.com/Flytheme"><i class="fa fa-twitter"></i></a></li>       
    
                                  <li><a href="https://plus.google.com/u/0/b/102399087761949580069/102399087761949580069/posts"><i class="fa fa-google-plus"></i></a></li>
    
                                   <li><a href="https://www.linkedin.com/in/flytheme"><i class="fa fa-linkedin"></i></a></li>
    
                                   <li><a href="#"><i class="fa fa-tumblr"></i></a></li>
    
                                   <li><a href="https://www.pinterest.com/flytheme/"><i class="fa fa-pinterest-p"></i></a></li>
    
                         </ul>
              </div>


    Our Contact

    In your Administrator Page, please go to Appearance > Widgets and select the menu to configure its structure.

    The Backend Settings: Please click Here to view
    Copy and paste the Code into editor:

    <div class="contact-footer">
               <ul>
                         <li><i class="fa fa-home"></i><span>Ranelagh Place, Liverpool, <br/>
    L3 5UL, England</span></li>
                         <li><i class="fa fa-phone"></i>8 (495) 989—20—11</li>
                         <li><i class="fa fa-envelope"></i><a href="#">hurama@co.uk.com</a></li>
               </ul>
    </div>
     

    In your Administrator Page, please go to Appearance > Widgets and select the menu to configure its structure.

    The Backend Settings: Please click Here to view
    Copy & Paste the code into your editor:

    [logo_footer]
    <div class="logo-footer">
               <div class="des">Sed ut perspiciatis unde omnis iste natus error sit voluptatem accusantium dolor-emque...<a href="http://dev.ytcvn.com/ytc_templates/wordpress/sw_hurama/?page_id=7515">Read More</a></div>
    </div>


    Customer Services

    In your Administrator Page, please go to Appearance > Widgets and select the menu to configure its structure.

    The Backend Settings: Please click Here to view

    Other pages

    In your Administrator Page, please go to Appearance > Widgets and select the menu to configure its structure.

    The Backend Settings: Please click Here to view

    Information

    In your Administrator Page, please go to Appearance > Widgets and select the menu to configure its structure.

    The Backend Settings: Please click Here to view

    My Account

    In your Administrator Page, please go to Appearance > Widgets and select the menu to configure its structure.

    The Backend Settings: Please click Here to view

    8SUPPORT

    • SUPPORT – If you have any questions that are beyond the scope of this help file, please feel free to send us via: Support Tickets System
    • FAQs – Go to Here to view more the Frequently Asked Questions.

    SM ATStore

    $
    0
    0

    Firstly, a huge thanks for purchasing this theme, your support is truly appreciated!

    This document covers the installation and use of this theme, reveals some answers to common problems and issues. We encourage you to read this document throughtly if you are experiencing any difficulties. If you have any questions that are beyond the scope of document, please feel free to contact us via our Support Tickets System.

    1 SYSTEM REQUIREMENT

    At the basic level, this theme will require the following conditions:

      • Compatible with Magento Community Edition 1.7.x; 1.8.x and 1.9.x ( latest version 1.9.2.2 ) (require: php 5.4 and Memory_limit no less than 256Mb)

    2INSTALLATION

    There are two ways to install a Magento Theme:

    • Quickstart Installation: By using this package, you will set the theme exactly like our Demo with sample data.
    • Manual Installation (including Theme Installation).

    2.1 Quickstart Installation:

    Magentech provides SM Quickstart package for each theme which aims to ease the installation for users. If you plan to start your site from the beginning, It will help you save much time of installing and configuring.

    Please follow steps below:

    • Step 1: Download the quickstart package
    • Step 2: Extract and Upload the whole Quickstart package to your server. In Quickstart folder you will see the extracted folder that include all sample data
    • Step 3: Create a Database for your Magento site
    • Note: You need to remember the database name to use in the next steps

    • Step 4: Start installation by opening browser and navigate to your URL (where the Quickstart uploaded) to load default Magento installer. Please follow each step of the Installer so that the installation process can be set.

    • Step 5: Locale Settings. Please fill fully into Required Fields (“Locale; Time Zone and Default Currency”.)

    • Step 6: In the Configuration step, input the required fields as below.
      • Database Name : sm-atstore-quickstart( It must be the exact name of database you have just created)
      • User name : root
      • User password : no need to fill
      • Do not use "localhost" in the URL path, otherwise you could not log in to your Admin area (you should use your local IP when setting up your website hosted entirely on your own computer).

    • Step 7: Create Admin Account. Please fill out Required Fields (“First Name; Last Name; Email; Username; password and confirm password” completely.)

    • Step 8: Finish Installation and now you you can click Go to Frontend to open Homepage or click Go to Backend to open Admin Panel.

    2.2 Manual Installation

      • Step 1: Please unzip “sm_fcstore_theme.zip” file and upload folders skin; media;lib;js;app from the theme package to the root of your Magento site folder on your server.

        Note: You could change the name of this folder. However, if you want your website run correctly, it need to have the same name as the database you choose.

      • Step 2: Log in to your Admin Panel (e.g. http://yourdomain/index.php/admin/)

        Note: If you are using the Admin Panel when copying folders in step 1, you need to log out and log in back.

      • Step 3: Disable Cache: Go to System >> Cache Management, click ‘Sellect All’ button, then choose ‘Disable’ and click ‘Submit’ button to complete the action.
      • Step 4: Navigate to System >> Configuration >> Design.
    • Step 5: In Package tab of Design Section, input the parameter Current Package Name with the actual theme name.

    • Step 6: You can also change the settings for Header.

    • Step 7: You can also change the settings for Footer.

    Note: After configuring in each steps( for example: Step 4, Step 5, Step6, Step 7), you need to click “Save Config” button to save your changes

    2.3 Theme Setting

    Configure SM ATStore General Setting Theme In Magento admin panel, navigate to SM ATStore Setting and configure theme as you want.

      • Configure General with Theme color, Font size, color for the link, hover buttons, page, text, title, background … for any store.

        Note:
        Copy and paste the following Elements into “Google Font Elements”:

        .title-footer , .title-subscribe , .block-subscribe-footer , .latest-post-home .item , .content-policy ,  .item .item-inner, .sorter .amount , .filter-wrapp dt , .category-title-top , .g2font , .sm_megamenu_title , .title-menu-home, ul.ltabs-tabs, .custom-item , .sm_megamenu_wrapper_vertical_menu, .item-info-slider, .sm-deal , .sm-gallery3d, .filter-shopby

      • Configure Theme Layout with Layout style, Header style& Homepage style ( depend on Default pages on Web tab) to configure
      • Configure the Product Listing with Layout 1 Column, Layout 2 Columns, Product Shows Effect On Hover, etc.
      • Configure the Product Detail To zoom image of product, adjust Zoom Mode, Custom tab, and content, etc.
      • Configure the Product Detail To zoom image of product, adjust Zoom Mode, Custom tab, and content, etc..

        Note:You also show your brands’ information like the following image in the frontend.


        Copy and paste the following code chain into “Custom Tab Content”:
         

        <table class="data-table" style="width: 100%;" border="1">
        		<tbody>
        		<tr>
        		<td>Brand</td>
        		<td><img title="brand" alt="brand" src="{{media url="wysiwyg/custom-tab/logo-client.jpg"}}" /></td>
        		</tr>
        		<tr>
        		<td>History</td>
        		lt;td>Color sit amet, consectetur adipiscing elit. In gravida pellentesque ligula, vel eleifend turpis blandit vel. Nam quis lorem ut mi mattis ullamcorper ac quis dui. Vestibulum et scelerisque ante, eu sodales mi. Nunc tincidunt tempus varius. Integer ante dolor, suscipit non faucibus a, scelerisque vitae sapien.</td>
        		</tr>
        		</tbody>
        		</table>

      • Configure Rich Snippets
      • Configure Socials : To connect with social networks such as Facebook, Twitter, Google Plus, Linkedin
      • Configure Advanced : To show popup, Cpanel, use “Add to cart, Add to wishlist, Add to Compare
      • Configure Theme Installation

    Note: Click the Import Static Blocks and CMS Pages to import all static blocks and CMS pages provided with this theme. The following notification will appear to announce that you have just imported static blocks or pages successfully.

    After importing, you need to go to CMS >> Static Block ( or Pages) to configure and select Store View for each block or page.

    2.4 Blog

    Configure Blog

    We are using Aheadworks Blog free extension from Aheadworks, so that it is not including in the quickstart package. You can download free version of Aheadworks Blog Here and follow Its Guide to install. After installing this extension, please go to the admin of blog, navigate to Blog >> Settings to configure it like our configuration and your desire.


    3CONFIGURATION
    Set Default Page
    • To set a default page for your Magento Site, in the Admin Panel you go to System>>Configuration>>Web>>Default Pages. Please click to see the Backend Settings.
    • You need to change to the website / store view that you want to change (the dropdown menu in the upper left corner). You will probably have to create a new CMS page if you want to have something different from your default home page.

    3.1 Page Configuration

    3.1.1 Home Style 1

    Frontend of Home Style 1 – Layout Position

    In the Admin Panel, please navigate to CMS >> Pages to create a new page in Page Management section. Here is the list of steps in this style’s configuration process:

    • Page Information Tab: Please click to see the Backend Settings.
    • Content Tab: Please click to see the Backend Settings.
    • Copy and paste the following code into the Content field::

    <p style="display:none"></p>

  • Design Tab: Please click to see the Backend Settings.
  • Copy and paste the following code into the Design field::

    <reference name="full_top">
    <block type="imageslider/list" name="imageslider.list.default" template="sm/imageslider/default-home1.phtml"/>
    <block type="atstore/wrapper" name="section.no">
            <action method="setParams"> <params>class="wrapper-contenttop1"</params> </action>	
    		<action method="setContainer"> <container>1</container> </action>
    	    <block type="cms/block" name="static-image-1">
    			<action method="setBlockId"><block_id>static-image-1</block_id></action>
    		</block>
    		<block type="gallery3d/list" name="gallery3d" template="sm/gallery3d/default.phtml"/>
    </block>
    <block type="atstore/wrapper" name="section.no.01">
            <action method="setParams"> <params>class="wrapper-contenttop2"</params> </action>	
    		<action method="setContainer"> <container>1</container> </action>
    		 <block type="cms/block" name="recommend_product">
    			<action method="setBlockId"><block_id>recommend_product</block_id></action>
    		</block>
    </block>		
    </reference>
    <reference name="content">
    		<block type="listingtabs/list" name="listingtabs.list.default" template="sm/listingtabs/default-home1.phtml">    
                <action method="_setConfig">      
                    <values>             
                        <product_limitation>8</product_limitation>                
                        <listingtabs_title_text>New accessories</listingtabs_title_text>			
                        <pretext>We provide all parts of your car</pretext>  
    					<show_loadmore_slider>loadmore</show_loadmore_slider>
                        <filter_type>categories</filter_type>   
    					 <row_count>2</row_count>				
                        <product_category>227,228,229,230,233</product_category>
    					<product_order_by>lastest_product</product_order_by>				
                        <product_description_display>0</product_description_display>				
                        <imgcfg_width>190</imgcfg_width>			
                        <imgcfg_height>190</imgcfg_height>  
    					<product_reviews_count>0</product_reviews_count>
                        <nbi_column1>4</nbi_column1>              
                        <nbi_column2>2</nbi_column2>                   
                    </values> 
                </action>   
            </block>
    </reference>
    <reference name="full_bottom">
    <block type="atstore/wrapper" name="section.no.03">
    	  <block type="cms/block" name="block_videohome">
    			<action method="setBlockId"><block_id>block_videohome</block_id></action>
    	 </block>
     </block>
    <block type="atstore/wrapper" name="section.no.04">	
    	  <block type="cms/block" name="policy_shop">
    			<action method="setBlockId"><block_id>policy_shop</block_id></action>
    	 </block>
     </block> 
     <block type="atstore/wrapper" name="section.no.05">
    	  <block type="cms/block" name="about_shop">
    			<action method="setBlockId"><block_id>about_shop</block_id></action>
    	 </block>
     </block> 
      <block type="atstore/wrapper" name="section.no.06">
    	  <block type="cms/block" name="service_shop">
    			<action method="setBlockId"><block_id>service_shop</block_id></action>
    	 </block>
     </block>
    <block type="atstore/wrapper" name="section.no.07">
          <action method="setParams"> <params>class="wrapper-home-bt wrapper-contentbottom5"</params> </action>	
    	  <action method="setContainer"> <container>1</container> </action>   
    	<block type="blog/blog" name="latest_post" template="aw_blog/latest-post.phtml"/>
     </block>
    </reference>

    3.1.2 Home Style 2

    Frontend of Home Style 2 – Layout Position

    In the Admin Panel, please navigate to CMS >> Pages to create a new page in Page Management section. Here is the list of steps in this style’s configuration process:

    • Page Information Tab: Please click to see the Backend Settings.
    • Content Tab: Please click to see the Backend Settings.
    • Copy and paste the following code into the Content field::

    <p style="display:none"> </p>

  • Design Tab: Please click to see the Backend Settings.
  • Copy and paste the following code into the Design field::

    <reference name="full_top">
    <block type="atstore/wrapper" name="section.no">
    	<block type="imageslider/list" name="imageslider.list.default" template="sm/imageslider/default.phtml"/>
    </block>
    <block type="atstore/wrapper" name="section.no.01">
    	     <action method="setParams"> <params>class="wrapper-fulltop-conent"</params> </action>	
    	    <action method="setContainer"> <container>1</container></action>
    		<block type="cms/block" name="static-image-2">
    			<action method="setBlockId"><block_id>static-image-2</block_id></action>
    		</block>
    <block type="listingtabs/list" name="listingtabs.list.default1" template="sm/listingtabs/default.phtml">    
                <action method="_setConfig">      
                    <values>             
                        <product_limitation>8</product_limitation>                
                        <listingtabs_title_text>Featured Products</listingtabs_title_text>			
                        <pretext>Special products for you</pretext>         
                        <filter_type>categories</filter_type>               
                        <product_category>227,228,229,230</product_category>
    					<product_order_by>lastest_product</product_order_by>				
                        <product_description_display>0</product_description_display>				
                        <imgcfg_width>270</imgcfg_width>			
                        <imgcfg_height>270</imgcfg_height> 
    					<product_reviews_count>0</product_reviews_count>
                        <nbi_column1>4</nbi_column1>              
                        <nbi_column2>3</nbi_column2>   
    <nbi_column3>2</nbi_column3>  					
                        <nav>1</nav>           
                        <loop>0</loop>       
                    </values> 
                </action>   
            </block>
    </block>
    <block type="atstore/wrapper" name="section.no.02">
    	 <action method="setParams"> <params>class="wrapper-fullbottom-conent"</params> </action>	
    	 <block type="custom/list" name="custom.list.default" template="sm/custom/default.phtml"/>
    </block>		 
    </reference>
    <reference name="content">
    		<block type="listingtabs/list" name="listingtabs.list.default2" template="sm/listingtabs/default.phtml">    
                <action method="_setConfig">      
                    <values>             
                        <product_limitation>8</product_limitation>                
                        <listingtabs_title_text>Best sellers</listingtabs_title_text>			
                        <pretext>Special products for you</pretext>         
                        <filter_type>categories</filter_type>               
                        <product_category>206,207,208,234</product_category>
    					<product_order_by>best_sales</product_order_by>				
                        <product_description_display>0</product_description_display>				
                        <imgcfg_width>270</imgcfg_width>			
                        <imgcfg_height>270</imgcfg_height>  
    					<product_reviews_count>0</product_reviews_count>
                        <nbi_column1>4</nbi_column1>              
                        <nbi_column2>3</nbi_column2>  
    					<nbi_column3>2</nbi_column3>  					
                        <nav>1</nav>           
                        <loop>0</loop>       
                    </values> 
                </action>   
            </block>
    		<block type="cms/block" name="block_testimonial">
    			<action method="setBlockId"><block_id>block_testimonial</block_id></action>
    		</block>
                  <block type="cms/block" name="block_servicehome2">
    			<action method="setBlockId"><block_id>block_servicehome2</block_id></action>
    		</block>
    </reference>
    <reference name="full_bottom">
    <block type="atstore/wrapper" name="section.no.07">
          <action method="setParams"> <params>class="wrapper-home-bt wrapper-contentbottom5"</params> </action>	
    	  <action method="setContainer"> <container>1</container> </action>   
    	<block type="blog/blog" name="latest_post" template="aw_blog/latest-post.phtml"/>
     </block>
    </reference>

    3.1.3 Home Style 3

    Frontend of Home Style 3 – Layout Position

    In the Admin Panel, please navigate to CMS >> Pages to create a new page in Page Management section. Here is the list of steps in this style’s configuration process:

    • Page Information Tab: Please click to see the Backend Settings.
    • Content Tab: Please click to see the Backend Settings.
    • Copy and paste the following code into the Content field::

    <p style="display:none"></p>

  • Design Tab: Please click to see the Backend Settings.
  • Copy and paste the following code into the Design field::

    <reference name="content">
    <block type="atstore/wrapper" name="section.no.01">
    	    <action method="setParams"> <params>class="wrapper-fulltop-conent"</params> </action>	
    		<action method="setRow"><row>1</row></action>
    		<block type="atstore/wrapper" name="section.no1.1">
    			<action method="setParams"><params>class="col-md-3 hidden-xs hidden-sm"</params></action>	
    			<block type="megamenu/list" name="megamenu.list.theme1" as="megaMenu" template="sm/megamenu/megamenu-vertical.phtml">
    			    <action method="setConfig">
    				<values>
    					 <title>Category</title>
    					 <group_id>5</group_id>
    					 <theme>2</theme>
    				 </values>
    			 </action>
    			 </block>
    		</block>
    		<block type="atstore/wrapper" name="section.no1.2">
    			<action method="setParams"><params>class="col-md-9"</params></action>
    			<block type="imageslider/list" name="imageslider.list.default" template="sm/imageslider/default.phtml"/>
    		</block>			
    </block>
    	    <block type="cms/block" name="static-image-1">
    			<action method="setBlockId"><block_id>static-image-1</block_id></action>
    		</block>
    		<block type="listingtabs/list" name="listingtabs.list.default2" template="sm/listingtabs/default.phtml">    
                <action method="_setConfig">      
                    <values>             
                        <product_limitation>8</product_limitation>                
                        <listingtabs_title_text>Best sellers</listingtabs_title_text>			
                        <pretext></pretext>         
                        <filter_type>categories</filter_type>               
                        <product_category>206,207,208,234</product_category>
    					<product_order_by>best_sales</product_order_by>				
                        <product_description_display>0</product_description_display>				
                        <imgcfg_width>270</imgcfg_width>			
                        <imgcfg_height>270</imgcfg_height>                
                        <nbi_column1>4</nbi_column1>              
                        <nbi_column2>3</nbi_column2>  
    <nbi_column3>2</nbi_column3>  					
                        <nav>1</nav>           
                        <loop>0</loop>       
                    </values> 
                </action>   
            </block>
            <block type="cms/block" name="policy_shop_2">
    			<action method="setBlockId"><block_id>policy_shop_2</block_id></action>
    		</block>
    		<block type="listingtabs/list" name="listingtabs.list.default1" template="sm/listingtabs/default.phtml">    
                <action method="_setConfig">      
                    <values>             
                        <product_limitation>8</product_limitation>                
                        <listingtabs_title_text>Featured Products</listingtabs_title_text>			
                        <pretext></pretext>         
                        <filter_type>categories</filter_type>               
                        <product_category>227,228,229,230</product_category>
    					<product_order_by>lastest_product</product_order_by>				
                        <product_description_display>0</product_description_display>				
                        <imgcfg_width>270</imgcfg_width>			
                        <imgcfg_height>270</imgcfg_height>                
                        <nbi_column1>4</nbi_column1>              
                        <nbi_column2>3</nbi_column2> 
    <nbi_column3>2</nbi_column3>  					
                        <nav>1</nav>           
                        <loop>0</loop>       
                    </values> 
                </action>   
            </block>
    </reference>
    <reference name="full_bottom">
    <block type="atstore/wrapper" name="section.no.07">
          <action method="setParams"> <params>class="wrapper-home-bt wrapper-contentbottom5"</params> </action>	
    	  <action method="setContainer"> <container>1</container> </action>   
    	<block type="blog/blog" name="latest_post" template="aw_blog/latest-post.phtml"/>
     </block>
    </reference>

    3.1.4 Home Style 4

    Frontend of Home Style 4 – Layout Position

    In the Admin Panel, please navigate to CMS >> Pages to create a new page in Page Management section. Here is the list of steps in this style’s configuration process:

    • Page Information Tab: Please click to see the Backend Settings.
    • Content Tab: Please click to see the Backend Settings.
    • Copy and paste the following code into the Content field::

    <p style="display:none"> </p>

  • Design Tab: Please click to see the Backend Settings.
  • Copy and paste the following code into the Design field::

    <reference name="content">
    <block type="atstore/wrapper" name="section.no.01">
    	    <action method="setParams"> <params>class="wrapper-fulltop-conent"</params> </action>	
    		<action method="setRow"><row>1</row></action>
    		<block type="atstore/wrapper" name="section.no1.1">
    			<action method="setParams"><params>class="col-md-9"</params></action>
    			<block type="imageslider/list" name="imageslider.list.default" template="sm/imageslider/default.phtml"/>
    		</block>
    		<block type="atstore/wrapper" name="section.no1.2">
    			<action method="setParams"><params>class="col-md-3"</params></action>	
    			<block type="cms/block" name="static-image-4">
    				<action method="setBlockId"><block_id>static-image-4</block_id></action>
    			</block>
    		</block>			
    </block>	
    <block type="cms/block" name="policy_shop_4">
    	<action method="setBlockId"><block_id>policy_shop_4</block_id></action>
    </block>
    <block type="atstore/wrapper" name="section.no.02">
    	    <action method="setParams"> <params>class="wrapper-producttabs-deals"</params> </action>	
    		<action method="setRow"><row>1</row></action>
    		<block type="atstore/wrapper" name="section.no2.1">
    			<action method="setParams"><params>class="col-md-9 col-sm-8"</params></action>
    			<block type="listingtabs/list" name="listingtabs.list.default2" template="sm/listingtabs/default.phtml">    
                <action method="_setConfig">      
                    <values>             
                        <product_limitation>8</product_limitation>                
                        <listingtabs_title_text>New Products</listingtabs_title_text>			
                        <pretext></pretext>         
                        <filter_type>categories</filter_type>               
                        <product_category>206,207,208,234</product_category>
    					<product_order_by>created_at</product_order_by>				
                        <product_description_display>0</product_description_display>				
                        <imgcfg_width>270</imgcfg_width>			
                        <imgcfg_height>270</imgcfg_height>                
                        <nbi_column1>3</nbi_column1>              
                        <nbi_column2>2</nbi_column2>             
                        <nav>1</nav>           
                        <loop>0</loop>       
                    </values> 
                </action>   
            </block>
    		</block>
    		<block type="atstore/wrapper" name="section.no2.2">
    			<action method="setParams"><params>class="col-md-3 col-sm-4"</params></action>	
    			<block type="deal/list" name="deal.list.default" template="sm/deal/default.phtml"/>
    		</block>			
    </block>
     <block type="cms/block" name="static-image-41">
    	<action method="setBlockId"><block_id>static-image-41</block_id></action>
    </block>
    <block type="basicproducts/list" name="basicproducts.list.customleft" template="sm/basicproducts/basic-product-home.phtml">
                    <action method="_setConfig">
                        <values>
                            <product_limitation>3</product_limitation>
                            <basicproducts_title_text>Steering wheels</basicproducts_title_text>
    						<pretext>Sed ut perspiciatis unde omnis iste natus error sit voluptatem accusantium doloremque laudantium, totam rem </pretext>
                            <posttext><![CDATA[<a href="#">Shop Now</a>]]> </posttext>
    						 <img_bg><![CDATA[<img src='media/wysiwyg/home-page-image/img5.jpg' alt='' />]]> </img_bg>
    					   <product_title_maxlength>80</product_title_maxlength>
    						<product_category>227</product_category>
                            <nb_column1>3</nb_column1>
                            <imgcfg_width>270</imgcfg_width>
                            <imgcfg_height>270</imgcfg_height>
                            <product_title_display>1</product_title_display>
                            <product_price_display>1</product_price_display>
                            <product_reviews_count>1</product_reviews_count>
                            <product_addcart_display>1</product_addcart_display>
                            <product_addwishlist_display>1</product_addwishlist_display>
                            <product_addcompare_display>1</product_addcompare_display>
                            <product_readmore_display>0</product_readmore_display>
                            <product_description_display>0</product_description_display>
                        </values>
                    </action>  
     </block>
     <block type="atstore/wrapper" name="section.no.03">
    	  <action method="setParams"> <params>class="wrapper-productbasic-bottom"</params> </action>
      <block type="basicproducts/list" name="basicproducts.list.customleft2" template="sm/basicproducts/basic-product-home.phtml">
                    <action method="_setConfig">
                        <values>
                            <product_limitation>3</product_limitation>
                            <basicproducts_title_text>Car Tires</basicproducts_title_text>
    						<pretext>Sed ut perspiciatis unde omnis iste natus error sit voluptatem accusantium doloremque laudantium, totam rem </pretext>
                            <posttext><![CDATA[<a href="#">Shop Now</a>]]> </posttext>
    						 <img_bg><![CDATA[<img src='media/wysiwyg/home-page-image/img5.jpg' alt='' />]]> </img_bg>
    					   <product_title_maxlength>80</product_title_maxlength>
    						<product_category>228</product_category>
                            <nb_column1>3</nb_column1>
                            <imgcfg_width>270</imgcfg_width>
                            <imgcfg_height>270</imgcfg_height>
                            <product_title_display>1</product_title_display>
                            <product_price_display>1</product_price_display>
                            <product_reviews_count>1</product_reviews_count>
                            <product_addcart_display>1</product_addcart_display>
                            <product_addwishlist_display>1</product_addwishlist_display>
                            <product_addcompare_display>1</product_addcompare_display>
                            <product_readmore_display>0</product_readmore_display>
                            <product_description_display>0</product_description_display>
                        </values>
                    </action>  
     </block>
      </block>
    <block type="cms/block" name="block_testimonial_4">
    	<action method="setBlockId"><block_id>block_testimonial_4</block_id></action>
    </block>
     <block type="blog/blog" name="latest_post" template="aw_blog/latest-post.phtml"/>
    </reference>

    3.1.5 Home Style 5

    Frontend of Home Style 5 – Layout Position

    In the Admin Panel, please navigate to CMS >> Pages to create a new page in Page Management section. Here is the list of steps in this style’s configuration process:

    • Page Information Tab: Please click to see the Backend Settings.
    • Content Tab: Please click to see the Backend Settings.
    • Copy and paste the following code into the Content field::

    <p style="display:none"> </p>

  • Design Tab: Please click to see the Backend Settings.
  • Copy and paste the following code into the Design field::

    <reference name="full_top">
    <block type="atstore/wrapper" name="section.no">
      <action method="setParams"> <params>class="slider-images"</params> </action>
    	<block type="imageslider/list" name="imageslider.list.default" template="sm/imageslider/default.phtml"/>
    <block type="atstore/wrapper" name="section.no.01">
      <action method="setParams"> <params>class="container"</params> </action>
    	<block type="cms/block" name="static-image-41">
    		<action method="setBlockId"><block_id>static-image-51</block_id></action>
    	</block>
    </block>
    </block>
    </reference>
    <reference name="content">
    <block type="atstore/wrapper" name="section.no.01">
    	    <action method="setParams"> <params>class="wrapper-fulltop-conent"</params> </action>	
    		<block type="atstore/wrapper" name="section.no1.1">
    			<action method="setParams"><params>class="col-md-3"</params></action>	
    			<block type="megamenu/list" name="megamenu.list.theme1" as="megaMenu" template="sm/megamenu/megamenu-vertical.phtml">
    			    <action method="setConfig">
    				<values>
    					 <title>Category</title>
    					 <group_id>5</group_id>
    					 <theme>2</theme>
    				 </values>
    			 </action>
    			 </block>
    		</block>
    		<block type="atstore/wrapper" name="section.no1.2">
    			<action method="setParams"><params>class="col-md-9"</params></action>
    			<block type="listingtabs/list" name="listingtabs.list.default1" template="sm/listingtabs/default.phtml">    
                <action method="_setConfig">      
                    <values>             
                        <product_limitation>8</product_limitation>                
                        <listingtabs_title_text>Featured Products</listingtabs_title_text>			       
                        <filter_type>categories</filter_type>               
                        <product_category>227,228,229,230</product_category>
    					<product_order_by>lastest_product</product_order_by>				
                        <product_description_display>0</product_description_display>				
                        <imgcfg_width>270</imgcfg_width>			
                        <imgcfg_height>270</imgcfg_height> 
                        <nbi_column1>3</nbi_column1>              
                        <nbi_column2>3</nbi_column2>  
    					 <nbi_column3>2</nbi_column3>  	
                        <nav>1</nav>           
                        <loop>0</loop>       
                    </values> 
                </action>   
    </block>
    		</block>			
    </block>
    <block type="cms/block" name="static-image-41">
    	<action method="setBlockId"><block_id>static-image-41</block_id></action>
    </block>
    <block type="listingtabs/list" name="listingtabs.list.default1" template="sm/listingtabs/default.phtml">    
                <action method="_setConfig">      
                    <values>             
                        <product_limitation>8</product_limitation>                
                        <listingtabs_title_text>Featured Products</listingtabs_title_text>			
                        <pretext>Special products for you</pretext>         
                        <filter_type>categories</filter_type>               
                        <product_category>227,228,229,230</product_category>
    					<product_order_by>lastest_product</product_order_by>				
                        <product_description_display>0</product_description_display>				
                        <imgcfg_width>270</imgcfg_width>			
                        <imgcfg_height>270</imgcfg_height> 
    					<product_reviews_count>0</product_reviews_count>
                        <nbi_column1>4</nbi_column1>              
                        <nbi_column2>3</nbi_column2>             
                        <nav>1</nav>           
                        <loop>0</loop>       
                    </values> 
                </action>   
    </block>
    
     
    <block type="cms/block" name="block_testimonial_4">
    	<action method="setBlockId"><block_id>block_testimonial_4</block_id></action>
    </block>
     <block type="blog/blog" name="latest_post" template="aw_blog/latest-post.phtml"/>
    </reference>

    3.2 Configure Megamenu

    • Step 3: In order to add menu items, go to SM Megamenu >> Menu Items Manager to add items as you want.

    Note: In the next steps, when editing items in the menus, the items (in a menu) having same level could have same configuration. Therefore, we encourage you read throughtly and find out the item’s level to configure it without any errors.

    3.2.1 Horizontal Megamenu:

    Horizontal-mega-menu

    • Horizontal Megamenu List Please click Here to view.
    • Horizontal Megamenu’s Backend Please click Here to view.

    Home
    Frontend Appearance

    • Backend Settings: Please click Here to view.

    Features

    • Frontend Appearance
    • Backend Settings: Please click Here to view.
    • Backend of ‘Dropdown Features’: Please click Here to view.
    • Copy and paste the following code into the content:

    <div class="home-menu-dropdown">
    	<ul class="item-home-store layout-home">
    		<li class="title-menu-home">Layouts</li>
    		<li><a title="Home Style 1" href="{{store url="?___store=default&___from_store=french"}}">Home Style 1</a></li>
    		<li><a title="Home Style 2" href="{{store url="?___store=french&___from_store=default"}}">Home Style 2</a></li>
    		<li><a title="Home Style 3" href="{{store url="?___store=german&___from_store=default"}}">Home Style 3</a></li>
    		<li><a title="Home Style 4" href="{{store url="?___store=argentina&___from_store=default"}}">Home Style 4</a></li>
    		<li><a title="Home Style 5" href="{{store url="?___store=bolivia&___from_store=default"}}">Home Style 5</a></li>
    		<li><a title="Boxed Layout" href="{{store url="?___store=somaliland&___from_store=default"}}">Boxed Layout</a></li>
    	</ul>
    	
    	<ul class="item-home-store theme-color">
    		<li class="title-menu-home">Color Styles</li>
    		<li class="yellow"><a title="Yellow" href="{{store url="?___store=default&___from_store=french"}}">Yellow</a></li>
    		<li class="green"><a title="Green" href="{{store url="?___store=andorra&___from_store=default"}}">Green</a></li>
    		<li class="orange"><a title="Orange" href="{{store url="?___store=belgium&___from_store=default"}}">Orange</a></li>
    		<li class="pink"><a title="Pink" href="{{store url="?___store=benin&___from_store=default"}}">Pink</a></li>
    		<li class="blue"><a title="Blue" href="{{store url="?___store=barbados&___from_store=default"}}">Blue</a></li>
    		<li class="brown"><a title="Brown" href="{{store url="?___store=korean&___from_store=default"}}">Brown</a></li>
    	</ul>
    	
    	<ul class="item-home-store header-home">
    		<li class="title-menu-home">Headers</li>
    		<li><a title="Home Style 1" href="{{store url="?___store=default&___from_store=french"}}">Home Style 1</a></li>
    		<li><a title="Home Style 2" href="{{store url="?___store=french&___from_store=default"}}">Home Style 2</a></li>
    		<li><a title="Home Style 3" href="{{store url="?___store=german&___from_store=default"}}">Home Style 3</a></li>
    		<li><a title="Home Style 4" href="{{store url="?___store=argentina&___from_store=default"}}">Home Style 4</a></li>
    		<li><a title="Home Style 5" href="{{store url="?___store=bolivia&___from_store=default"}}">Home Style 5</a></li>
    		<li><a title="Megamenu" href="{{store url="?___store=default&___from_store=french"}}">Megamenu</a></li>
    		<li><a title="Css Menu" href="{{store url="?___store=barbados&___from_store=default"}}">Css Menu</a></li>
    	</ul>
    	
    	<ul class="item-home-store detail-home">
    		<li class="title-menu-home">Detail Layouts</li>
    		<li><a title="Product Detail - Full" href="{{store url="shop/amire-tracemis.html?detail_style=1"}}">Product Detail - Full</a></li>
    		<li><a title="Product Detail - Left Sidebar" href="{{store url="shop/amire-tracemis.html?detail_style=2&thumbstyle=1"}}">Product Detail - Left Sidebar</a></li>
    		<li><a title="Product Detail - Right Sidebar" href="{{store url="shop/amire-tracemis.html?detail_style=3&thumbstyle=1"}}">Product Detail - Right Sidebar</a></li>
    		<li><a title="Thumbnail  - Horizontal" href="{{store url="shop/amire-tracemis.html?thumbstyle=1"}}">Thumbnail  - Horizontal</a></li>
    		<li><a title="Thumbnail - Vertical" href="{{store url="shop/amire-tracemis.html?thumbstyle=2"}}">Thumbnail - Vertical</a></li>
    	</ul>
    	
    	<ul class="item-home-store detail-home">
    		<li class="title-menu-home">Zoom Types</li>
    		<li><a title="Product Page Inner Zoom" href="{{store url="shop/amire-tracemis.html?___store=default&___from_store=argentina"}}">Product Page Inner Zoom</a></li>
    		<li><a title="Product Page Outer Zoom" href="{{store url="shop/amire-tracemis.html?___store=andorra&___from_store=default"}}">Product Page Outer Zoom</a></li>
    		<li><a title="Product Page Lens Zoom" href="{{store url="shop/amire-tracemis.html?___store=bolivia&___from_store=default"}}">Product Page Lens Zoom</a></li>
    	</ul>
    	
    	<div style="clear:both;"> </div>
    	
    	<ul class="item-home-store layout-home">
    		<li class="title-menu-home">Listing Layouts</li>
    		<li><a title="Without Sidebar" href="{{store url="sidebar-types/without-sidebar.html?___store=default&___from_store=french&mode=grid"}}">Without Sidebar</a></li>
    		
    		<li><a title="Left Sidebar" href="{{store url="sidebar-types/left-sidebar.html?___store=default&___from_store=french&mode=grid"}}">Left Sidebar</a></li>
    		
    		<li><a title="Right Sidebar" href="{{store url="sidebar-types/right-sidebar.html?___store=default&___from_store=french&mode=grid"}}">Right Sidebar</a></li>
    	</ul>
    	
    	<ul class="item-home-store layout-home">
    		<li class="title-menu-home">About Us Layouts</li>
    		<li><a title="About Us Style 1" href="{{store url="about-us.html/?___store=default&___from_store=argentina"}}">About Us Style 1</a></li>
    		<li><a title="About Us Style 2" href="{{store url="about-us.html/?___store=french&___from_store=default"}}">About Us Style 2</a></li>
    		<li><a title="About Us Style 3" href="{{store url="about-us.html/?___store=german&___from_store=default"}}">About Us Style 3</a></li>
    		<li><a title="About Us Style 4" href="{{store url="about-us.html/?___store=argentina&___from_store=default"}}">About Us Style 4</a></li>
    	</ul>
    	
    	<ul class="item-home-store layout-home">
    		<li class="title-menu-home">Contact Us Layouts</li>
    		<li><a title="Contact Us Style 1" href="{{store url="contact-us.html/?___store=default&___from_store=argentina"}}">Contact Us Style 1</a></li>
    		<li><a title="Contact Us Style 2" href="{{store url="contact-us.html/?___store=french&___from_store=default"}}">Contact Us Style 2</a></li>
    		<li><a title="Contact Us Style 3" href="{{store url="contact-us.html/?___store=german&___from_store=default"}}">Contact Us Style 3</a></li>
    		<li><a title="Contact Us Style 4" href="{{store url="contact-us.html/?___store=argentina&___from_store=default"}}">Contact Us Style 4</a></li>
    	</ul>
    	
    	<ul class="item-home-store layout-home">
    		<li class="title-menu-home">404 Page Layout</li>
    		<li><a title="404 Page Style 1" href="{{store url="404page"}}">404 Page Style 1</a></li>
    	</ul>
    	
    	<ul class="item-home-store detail-home">
    		<li class="title-menu-home">Effect Hover Product</li>
    		<li><a title="Simple" href="{{store url="shop.html?___store=default&___from_store=french"}}">Simple</a></li>
    		<li><a title="Display Second Image" href="{{store url="shop.html?___store=benin&___from_store=default"}}">Display Second Image</a></li>
    		<li><a title="Display Slider Image" href="{{store url="shop.html?___store=barbados&___from_store=default"}}">Display Slider Image</a></li>
    	</ul>
    </div>

    Shop

    • Frontend Appearance
    • Backend Settings: Please click Here to view.
    • Backend of ‘Banner’: Please click Here to view.
    • Copy and paste the following code into the content:

    <div class="static-image-megamenu">
    <a class="banner-img" title="Static Image" href="#"><img src="{{media url="wysiwyg/image-megamenu/image-1.jpg"}}" alt="Static Image" /></a>
    </div>

    • Backend of ‘Categories’: Please click Here to view.
    • Backend of ‘Men Collection’ in the ‘Categories’: Please click Here to view.

    Note: The following items having same menu level (Level 3) as item ‘Men Collection’ could have the same configuration: ‘Women Collection’, ‘Kids Collection’.

    • Backend of ‘Men Collection’ in the ‘Men Collection’: Please clickHere to view.

    Note: Other items in Shop Menu having menu level would have same configuration.

    Pages

    • Frontend Appearance
    • Backend Settings: Please click Here to view.
    • Backend of ‘Dropdown’: Please click Here to view.
    • Copy and paste the following code into the content:

    <div class="home-menu-dropdown">
    <div class="row">
    <div class="col-sm-6">
    <div class="row">
    <div class="col-sm-4">
    <ul class="item-home-store">
    <li class="title-menu-home">Category 01</li>
    <li><a href="#">Lorem ipsum dolor sit</a></li>
    <li><a href="#">Category name here</a></li>
    <li><a href="#">Category name</a></li>
    <li><a href="#">Lorem ipsum dolor sit</a></li>
    <li><a href="#">Category name here</a></li>
    </ul>
    </div>
    <div class="col-sm-8">
    <a href="#" class="banner-img"><img src="{{media url="wysiwyg/image-megamenu/image-2.jpg"}}" alt="" /></a>
    </div>
    </div>
    </div>
    <div class="col-sm-6">
    <div class="row">
    <div class="col-sm-4">
    <ul class="item-home-store">
    <li class="title-menu-home">Category 02</li>
    <li><a href="#">White floral lace </a></li>
    <li><a href="#">Bardot neckline</a></li>
    <li><a href="#">Hottest trends</a></li>
    <li><a href="#">Lorem ipsum dolor sit</a></li>
    <li><a href="#">The Big Announcement</a></li>
    </ul>
    </div>
    <div class="col-sm-8">
    <a href="#" class="banner-img"><img src="{{media url="wysiwyg/image-megamenu/image-3.jpg"}}" alt="" /></a>
    </div>
    </div>
    </div>
    </div>
    </div>

    Blog
    Frontend Appearance

    • Backend Setting:Please click Here to view.

    Contact Us
    Frontend Appearance

    • Backend Setting:Please click Here to view.
    • Backend of ‘Dropdown’: Please click Here to view.
    • Copy and paste the following code into the content:

    <ul class="item-about-contact">
    		<li><a title="Contact Us Style 1" href="{{store url="contact-us.html/?___store=default&___from_store=argentina"}}">Contact Us Style 1</a></li>
    		<li><a title="Contact Us Style 2" href="{{store url="contact-us.html/?___store=french&___from_store=default"}}">Contact Us Style 2</a></li>
    		<li><a title="Contact Us Style 3" href="{{store url="contact-us.html/?___store=german&___from_store=default"}}">Contact Us Style 3</a></li>
    		<li><a title="Contact Us Style 4" href="{{store url="contact-us.html/?___store=argentina&___from_store=default"}}">Contact Us Style 4</a></li>
    	</ul>

    About Us
    Frontend Appearance

    • Backend Setting:Please click Here to view.
    • Backend of ‘Drop About’: Please click Here to view.
    • Copy and paste the following code into the content:

    <ul class="item-about-contact">
    		<li><a title="About Us Style 1" href="{{store url="about-us.html/?___store=default&___from_store=argentina"}}">About Us Style 1</a></li>
    		<li><a title="About Us Style 2" href="{{store url="about-us.html/?___store=french&___from_store=default"}}">About Us Style 2</a></li>
    		<li><a title="About Us Style 3" href="{{store url="about-us.html/?___store=german&___from_store=default"}}">About Us Style 3</a></li>
    		<li><a title="About Us Style 4" href="{{store url="about-us.html/?___store=argentina&___from_store=default"}}">About Us Style 4</a></li>
    	</ul>

    3.2.2 Vertical Megamenu (In Home Style 3):

    Vertical-mega-menu

    • Vertical Megamenu List Please click Here to view.
    • Vertical Megamenu’s Backend Please click Here to view.

    Car Mats & Boot Liners

    • Frontend Appearance
    • Backend Settings: Please click Here to view.

    Note: The following items having same menu level (Level 1) as item ‘Car Mats & Boot Liners’ could have the same configuration: Car Covers & Tarpaulins, Wheel Trims & Alloys, Interior Car Accessories, Air Fresheners, Replacement Mirror Glass, View All Categories.

    Tailored Car Mats

    • Frontend Appearance
    • Backend Settings: Please click Here to view.
    • Backend of ‘Categories Group’: Please click Here to view.
    • Backend of ‘Category 1′ in the ‘Categories Group’: Please click Here to view.

    Note: In Tailored Car Mats Menu, the items having same menu level (Level 3) as item ‘Category 1′ could have the same configuration.

    • Backend of ‘Categories’ in the ‘Category 1′: Please click Here to view.

    Note: In Tailored Car Mats Menu, the items having same menu level (Level 4) as item ‘Categories’ could have the same configuration.

    Car Seat Covers & Cushions

    • Frontend Appearance
    • Backend Settings: Please click Here to view.
    • Backend of ‘Categories Group’: Please click Here to view.
    • Backend of ‘Categories 1′ in the ‘Categories Group’: Please click Here to view.

    Note: In Car Seat Covers & Cushions Menu, the items having same menu level (Level 3) as item ‘Category 1′ could have the same configuration.

    • Backend of ‘Categories 2′ in the ‘Categories Group’: Please click Here to view.
    • Backend of ‘Image Group’ in the ‘Categories Group’: Please click Here to view.
    • Copy and paste the following code into the content:

    <ul class="image-list">
    <li><a title="Static Image" href="#"><img src="{{media url="wysiwyg/image-megamenu/image-4.jpg"}}" alt="Static Image" /></a></li>
    <li><a title="Static Image" href="#"><img src="{{media url="wysiwyg/image-megamenu/image-5.jpg"}}" alt="Static Image" /></a></li>
    </ul>

    3.3 Configure Extensions

    The SM ATStore front-page has been integrated with the extensions in the following list:

    In SM ATStore Administration Page, please navigate to SM Atstore Setting field (in the right hand column, below the General and Catalog fields) to configure extensions as you want.

    I. SM Megamenu
        • Position: SM Megamenu
        • Frontend Appearance

    Horizontal Megamenu

    Vertical Megamenu

        • Backend of SM Megamenu: Click Here
    II. SM CartPro
        • Position: SM CartPro
        • Frontend Appearance

        • Backend of SM CartPro: Click Here
        • Go Here to readmore about the SM CartPro module.
    III. SM Image Slider
        • Position: SM Camera Slider
        • Frontend Appearance

        • Backend of SM Camera Slider: Click Here
        • Go Here to readmore about the SM Image Slider module.
    IV. SM Gallery 3D
        • Position: SM Camera Slider
        • Frontend Appearance

        • Backend of SM Camera Slider: Click Here
        • Go Here to readmore about the SM Gallery 3D module.
    V. SM Listing Tabs
        • Position: SM Listing Tabs
        • Frontend Appearance

        • Backend of SM Listing Tabs : Click Here
        • Go Here to readmore about the SM Listing Tabs module.
    VI. SM Custom Deals
        • Position: SM Custom
        • Frontend Appearance

        • Backend of SM Deal: Click Here
    VII. SM Deal
        • Position: SM Deal
        • Frontend Appearance

        • Backend of SM Deal: Click Here
        • Go Here to readmore about the SM Deal module.
    VIII. SM Basic Products
        • Position: SM Basic Products
        • Frontend Appearance

        • Backend of SM Basic Products: Click Here
        • Go Here to readmore about the SM Basic Products module.
    IX. SM Quickview
        • Frontend Appearance
        • When you put your cursor on a product in the frontend pages, you will see the quickview button appear and you could click on this button to view the product

        • Backend of SM Quickview: Click Here
        • Go Here to readmore about the SM Quickview module.
    X. SM Shopby
        • Frontend Appearance

        • Backend of SM Shopby: Click Here
    XI. SM Categories
        • Frontend Appearance

        • Backend of SM Categories: Click Here
        • Go Here to readmore about the SM Categories module.

    3.4 Configure Static Blocks

    The SM ATStore front-page has the following static blocks in the theme:

    To create a new static block, go to CMS >> Static Blocks >> Add new block

    1. Static Block: info_top

    To create the static block, go to CMS >> Static Blocks with Identifier * : “info_top”

    Frontend Appearance

    • Backend Setting: Please click Here to view.

    Copy and paste the following code into the content tab of this static block:

    <div class="action-block-info">
    <div class="icon">i</div>
    <ul class="content_info">
    <li class="phone">
    <i class="fa fa-phone">  </i>
    + 123 456 7890
    <br>
    + 123 456 7890
    </li>
    <li class="mail">
    <i class="fa fa-envelope">  </i>
    <a href="#" title="Email">support@yourdomain.com</a>
    <br>
    <a href="#" title="Email">sale@yourdomain.com</a>
    </li>
    <li class="tp-button"><a class="button-contact g2font" href="{{store url="contact-us.html"}}">Contact us</a></li>
    </ul>
    </div>

    2. Static Block: static-image-1

    To create the static block, go to CMS >> Static Blocks with Identifier * : “static-image-1″

    Frontend Appearance

    • Backend Setting: Please click Here to view.

    Copy and paste the following code into the content tab of this static block:

    <div class="row">
    <div class="col-xs-4">
    <a href="#" class="banner-home1"><img src="{{media url="wysiwyg/home-page-image/banner1.jpg"}}" alt="" /></a>
    </div>
    <div class="col-xs-4">
    <a href="#" class="banner-home1"><img src="{{media url="wysiwyg/home-page-image/banner2.jpg"}}" alt="" /></a>
    </div>
    <div class="col-xs-4">
    <a href="#" class="banner-home1"><img src="{{media url="wysiwyg/home-page-image/banner3.jpg"}}" alt="" /></a>
    </div>
    </div>

    3. Static Block: recommend_product

    To create the static block, go to CMS >> Static Blocks with Identifier * : “recommend_product”

    Frontend Appearance

    • Backend Setting: Please click Here to view.

    Copy and paste the following code into the content tab of this static block:

    <div class="recommed-product">
    <div class="block-title g2font"> Get Recommend products </div>
      <ul  role="tablist">
        <li role="presentation" class="active"><a href="#blog1" aria-controls="blog1" role="tab" data-toggle="tab"><img src="{{media url="wysiwyg/home-page-image/img7.png"}}" alt="" />
    	
    	</a><h2 class="g2font">What's the Ultimate Minivan?</h2></li>
        <li role="presentation"><a href="#blog2" aria-controls="blog2" role="tab" data-toggle="tab"><img src="{{media url="wysiwyg/home-page-image/img8.png"}}" alt="" />
    	
    	</a><h2 class="g2font">2016 Ford Mustang Shelby GT350: First Drive</h2></li>
        <li role="presentation"><a href="#blog3" aria-controls="blog3" role="tab" data-toggle="tab"><img src="{{media url="wysiwyg/home-page-image/img9.png"}}" alt="" />
    	
    	</a><h2 class="g2font">The Big Announcement</h2></li>
      </ul>	 
      <div class="tab-content">
        <div role="tabpanel" class="tab-pane active" id="blog1">
    	<a href="#">
    	<img src="{{media url="wysiwyg/home-page-image/img10.png"}}" alt="" />
    	<div class="title"><h2 class="g2font">What's the Ultimate Minivan?</h2></div>
    	</a>
    	</div>
        <div role="tabpanel" class="tab-pane" id="blog2">
    	<a href="#">
    	<img src="{{media url="wysiwyg/home-page-image/img111.png"}}" alt="" />
    	<div class="title"><h2 class="g2font">2016 Ford Mustang Shelby GT350: First Drive</h2></div>
    	</a>
    	</div>
        <div role="tabpanel" class="tab-pane" id="blog3">
    	<a href="#">
    	<img src="{{media url="wysiwyg/home-page-image/img112.png"}}" alt="" />
    	<div class="title"><h2 class="g2font">The Big Announcement</h2></div>
    	</a>
    	</div>
      </div>
    </div>

    4. Static Block: block_videohome

    To create the static block, go to CMS >> Static Blocks with Identifier * : “block_videohome”

    Frontend Appearance

    • Backend Setting: Please click Here to view.

    Copy and paste the following code into the content tab of this static block:

    <div class="full-block-info-video1">
    <div class="static-surround">
    	<div class="static-surround-inner">
    		<div class="static-wrap">
    		   <span class="mask"></span>
    		   <video id="static_video" poster="{{store url="media/wysiwyg/video/"}}bg-video.jpg" class="bg-video js-is-active" loop="" >
    			<source src="{{store url="media/wysiwyg/video/"}}big.mp4" type="video/mp4" >
    		   </video>
                      <img src="{{media url="wysiwyg/video/bg-video.jpg"}}" alt="Client" />
                       <div class="box-play">
                         <div class="border-play">
    		        <i class="fa static-control"></i>
                         </div>
    	           </div>	  
    		</div>
        
    		<div class="static-content static-content1 animated" data-animation="fadeInRight" data-animation-delay="100">		  
    		  <h2 class="g2font">Watch the video of the new Chevrolet</h2>		      
    		</div>
    
    	</div>
    </div>
     </div>
      <script>
      jQuery('.static-control').click(function(){
        var t = jQuery(this).closest('.static-surround');
        if(t.hasClass('is_play')){
          document.getElementById('static_video').pause();
          t.removeClass('is_play');
        }
        else{
          document.getElementById('static_video').play();
          t.addClass('is_play');
        }
      });
    </script>

    5. Static Block: policy_shop

    To create the static block, go to CMS >> Static Blocks with Identifier * : “policy_shop”

    Frontend Appearance

    • Backend Setting: Please click Here to view.

    Copy and paste the following code into the content tab of this static block:

    <div class="policy_shop">
    <div class="container">
    <div class="row">
    <div class="col-sm-4">
    <div class="images">
    <img src="{{media url="wysiwyg/img/p1.png"}}" alt="" />
    </div>
    <div class="content-policy">
    <h2>Free Shipping</h2>
    <h3>Lorem ipsum dolor sit amet, consectetur</h3>
    </div>
    </div>
    <div class="col-sm-4">
    <div class="images">
    <img src="{{media url="wysiwyg/img/p2.png"}}" alt="" />
    </div>
    <div class="content-policy">
    <h2>BEST SUPPORT</h2>
    <h3>Lorem ipsum dolor sit amet, consectetur</h3>
    </div>
    </div>
    <div class="col-sm-4">
    <div class="images">
    <img src="{{media url="wysiwyg/img/p3.png"}}" alt="" />
    </div>
    <div class="content-policy">
    <h2>GIFT DISCOUNT</h2>
    <h3>Lorem ipsum dolor sit amet, consectetur</h3>
    </div>
    </div>
    </div>
    </div>
    </div>

    6. Static Block: about_shop

    To create the static block, go to CMS >> Static Blocks with Identifier * : “about_shop”

    Frontend Appearance

    • Backend Setting: Please click Here to view.

    Copy and paste the following code into the content tab of this static block:

    <div class="about-home">
    <div class="container">
    <div class="row">
    <div class="col-sm-6">
    <div class="wrapper-content">
    <h2 class="g2font">2015 Cadillac Escalade</h2>
    <p class="description">Lorem ipsum dolor sit amet, consectetur adipiscing elit, sed do eiusmod tempor incididunt ut labore et dolore magna aliqua. Ut enim ad minim veniam, quis nostrud exercitation ullamco laboris nisi ut aliquip ex ea commodo consequat.</p>
    <a href="#" title="Book Now" class="button-about g2font">Book Now</a>
    </div>
    </div>
    <div class="col-sm-6">
    <img src="{{media url="wysiwyg/home-page-image/about1.jpg"}}" alt="" />
    </div>
    </div>
    </div>
    </div>

    7. Static Block: service_shop

    To create the static block, go to CMS >> Static Blocks with Identifier * : “service_shop”

    Frontend Appearance

    • Backend Setting: Please click Here to view.

    Copy and paste the following code into the content tab of this static block:

    <div class="service-home">
    <div class="container">
    <div class="service-home-top">
    <h1 class="g2font">Our Services</h1>
    <p>What we provide beside our products</p>
    <div class="row">
    <div class="col-sm-4">
    <div class="item">
    <img src="{{media url="wysiwyg/home-page-image/se1.jpg"}}" alt="" />
    <h2 class="title g2font">Interim Service</h2>
    <div class="contenttop-se">
    <h2 class="title g2font">Interim Service</h2>
    <p class="description">Lorem ipsum dolor sit amet, consectetur
    adipiscing elit, sed do eiusmod tempor incidi
    labore et dolore magna aliqua.</p>
    <a href="#" class="button-se g2font ">Learn more</a>
    <p class="price g2font "><span>From</span>$15.000</p>
    </div>
    </div>
    </div>
    <div class="col-sm-4">
    <div class="item">
    <img src="{{media url="wysiwyg/home-page-image/se2.jpg"}}" alt="" />
    <h2 class="title g2font">Full Service</h2>
    <div class="contenttop-se">
    <h2 class="title g2font">Full Service</h2>
    <p class="description">Lorem ipsum dolor sit amet, consectetur
    adipiscing elit, sed do eiusmod tempor incidi
    labore et dolore magna aliqua.</p>
    <a href="#" class="button-se g2font ">Learn more</a>
    <p class="price g2font "><span>From</span>$15.000</p>
    </div>
    </div>
    </div>
    <div class="col-sm-4">
    <div class="item">
    <img src="{{media url="wysiwyg/home-page-image/se3.jpg"}}" alt="" />
    <h2 class="title g2font">Major Service</h2>
    <div class="contenttop-se">
    <h2 class="title g2font">Major Service</h2>
    <p class="description">Lorem ipsum dolor sit amet, consectetur
    adipiscing elit, sed do eiusmod tempor incidi
    labore et dolore magna aliqua.</p>
    <a href="#" class="button-se g2font ">Learn more</a>
    <p class="price g2font "><span>From</span>$15.000</p>
    </div>
    </div>
    </div>
    <div class="content-service col-sm-12">
    <h2 class="g2font"><a href="#">Download the app</a></h2>
    <p class="descrip">Lorem ipsum dolor sit amet, consectetur adipiscing elit, sed do eiusmod tempor incididunt ut labore et dolore magna aliqua. Ut enim ad minim veniam, quis nostrud exercitation ullamco.</p>
    </div>
    <div class="service-home-bottom col-sm-12">
    <div class="img-serice">
    <div class="col-xs-3">
    <a href="#"><img src="{{media url="wysiwyg/home-page-image/se4.png"}}" alt="" /></a>
    </div>
    <div class="col-xs-6">
    <a href="#"><img src="{{media url="wysiwyg/home-page-image/se5.png"}}" alt="" /></a>
    </div>
    <div class="col-xs-3">
    <a href="#"><img src="{{media url="wysiwyg/home-page-image/se6.png"}}" alt="" /></a>
    </div>
    </div>
    </div>
    </div>
    </div>
    </div>
    </div>

    8. Static Block: brand-slider

    To create the static block, go to CMS >> Static Blocks with Identifier * : “brand-slider”

    Frontend Appearance

    • Backend Setting: Please click Here to view.

    Copy and paste the following code into the content tab of this static block:

    <div class="slider-brand">
    	<div class="item">
    	<a title="Brand Image" href="#"><img src="{{media url="wysiwyg/brand/b1.jpg"}}" alt="Brand Image" /></a>
    	<a title="Brand Image" href="#"><img src="{{media url="wysiwyg/brand/b2.jpg"}}" alt="Brand Image" /></a>
    	</div>	
    	<div class="item">
    	<a title="Brand Image" href="#"><img src="{{media url="wysiwyg/brand/b3.jpg"}}" alt="Brand Image" /></a>
    	<a title="Brand Image" href="#"><img src="{{media url="wysiwyg/brand/b4.jpg"}}" alt="Brand Image" /></a>
    	</div>
    	<div class="item">
    	<a title="Brand Image" href="#"><img src="{{media url="wysiwyg/brand/b5.jpg"}}" alt="Brand Image" /></a>
    	<a title="Brand Image" href="#"><img src="{{media url="wysiwyg/brand/b6.jpg"}}" alt="Brand Image" /></a>
    	</div>
    	<div class="item">
    	<a title="Brand Image" href="#"><img src="{{media url="wysiwyg/brand/b7.jpg"}}" alt="Brand Image" /></a>
    	<a title="Brand Image" href="#"><img src="{{media url="wysiwyg/brand/b8.jpg"}}" alt="Brand Image" /></a>
    	</div>
    	<div class="item">
    	<a title="Brand Image" href="#"><img src="{{media url="wysiwyg/brand/b9.jpg"}}" alt="Brand Image" /></a>
    	<a title="Brand Image" href="#"><img src="{{media url="wysiwyg/brand/b10.jpg"}}" alt="Brand Image" /></a>
    	</div>
    	<div class="item">
    	<a title="Brand Image" href="#"><img src="{{media url="wysiwyg/brand/b11.jpg"}}" alt="Brand Image" /></a>
    	<a title="Brand Image" href="#"><img src="{{media url="wysiwyg/brand/b12.jpg"}}" alt="Brand Image" /></a>
    	</div>
    </div>
    
    <script>
    	jQuery(document).ready(function($) {
    		var brandslider = $(".slider-brand");
    		brandslider.owlCarousel({				
    			responsive:{
    				0:{
    					items:2
    				},
    				480:{
    					items:3
    				},
    				768:{
    					items:5
    				},
    				992:{
    					items:5
    				},
    				1200:{
    					items:6
    				}
    			},
    			autoplay:false,
    			loop:false,
    			nav : false, // Show next and prev buttons
    			dots: false,
    			autoplaySpeed : 500,
    			navSpeed : 500,
    			dotsSpeed : 500,
    			autoplayHoverPause: true,
    			margin:30,
    		});	  
    	});	
    </script>

    To create the static block, go to CMS >> Static Blocks with Identifier * : “footer-about-us”

    Frontend Appearance

    • Backend Setting: Please click Here to view.

    Copy and paste the following code into the content tab of this static block:

    <div class="block-footer">
    <div class="title-footer">
    <h3>About us</h3>
    </div>
    <div class="content-block-footer">
    Lorem ipsum dolor sit amet, consectetur adipiscing elit, sed do eiusmod tempor incididunt ut labore et dolore magna aliqua. Ut enim ad minim veniam, quis nostrud exercitation ullamco laboris nisi ut aliquip <a href="{{store url="about-us.html"}}">[...]</a>
    </div>
    </div>
    {{block type="page/html" name="social_info" as="social_info" template="page/html/social.phtml"/}}

    To create the static block, go to CMS >> Static Blocks with Identifier * : “footer-categories”

    Frontend Appearance

    • Backend Setting: Please click Here to view.

    Copy and paste the following code into the content tab of this static block:

    <div class="block-footer">
    <div class="title-footer">
    <h3>Categories</h3>
    </div>
    <div class="content-block-footer">
    <ul class="list_item">
    <li><a title="Brand-new Car" href="#">Brand-new Car</a></li>
    <li><a title="Volantes" href="#">Volantes</a></li>
    <li><a title="Tires" href="#">Tires</a></li>
    <li><a title="Mirrors" href="#">Mirrors</a></li>
    <li><a title="Sounds" href="#">Sounds</a></li>
    <li><a title="Lights" href="#">Lights</a></li>
    </ul>
    </div>
    </div>

    To create the static block, go to CMS >> Static Blocks with Identifier * : “footer-information”

    Frontend Appearance

    • Backend Setting: Please click Here to view.

    Copy and paste the following code into the content tab of this static block:

    <div class="block-footer">
    <div class="title-footer">
    <h3>Information</h3>
    </div>
    <div class="content-block-footer">
    <ul class="list_item">
    <li><a title="Shipping & Return Policy " href="#">Shipping & Return Policy </a></li>
    <li><a title="Careers" href="#">Careers</a></li>
    <li><a title="Store Location" href="#">Store Location</a></li>
    <li><a title="Services" href="#">Services</a></li>
    <li><a title="Help Center" href="#">Help Center</a></li>
    <li><a title="My Cart" href="#">My Cart</a></li>
    </ul>
    </div>
    </div>

    To create the static block, go to CMS >> Static Blocks with Identifier * : “footer-address”

    Frontend Appearance

    • Backend Setting: Please click Here to view.

    Copy and paste the following code into the content tab of this static block:

    <div class="block-footer">
    <div class="title-footer">
    <h3>Contact</h3>
    </div>
    <div class="content-block-footer">
    <ul class="info-store-footer">
    	<li class="address"><i class="fa fa-map-marker"> </i>123 Queen Street, Melbourne Victoria<br> 4000 Australia</li>
    	<li class="phone"><i class="fa fa-mobile-phone"> </i>+ 123 456 7890<br>+ 123 456 7890</li>
    	<li class="mail"><i class="fa fa-envelope"> </i><a title="Email" href="#">support@yourdomain.com</a> <br><a title="Email" href="#">sale@yourdomain.com</a></li>
    	</ul>
    </div>
    </div>

    To create the static block, go to CMS >> Static Blocks with Identifier * : “payment-footer”

    Frontend Appearance

    • Backend Setting: Please click Here to view.

    Copy and paste the following code into the content tab of this static block:

    <img src="{{media url="wysiwyg/payment/payment.png"}}" alt="" />

    14. Static Block: static-image-2

    To create the static block, go to CMS >> Static Blocks with Identifier * : “static-image-2″

    Frontend Appearance

    • Backend Setting: Please click Here to view.

    Copy and paste the following code into the content tab of this static block:

    <div class="static-image-block2">
    <div class="col-sm-6"><a href="#" class="banner-img"><img src="{{media url="wysiwyg/home-page-image/h2-img1.jpg"}}" alt="" /></a></div>
    <div class="col-sm-6"><a href="#" class="banner-img"><img src="{{media url="wysiwyg/home-page-image/h2-img2.jpg"}}" alt="" /></a></div>
    </div>

    15. Static Block: block_testimonial

    To create the static block, go to CMS >> Static Blocks with Identifier * : “block_testimonial”

    Frontend Appearance

    • Backend Setting: Please click Here to view.

    Copy and paste the following code into the content tab of this static block:

    <div class="static-image-block2">
    <div class="col-sm-6"><a href="#" class="banner-img"><img src="{{media url="wysiwyg/home-page-image/h2-img1.jpg"}}" alt="" /></a></div>
    <div class="col-sm-6"><a href="#" class="banner-img"><img src="{{media url="wysiwyg/home-page-image/h2-img2.jpg"}}" alt="" /></a></div>
    </div>

    16. Static Block: block_servicehome2

    To create the static block, go to CMS >> Static Blocks with Identifier * : “block_servicehome2″

    Frontend Appearance

    • Backend Setting: Please click Here to view.

    Copy and paste the following code into the content tab of this static block:

    <div class="servicehome2">
    <div class="row">
    <div class="col-sm-4">
    <div class="item">
    <h2 class="title-name g2font">Brand-new Cars</h2>
    <p>Products you must have</p>
    <img src="{{media url="wysiwyg/home-page-image/se1-h2.png"}}" alt="" />
    <div class="info-service">
    <p>Sed ut perspiciatis unde omnis iste natus error sit voluptatem accusantium doloremque laudantium, totam rem aperiam, eaque ipsa quae ab illo inventore.</p>
    <a class="bt-learmore g2font" href="">Learn more</a>
    </div>
    </div>
    </div>
    <div class="col-sm-4">
    <div class="item">
    <h2 class="title-name g2font">our Services</h2>
    <p>Products you must have</p>
    <img src="{{media url="wysiwyg/home-page-image/se2-h2.png"}}" alt="" />
    <div class="info-service">
    <p>Sed ut perspiciatis unde omnis iste natus error sit voluptatem accusantium doloremque laudantium, totam rem aperiam, eaque ipsa quae ab illo inventore.</p>
    <a class="bt-learmore g2font" href="">Learn more</a>
    </div>
    </div>
    </div>
    <div class="col-sm-4">
    <div class="item">
    <h2 class="title-name g2font">Accessories</h2>
    <p>Products you must have</p>
    <img src="{{media url="wysiwyg/home-page-image/se3-h2.png"}}" alt="" />
    <div class="info-service">
    <p>Sed ut perspiciatis unde omnis iste natus error sit voluptatem accusantium doloremque laudantium, totam rem aperiam, eaque ipsa quae ab illo inventore.</p>
    <a class="bt-learmore g2font" href="">Learn more</a>
    </div>
    </div>
    </div>
    </div>
    </div>

    17. Static Block: policy_shop_2

    To create the static block, go to CMS >> Static Blocks with Identifier * : “policy_shop_2″

    Frontend Appearance

    • Backend Setting: Please click Here to view.

    Copy and paste the following code into the content tab of this static block:

    <div class="policy_shop g2font">
    <div class="container">
    <div class="row">
    <div class="col-sm-4">
    <div class="images">
    <img src="{{media url="wysiwyg/img/p4.png"}}" alt="" />
    </div>
    <div class="content-policy">
    <h2><a href="#">Free Shipping</a></h2>
    <h3>Lorem ipsum dolor sit amet, consectetur</h3>
    </div>
    </div>
    <div class="col-sm-4">
    <div class="images">
    <img src="{{media url="wysiwyg/img/p5.png"}}" alt="" />
    </div>
    <div class="content-policy">
    <h2><a href="#">Money back</a></h2>
    <h3>Lorem ipsum dolor sit amet, consectetur</h3>
    </div>
    </div>
    <div class="col-sm-4">
    <div class="images">
    <img src="{{media url="wysiwyg/img/p6.png"}}" alt="" />
    </div>
    <div class="content-policy">
    <h2><a href="#">Satisfaction guaranteed</a></h2>
    <h3>Lorem ipsum dolor sit amet, consectetur</h3>
    </div>
    </div>
    </div>
    </div>
    </div>

    18. Static Block: static-image-4

    To create the static block, go to CMS >> Static Blocks with Identifier * : “static-image-4″

    Frontend Appearance

    • Backend Setting: Please click Here to view.

    Copy and paste the following code into the content tab of this static block:

    <div class='img-right'>
    <a href="#" class="banner-img"><img src="{{media url="wysiwyg/home-page-image/banner4.jpg"}}" alt="" /></a>
    <a href="#" class="banner-img"><img src="{{media url="wysiwyg/home-page-image/banner5.jpg"}}" alt="" /></a>
    </div>

    Static Block: policy_shop_4

    To create the static block, go to CMS >> Static Blocks with Identifier * : “policy_shop_4″

    Frontend Appearance

    • Backend Setting: Please click Here to view.

    Copy and paste the following code into the content tab of this static block:

    <div class="policy_shop">
    <div class="container">
    <div class="row">
    <div class="col-sm-4">
    <div class="images">
    <img src="{{media url="wysiwyg/img/p1.png"}}" alt="" />
    </div>
    <div class="content-policy">
    <h2>Free Shipping</h2>
    <h3>Lorem ipsum dolor sit amet, consectetur</h3>
    </div>
    </div>
    <div class="col-sm-4">
    <div class="images">
    <img src="{{media url="wysiwyg/img/p2.png"}}" alt="" />
    </div>
    <div class="content-policy">
    <h2>BEST SUPPORT</h2>
    <h3>Lorem ipsum dolor sit amet, consectetur</h3>
    </div>
    </div>
    <div class="col-sm-4">
    <div class="images">
    <img src="{{media url="wysiwyg/img/p3.png"}}" alt="" />
    </div>
    <div class="content-policy">
    <h2>GIFT DISCOUNT</h2>
    <h3>Lorem ipsum dolor sit amet, consectetur</h3>
    </div>
    </div>
    </div>
    </div>
    </div>

    Static Block: static-image-41

    To create the static block, go to CMS >> Static Blocks with Identifier * : “static-image-41″

    Frontend Appearance

    • Backend Setting: Please click Here to view.

    Copy and paste the following code into the content tab of this static block:

    <div class="banner-center4">
    <div class="row">
    <div class="col-sm-5">
    <a class="img-banner4" href="#">
    <img src="{{media url="wysiwyg/home-page-image/img1.png"}}" alt="" />
    <h2 class="title-img g2font">car accesories</h2>
    </a>
    </div>
    <div class="col-sm-7">
    <a class="img-banner4 mr35" href="#">
    <img src="{{media url="wysiwyg/home-page-image/img2.png"}}" alt="" />
    <h2 class="title-img g2font">car accesories</h2>
    </a>
    <div class="row">
    <div class="col-sm-6">
    <a class="img-banner4 mr30" href="#">
    <img src="{{media url="wysiwyg/home-page-image/img3.png"}}" alt="" />
    <h2 class="title-img g2font">car accesories</h2>
    </a>
    </div>
    <div class="col-sm-6">
    <a class="img-banner4 mr30" href="#">
    <img src="{{media url="wysiwyg/home-page-image/img4.png"}}" alt="" />
    <h2 class="title-img g2font">car accesories</h2>
    </a>
    </div>
    </div>
    </div>
    </div>
    </div>

    Static Block: block_testimonial_4

    To create the static block, go to CMS >> Static Blocks with Identifier * : “block_testimonial_4″

    Frontend Appearance

    • Backend Setting: Please click Here to view.

    Copy and paste the following code into the content tab of this static block:

    <div class="overflow-slider testimonials">
    	<div class="margin-slider">
    		<ul class="testimonials-slider">
    			<li class="item">
    				<div class="client">
    					<div class="image-client">
    						<img src="{{media url="wysiwyg/testimonial/client-1.jpg"}}" alt="Venus" />
    					</div>
    					<div class="info-client g2font">
    						<h2 class="client-name"> Kenny </h2>
    						<span>Company Inc</span>
    						<p class="comment">
    							"Sed ut perspiciatis unde omnis iste natus error sit voluptatem accusantium doloremque laudantium, totam rem aperiam, eaque ipsa quae ab illo inventore veritatis et quasi architecto beatae.."
    						</p>
    					
    					</div>
    				</div>
    			</li>
    			<li class="item">
    				<div class="client">
    					<div class="image-client">
    						<img src="{{media url="wysiwyg/testimonial/client-2.jpg"}}" alt="Venus" />
    					</div>
    					<div class="info-client g2font">
    						<h2 class="client-name">Venus</h2>
    						<span>Market Research</span>
    						<p class="comment">
    							"Sed ut perspiciatis unde omnis iste natus error sit voluptatem accusantium doloremque laudantium, totam rem aperiam, eaque ipsa quae ab illo inventore veritatis et quasi architecto beatae.."
    						</p>
    						
    					</div>
    				</div>
    			</li>
    			<li class="item">
    				<div class="client">
    					<div class="image-client">
    						<img src="{{media url="wysiwyg/testimonial/client-3.jpg"}}" alt="Venus" />
    					</div>
    					<div class="info-client g2font">
    						<h2 class="client-name">Vin Nguyen</h2>
    						<span>Company Inc</span>
    						<p class="comment">
    							"Sed ut perspiciatis unde omnis iste natus error sit voluptatem accusantium doloremque laudantium, totam rem aperiam, eaque ipsa quae ab illo inventore veritatis et quasi architecto beatae.."
    						</p>
    						
    					</div>
    				</div>
    			</li>
    			<li class="item">
    				<div class="client">
    					<div class="image-client">
    						<img src="{{media url="wysiwyg/testimonial/client-4.jpg"}}" alt="Venus" />
    					</div>
    					<div class="info-client g2font">
    						<h2 class="client-name">Minh Nguyen</h2>
    						<span>Market Research</span>
    						<p class="comment">
    							"Sed ut perspiciatis unde omnis iste natus error sit voluptatem accusantium doloremque laudantium, totam rem aperiam, eaque ipsa quae ab illo inventore veritatis et quasi architecto beatae.."
    						</p>
    						
    					</div>
    				</div>
    			</li>
    			
    		</ul>
    	</div>
    	
    	<script>
    		jQuery(document).ready(function($) {
    			var owl_testimonial = $(".testimonials-slider");
    			owl_testimonial.owlCarousel({
    				responsive:{
    					0:{
    						items:1
    					},
    					480:{
    						items:1
    					},
    					768:{
    						items:1
    					},
    					992:{
    						items:1
    					},
    					1200:{
    						items:1
    					}
    				},
    				
    				autoplay:false,
    				loop:false,
    				nav : false, // Show next and prev buttons
    				dots: true,
    				autoplaySpeed : 500,
    				navSpeed : 500,
    				dotsSpeed : 500,
    				autoplayHoverPause: true,
    				margin:30,
    			});
    		});
    
    	</script>
    </div>

    Static Block: static-image-51

    To create the static block, go to CMS >> Static Blocks with Identifier * : “static-image-51″

    Frontend Appearance

    • Backend Setting: Please click Here to view.

    Copy and paste the following code into the content tab of this static block:

    <div class="img-home5">
    <div class="col-xs-3">
    <a href="#" class="banner-img"><img src="{{media url="wysiwyg/home-page-image/img11.png"}}" alt="" /></a>
    </div>
    <div class="col-xs-3">
    <a href="#" class="banner-img"><img src="{{media url="wysiwyg/home-page-image/img12.png"}}" alt="" /></a>
    </div>
    <div class="col-xs-3">
    <a href="#" class="banner-img"><img src="{{media url="wysiwyg/home-page-image/img13.png"}}" alt="" /></a>
    </div>
    <div class="col-xs-3">
    <a href="#" class="banner-img"><img src="{{media url="wysiwyg/home-page-image/img14.png"}}" alt="" /></a>
    </div>
    </div>

    3.5 How To Edit Copyright in Admin Panel

    Frontend Appearance

    In the Administrator page, Please navigate to SM ATStore Setting; find SM ATStore Setting Module to configure the “Copyright” parameter as image below:

    3.6 How To Customize the Social symbols in admin panel

    Frontend Appearance

    In the Administrator page, please go to SM ATStore Setting; find SM ATStore Setting Module to configure the “Social Style” parameter as image below:

    4SUPPORT

    • SUPPORT – If you have any questions that are beyond the scope of this help file, please feel free to send us via: Support Tickets System
    • FAQs – Go to Here to view more the Frequently Asked Questions.


    How to rate an item on Themeforest

    $
    0
    0


    Do you love our item? If YES, please rate it 5 stars as we see it as a feedback and great encouragement from you. We believe your feedback will help us to improve our ability and can provide products and services that deserve your 5 stars.

    If you aren’t satisfied with our item and support, and think we can’t earn 5 stars, please send us a ticket about your issues, we’ll do our best to make you happy.

    And here is the tutorial how to rate an item on Themeforest.

    1. Login into your Account on Themeforest
    2. When successfully logged in, move your Mouse over your username as seen at the below image
    3. Navigate to your Downloads. You will see all items that you bought from Themeforest.
    4. Search our theme, drag your mouse over the last star and click, done
    Rate an item on Themeforest

    Rate an item on Themeforest

    Thank you for reading and rating for us!

    SP Product Tab

    $
    0
    0
    This guide will help you install SP Product Tab – Ver 1.0.0 module step by step.


    1 Installation - Back to top

    • Firstly, you must install Prestashop version 1.6.x. Please Click Here to read more about How To Install Prestashop version 1.6.x
    • Secondly, when you are ready to install SP Product Tab, please follow 5 steps as following:

    Step 1: Login to your Prestashop admin panel and go to Back Office >> Modules and Services >> Modules and Services . At the top of the page, click the Add a new module button.

    Step 2: Click "Choose a file" button to select your module .zip file named as "sp_product_tabs_p1.6-res_v1.0.0.zip" that you have downloaded, then click "Upload this module" button.

    Step 3: The new module will be located in the module list. Please search the name of module and click on the Install button to install the module.

    Step 4:When seeing a notification message as following, please click "Proceed with the installation" button to finish the installation process:

    Step 5: When the uploading process is done, you will see the message denoting that:"Module(s) installed successfully". Please click "Edit" button to configure this module.

    2 Configuration - Back to top


    You could see the appearance of SP Product Tab module as following:

    To configure this module, please find the module that you have completely installed in the module list and start setting its options.
     

    Let's look at the parameters in detail:

    • Title - Enter the title of the module.
    • Module Class Suffix - Enter the suffix which is applied to the CSS class of module. This allows to style an individual module easily.
    • Display Title Module - Allow to show/hide title of the module.
    • Status - Allow to enable/disable the status of the module.
    • Hook into - Select Hook into in the list box. Please click Here to read more How To Create Custom CMS Hook Page.
    • Select Tabs - Allow to select the product tabs having products that you want to show
    • Limit - Enter the quantity of images you want to display in each tab, for example: When you enter number ’4′ here, four images will be displayed in each tab
    • Column - Enter the quantity of columns you want to display
    • Size image (W x H) - Allow to sellect the size image from the dropdown menu.
    • Display Name - Allow to display the product names in the module
    • Name Maxleghth - Allow to set the maximum number of characters allowed in the name area
    • Display Description - Allow to display the description of each product.
    • Description Maxlength - Allow to set the maximum number of characters allowed in the description area
    • Display Price - Allow to display the product price.
    • Display Add to Cart Button - Allow to display Add to Cart Button button
    • Display Quick View Button - Allow to display Quick View button
    • Display Add to Wishlist Button - Allow to display Add to Wishlist button
    • Display Add to Compare Button - Allow to display Add to Compare button
    • Display Detail Link - Allow to display Detail Link of each product

    3SUPPORT - Back to top

    Thank you so much for using this extension, your support is truly appreciated. If you have any questions that are beyond the scope of this document, please feel free to contact us via our Support Tickets System


    SP Styleshop

    $
    0
    0

    1GETTING STARTED

    1.1 Introduction

    Firstly, a huge thanks for purchasing this theme, your support is truly appreciated!

    This document covers the installation and use of this theme, reveals some answers to common problems and issues. We encourage you to read this document throughtly if you are experiencing any difficulties. If you have any questions that are beyond the scope of document, please feel free to contact us via our Support Tickets System.

    1.2 System Requirements

    Please make sure your hosting server meets the PrestaShop requirements:

    • Supported operating system: Windows, Mac and Linux.
    • Wamp (for Windows) or Xampp (for Windows and Mac)
    • Web server: Apache Web server 1.3 or later, Microsoft’s IIS Web server 6.0 or later.
    • PHP 5.2* or later.
    • MySQL 5.0 or later.
    • At least 32 Mb of RAM on your server (64 Mb is comfortable, the more the better).

    Note: If you can not import the theme/module file to your server due to the maximum upload and PHP memory limit, you need to increase the parameter “memory_limit=200M”; “max_execution_time=300″; “max_execution_time=1000″ & “upload_max_filesize=20M” in the file php.ini.

    1.3 PrestaShop Guide

    If you are not familiar with Prestashop, please read its guide first: http://doc.prestashop.com/display/PS16/Getting+Started

    2INSTALLATION

    There are two ways to install SP Styleshop Theme

    • Quickstart Installation: By using this package, you will set the theme exactly like our Demo with sample data.
    • Manual Installation : Include of Theme layout Installation Packages. Please unzip the package and you would see the following folders:
      • module folder
      • override folder
      • sp_styleshop_template_p16_v1.0.0.zip file

    2.1 Quickstart Installation

    We provide Quickstart package for each theme which aims to ease the installation for users. It will help you save much time of installing and configuring if you plan to start your site from the beginning. Please following steps below:

    • Step 1: Download the quickstart package of SP Styleshop theme
    • Step 2: Extract the downloaded package named “sp_styleshop_quickstart_p16_v1.0.0.zip” in your localhost (or your hosting) folder. In Quickstart folder you will see the extracted folder that include all sample data
    • Step 3: Start installation by opening browser and navigate to your URL (where the Quickstart uploaded) to load default Prestashop installer. Please follow these steps of the Installer so that the installation process can be set.
      • Installation Assistant (Choose your language)

    Please select the installation language

    Please note: The installation language option will not affect your store language. By default PrestaShop is offered in English. You can install additional localization packages to change the store language.

    When you are done, click the ‘Next’ button.

      • Installation Assistant (License agreements)

    Please check the license agreement.

    When you are done, click the ‘Next’ button.

      • System Compatibility

    Check the PHP settings and directory permissions. In case of any errors, please contact your hosting provider for further assistance.

    If everything is correct, click the ‘Next’ button.

      • Store Information

    Now add required information for your store: Shop name, Main activity, Country, Shop timezone and add the account info: first name, last name, email and password. Click “Next” to next step.

    When you are done, click the ‘Next’ button.

      • System Configuration

    Here is the database configuration panel, we need to create database first.

    Access your database panel and create database for your site. Add database name and then click “Create” button.

    When the database is created successfully, copy and paste its name into the “Database name” field, then click the “Test your database connection now!” button to make sure that the entered settings are correct. If they are, you will see a Database is connected message. After that, you could click the “Next” button to move to next steps.

      • Finish installation: This process could take a few minutes

    Note: For security reasons you need to delete the install/ directory on your hosting server.

    And finally, go to the Frontend or Backend as you want:

    2.2 Theme Installation

    Note: Before installing theme, you must disable the cache. In your back office, please go to ADVANCED PARAMETERS >> Performance >> find “Cache” parameter >> Set “No” to disable cache >> Click “Save”.

    SP Styleshop Layout1 Theme Installation

    Note: Here we will introduce you How To Install SP Styleshop layout1 Theme, with layout2 do the same.

    Firstly, you must EXTRACT the “sp_styleshop_layout1_theme_p16_v1.0.0.zip” package and open the extracted folder. Here you will see:

    • module folder: contain of the smartblog.zip file, smartblogcategories.zip file and themeinstallator.zip file.
    • override folder: contain of FrontController.php” file in the folder URL: \override\classes\controller\ .
    • and the sp_styleshop_template_p16_v1.0.0.zip file.

    STEP 1: Install “smartblog.zip”, “smartbloghomelatestnews.zip” and“smartblogcategories.zip” Module.

    1. Login to your Prestashop admin panel and navigate to MODULES -> Modules. At the top of the page click the Add a new module button.

    2. Choose “smartblog.zip” file and click “Upload this module” button

    3. There is a message-box “The module was successfully downloaded.”

    4. Please find to the uploaded module and click “Install” button to run it.

    5. When a pop-up window displays, please click “Proceed with the installation” button.

    6. Finally, Module(s) installed successfully.

    Note: Do the same with the “smartblogcategories.zip” and “smartbloghomelatestnews.zip” module’s installation

    STEP 2: Install “themeinstallator” Module.

    1. Login to your Prestashop admin panel and navigate to MODULES -> Modules. At the top of the page click the Add a new module button.

    2. Select your file named “themeinstallator.zip” and click “Upload this module” button

    3. The uploading process will be started. You will see the message that the module has been successfully downloaded.

    4. The new module is located in the modules list, so you can Search its name and click Install button to start the module.

    5. Finally, you will see a notice message: "Module(s) installed successfully".


    STEP 3: Install the “sp_styleshop_template_p16_v1.0.0.zip” file.

    1. In the your Prestashop admin panel and navigate to MODULES >> Modules. Find to the module that you have installed and clicked on Configure button to configure the module.

    2. Navigate to “Import from your computer>> choose the zip theme file as named “sp_styleshop_template_p16_v1.0.0.zip>> Next.

    3. You will see a message that You are going to install the following theme SP Styleshop version 1.0.0, please click “Next” button to continue.

    4. Select the module that you want to install/disable >> click “Next” button to continue the installation process.

    5. After that, a list of the installed/disabled modules will be showed out and you could click “Finish” button to finish the theme installation.

    STEP 4: Override folder: copy the "FrontController.php" file into the installation folder with the URL: override\classes\controller.

    3SP THEME CONFIGURATION

    3.1 General Settings

    1. In your Prestashop Admin Dashboard, navigate to Modules and Services >> Modules and Services >> go to MODULES LIST section, search for “SP Theme configurator” module then click on Configure.

    2. In the SP Theme Settings, choose “General” to configure the parameters in this section. After finishing, you could go to the front-end to view the changes.

    3.2 Layout Settings

    1. In your Prestashop Admin Dashboard, navigate to Modules and Services >> Modules and Services >> go to MODULES LIST section, search for “SP Theme configurator” module then click on Configure.

    2. In the SP Theme Settings, choose “Layout” to configure the parameters in this section. After finishing, you could go to the front-end to view the changes.

    Note: Please copy and paste the following line into Font Selector tab:

    3.3 Fonts

    1. In your Prestashop Admin Dashboard, navigate to Modules and Services >> Modules and Services >> go to MODULES LIST section, search for “SP Theme configurator” module then click on Configure.

    2. In the SP Theme Settings, choose “Fonts” to configure the parameters in this section. After finishing, you could go to the front-end to view the changes.

    Note: Please copy and paste the following line into Font Selector tab:
    1.

    body, h5.product-name, .price-box, #attributes .attribute_list select, h1.product_name

    2.

    div#articleComments .commentList li .text .created span, div#articleComments .commentList li .text .reply, #sdsblogArticle .article-info a, #sdsblogArticle .article-info span ,ul.recentArticles li .info,#smartblogcat .articleContent .sdsarticle-info span,div.lastestnews .post .post_content .post-info span

    3.4 Category Pages

    1. In your Prestashop Admin Dashboard, navigate to Modules and Services >> Modules and Services >> go to MODULES LIST section, search for “SP Theme configurator” module then click on Configure.

    2. In the SP Theme Settings, choose “Category Pages” to configure the parameters in this section. After finishing, you could go to the front-end to view the changes.

    3.5 Product Pages

    1. In your Prestashop Admin Dashboard, navigate to Modules and Services >> Modules and Services >> go to MODULES LIST section, search for “SP Theme configurator” module then click on Configure.

    2. In the SP Theme Settings, choose “Product Pages” to configure the parameters in this section. After finishing, you could go to the front-end to view the changes.

    3.6 Bonus Pages

    1. In your Prestashop Admin Dashboard, navigate to Modules and Services >> Modules and Services >> go to MODULES LIST section, search for “SP Theme configurator” module then click on Configure.

    2. In the SP Theme Settings, choose “Bonus Pages” to configure the parameters in this section. After finishing, you could go to the front-end to view the changes.

    3.7 Advanced Settings

    1. In your Prestashop Admin Dashboard, navigate to Modules and Services >> Modules and Services >> go to MODULES LIST section, search for “SP Theme configurator” module then click on Configure.

    2. In the SP Theme Settings, choose “Advanced” to configure the parameters in this section. After finishing, you could go to the front-end to view the changes.

    3.8 Social Accounts

    1. In your Prestashop Admin Dashboard, navigate to Modules and Services >> Modules and Services >> go to MODULES LIST section, search for “SP Theme configurator” module then click on Configure.

    2. In the SP Theme Settings, choose “Social Accounts” to configure the parameters in this section. After finishing, you could go to the front-end to view the changes.

    1. To configure Logo for your store, navigate to PREFERENCES > Themes in your Prestashop Admin Dashboard. Go to Logo tab to set up your logo. Click “Add File” to upload the logo image as you want and “Save”.

    2. Please check the front-end to view the changes.

    3.10 Image Size Adjustment

    In your Prestashop admin dashboard, navigate to: PREFERENCES >> Images to configure the image size for category, manufacturer, supplier, product, etc that fit your layout best.

    1. Image size - You can choose the image size types that suit your products best.

    2. Image quality - You can set image quality in use on your site.

    3. Regenerate thumbnails - To see the changes after you update the image sizes, image quality; you need to re-generate the images used in your site. Select option then click Regenerate thumbnails button.

    Frontend Appearance:

    To edit Copyright, please follow these steps:
    1. In your Prestashop Admin Dashboard, navigate to Modules and Services >> Modules and Services >> go to MODULES LIST section, search for “SP Theme configurator” module then click on Configure.

    2. In the SP Theme Settings, choose “General” to configure the parameter named “Copyright” in this section. After finishing, you could go to the front-end to see the changes.

    3.12 Edit Pop-up

    Frontend Appearance:

    To edit this pop-up, please follow these steps:
    1. Change the image:
    In your Website’s Directory, go to themes\sp_styleshop\img\icon folder. To change the image in this pop-up, you could replace our sample image named bg_popup.jpg by your image with the same name as our sample image.

    2. Change the text:
    In your Website’s Directory, go to themes\sp_styleshop\modules\spblocknewsletter folder. To change the text in this pop-up, in this folder, you could open the file named spblocknewsletterpopup.tpl by your editor program.
    Find and change the following text in this file as you want:

    Subscribe to the Styleshop mailing list to receive updates on new arrivals, special offers and other discount information.


    3. After finishing, you could go to the front-end to see the changes.

    4SP MEGA MENU CONFIGURATION

    displayMenu: SP Mega Menu


    1. Navigate to Modules -> Modules >> look for SP Mega Menu >> Click the Configure button to access the module configuration page.

    2. In the SP Mega Menu Panel, you could configure Add New Module by click on the button like the following image:

    3. In the configuration page of new module, you could configure General Options as follows

    4. In the configuration page of new module, you could configure Menu Information as follows

    5. In order to add menu items, to add items as you want, you need to click this button.

    6. Menu list of Mega Menu You need to look at the menu list to configure easily.

    7. To configure each item, you need to click “Edit” button as follows:

    Go Here to readmore about the SP Mega Menu module.

    Note: In the next steps, when editing items in the menus, the items (in a menu) having same level could have same configuration. Therefore, we encourage you read throughtly and find out the item’s level to configure it without any errors.

    Men
    Frontend Appearance

    • Backend Settings : Please click Here to view.
    • Backend Settings of Item ‘Living Room’: Please click Here to view.

    Note: You could do the same with these items having same level in this menu: Bed Room, Chairs, Light, Tables

    • Backend Settings of Item ‘Category Image’: Please click Here to view.

    Copy and paste the following code into the content:

    <div class="images_cat"><a class="img img1" href="#"><img src="http://your-website-address/themes/sp_styleshop/img/cms/image_cat1.jpg" alt="" /> </a><a class="img img2" href="#"><img src="http://your-website-address/themes/sp_styleshop/img/cms/image_cat2.jpg" alt="" /> </a></div>

    Women
    Frontend Appearance

    • Backend Settings : Please click Here to view.
    • Backend Settings of Item ‘Bags’: Please click Here to view.

    Note: You could do the same with these items having same level in this menu: Jackets, Shirt & T-Shirt, Accessories

    • Backend Settings of Item ‘Featured product’: Please click Here to view.

    Dining
    Frontend Appearance

    • Backend Settings : Please click Here to view.
    • Backend Settings of Item ‘Dining Submenu 1′: Please click Here to view.

    Note: You could do the same with these items having same level in this menu: Dining Submenu 2, Dining Submenu 3, Dining Submenu 4

    Kitchen
    Frontend Appearance

    • Backend Settings : Please click Here to view.

    Blog
    Frontend Appearance

    • Backend Settings : Please click Here to view.

    About Us
    Frontend Appearance

    • Backend Settings : Please click Here to view.

    Contact Us
    Frontend Appearance

    • Backend Settings : Please click Here to view.
    • Backend Settings of Item ‘Contact Page 1′ : Please click Here to view.

    Note: You could do the same with these items having same level in this menu: Contact Page 2, Contact Page 3, Contact Page 4

    5EXTENSIONS CONFIGURATION

    5.1 SP Styleshop Layout 1

    home-default

    displayUserinfo

    SP User Info Block

    Frontend Appearance:

    Backend Settings:

    In the Pretashop Admin Panel, navigate to Modules and Services >> Modules and Services >> look for “SP User Info Block” module >> click “Enable” button to enable this module.

    Frontend Appearance:

    Backend Settings: Go Here to see the backend settings.

    displayTopNav

    1. SP Block Languages

    Frontend Appearance:

    Backend Settings:

    Step 1: To add language as you want. For example: To add “Arabic” language, in your Admin Panel >> navigate to LOCALIZATION >> Languages >> click button in the right corner to “ADD NEW”.

    Step 2: Fill information into the required field (*) as below:

    Step 3: Click “Save” button and view shop to see the changes.

    Note: When you add any language as you want, for example: Arabic language as above. At the frontend , some images will display “?” image as following:

    .

    To resolve this error, please make the steps following:

    1. In your administator, please find to position of this module, for example: Position – displayHtml1: New Arrival; Module: SP Custom HTML.

    .

    2. And click source code to add “../” at before the image url >> Click “OK”.

    .

    3. Click “Save” button and go to the frontend to view the changes.

    2. SP Block Currencies

    Frontend Appearance:

    Backend Settings:

    In the Pretashop Admin Panel, navigate to Modules and Services >> Modules and Services >> look for “SP Currency Block>> click “Enable” button to enable this module.

    SP Search Block

    Frontend Appearance:

    Backend Settings:

    Step 1: In the Pretashop Admin Panel, navigate to Modules and Services >> Modules and Services >> look for “SP Search Pro” module >> click “Configure” button to configure.

    Step 2: In the “SP Search Pro” configuration page, click button in the right corner to “ADD NEW MODULE”.

    Step 3: You could configure this module like the following image.

    displayCart

    SP Cart Block

    Frontend Appearance:

    Backend Settings:

    Step 1: In the Pretashop Admin Panel, navigate to Modules and Services >> Modules and Services >> look for “SP Cart Block” module >> click “Configure” button to configure.

    Step 2: In the “SP Cart Block” configuration page, click button in the right corner to “ADD NEW MODULE”.

    Step 3: You could configure this module like the following image.

    displaySlideShow1

    Sp slider for your homepage

    Frontend Appearance:

    Backend Settings:

    Step 1: In the Pretashop Admin Panel, navigate to Modules and Services >> Modules and Services >> look for “SP Home Slider” module >> click “Configure” button to configure.

    Step 2: In the “SP Slider For Your Homepage” configuration page, click button in the right corner to “ADD NEW MODULE”.

    Step 3: You could configure this module like the following image.

    Step 4: In the last part named Slides List of this configuration page, click button in the right corner to add new slide and edit slide’s information as follows:

    • Sample 1:
      Copy and paste the following code into the content:
      <h3>welcome to styleshop</h3>
      <h2>NEW TREND FROM france</h2>
      <h4>* Discount applied automatically at checkout</h4>
    • Sample 2:
      Copy and paste the following code into the content:
      <h3>welcome to styleshop</h3>
      <h2>NEW TREND FROM france</h2>
      <h4>* Discount applied automatically at checkout</h4>
    • Sample 3:
      Copy and paste the following code into the content:
      <h3>welcome to styleshop</h3>
      <h2>NEW TREND FROM france</h2>
      <h4>* Discount applied automatically at checkout</h4>

    display CustomHTML1

    SP Custom HTML – New Arrival
    Frontend Appearance:

    Backend Settings:

    Step 1: In the Pretashop Admin Panel, navigate to Modules and Services >> Modules and Services >> look for “SP Custom HTML” module >> click “Configure” button to configure.

    Step 2: In the “SP Custom HTML” configuration page, click button in the right corner to “ADD NEW MODULE”.

    Step 3: You could configure this module like the following image.


    Copy and paste the following code into the content:

    <div class="block_newarrival">
    <div class="box-top">
    <div class="box-left col-md-6 col-lg-6 col-sm-6 col-xs-12">
    <div class="col-md-6 col-lg-6 col-sm-6 col-xs-12">
    <div class="content_info">
    <h1>Accessories</h1>
    <p class="text">Go hell for leather or switch it up with suede shoppers, clutches and cross-body bags.</p>
    <div class="btn_newarr"><a href="#">Shop it now!</a></div>
    </div>
    </div>
    <div class="col-md-6 col-lg-6 col-sm-6 col-xs-12">
    <div class="images"><img src="../themes/sp_styleshop/img/cms/banner01.jpg" alt="" /></div>
    </div>
    <span class="women">W</span></div>
    <div class="box-right col-md-6 col-lg-6 col-sm-6 col-xs-12"><span class="men">M</span>
    <div class="col-md-6 col-lg-6 col-sm-6 col-xs-12">
    <div class="images"><img src="../themes/sp_styleshop/img/cms/banner02.jpg" alt="" /></div>
    </div>
    <div class="col-md-6 col-lg-6 col-sm-6 col-xs-12">
    <div class="content_info">
    <h1>Backpacks</h1>
    <p class="text">Give strong street-style game with our range of Nike and adidas backpacks.</p>
    <div class="btn_newarr"><a href="#">Shop it now!</a></div>
    </div>
    </div>
    </div>
    </div>
    <div class="box-bottom">
    <div class="box-left col-md-4 col-lg-4 col-sm-4 col-xs-12">
    <div class="col-md-6 col-lg-6 col-sm-6 col-xs-12">
    <div class="content_info">
    <h1>Cross-Body Bags</h1>
    <p class="text">Take your bag hands-free with a cross-body style for instant cool.</p>
    <div class="btn_newarr"><a href="#">Shop it now!</a></div>
    </div>
    </div>
    <div class="col-md-6 col-lg-6 col-sm-6 col-xs-12">
    <div class="images"><img src="../themes/sp_styleshop/img/cms/banner03.jpg" alt="" /></div>
    </div>
    </div>
    <div class="box-center col-md-4 col-lg-4 col-sm-4 col-xs-12">
    <div class="images"><a href="#"><img src="../themes/sp_styleshop/img/cms/banner05.jpg" alt="" /></a></div>
    </div>
    <div class="box-right col-md-4 col-lg-4 col-sm-4 col-xs-12">
    <div class="col-md-6 col-lg-6 col-sm-6 col-xs-12">
    <div class="images"><img src="../themes/sp_styleshop/img/cms/banner04.jpg" alt="" /></div>
    </div>
    <div class="col-md-6 col-lg-6 col-sm-6 col-xs-12">
    <div class="content_info">
    <h1>Accessories</h1>
    <p class="text">The little things make a big difference with our range of accessories.</p>
    <div class="btn_newarr"><a href="#">Shop it now!</a></div>
    </div>
    </div>
    </div>
    </div>
    </div>

    displayExtraSlider

    SP Extra Slider – The Collection
    Frontend Appearance:

    Backend Settings:

    Step 1: In the Pretashop Admin Panel, navigate to Modules and Services >> Modules and Services >> look for “SP Extra Slider” module.

    Step 2: In the “SP Extra Slider” configuration page, click button in the right corner to “ADD NEW MODULE”.

    Step 3: You could configure this module like the following image.

    display CustomHTML2

    SP Custom HTML – Banner Top
    Frontend Appearance:

    Backend Settings:

    Step 1: In the Pretashop Admin Panel, navigate to Modules and Services >> Modules and Services >> look for “SP Custom HTML” module >> click “Configure” button to configure.

    Step 2: In the “SP Custom HTML” configuration page, click button in the right corner to “ADD NEW MODULE”.

    Step 3: You could configure this module like the following image.


    Copy and paste the following code into the content:

    <div class="best-style">
    <div class="title"><span class="title-span">New Collection</span></div>
    <h1>Best for women style</h1>
    <p>Sale off up 30%</p>
    <div class="btn_newarr"><a href="#">Shop it now!</a></div>
    </div>

    displayExtraSlider2

    SP Extra Slider – New Arrivals (women)
    Frontend Appearance:

    Backend Settings:

    Step 1: In the Pretashop Admin Panel, navigate to Modules and Services >> Modules and Services >> look for “SP Extra Slider” module.

    Step 2: In the “SP Extra Slider” configuration page, click button in the right corner to “ADD NEW MODULE”.

    Step 3: You could configure this module like the following image.
    Module Class Suffix:

    ex_women col-lg-4 col-md-4 col-sm-4 col-xs-12

    display CustomHTML3

    SP Custom HTML – Banner Center Shop
    Frontend Appearance:

    Backend Settings:

    Step 1: In the Pretashop Admin Panel, navigate to Modules and Services >> Modules and Services >> look for “SP Custom HTML” module >> click “Configure” button to configure.

    Step 2: In the “SP Custom HTML” configuration page, click button in the right corner to “ADD NEW MODULE”.

    Step 3: You could configure this module like the following image.

    • Module Class Suffix:
      html-center col-lg-4 col-md-4 col-sm-4 col-xs-12
    • Copy and paste the following code into the content:
      <div class="ex_wm">
      <div class="images"><img src="../themes/sp_styleshop/img/cms/cate01.jpg" alt="" /></div>
      <div class="title_shop">
      <h4>Shop</h4>
      </div>
      <h3 class="title_block"><span class="style1"> <span class="title2">New Arrivals</span></span></h3>
      <p>Lorem ipsum dolor sit amet, consectetur adipisicing elit, sed do eiusmod tempor</p>
      <div class="btn_newarr"><a href="#">view all products</a></div>
      </div>

    displayExtraSlider3

    SP Extra Slider – New Arrivals (men)
    Frontend Appearance:

    Backend Settings:

    Step 1: In the Pretashop Admin Panel, navigate to Modules and Services >> Modules and Services >> look for “SP Extra Slider” module.

    Step 2: In the “SP Extra Slider” configuration page, click button in the right corner to “ADD NEW MODULE”.

    Step 3: You could configure this module like the following image.
    Module Class Suffix:

    ex_men col-lg-4 col-md-4 col-sm-4 col-xs-12

    display CustomHTML4

    SP Custom HTML – Trending Fashion
    Frontend Appearance:

    Backend Settings:

    Step 1: In the Pretashop Admin Panel, navigate to Modules and Services >> Modules and Services >> look for “SP Custom HTML” module >> click “Configure” button to configure.

    Step 2: In the “SP Custom HTML” configuration page, click button in the right corner to “ADD NEW MODULE”.

    Step 3: You could configure this module like the following image.


    Copy and paste the following code into the content:

    <div class="trending">
    <div class="img img1 col-xs-12 col-sm-6 col-md-6 col-lg-6"><a href="#"><img src=" http://your-website-address/themes/sp_styleshop/img/icon/bgr_spotlight4.jpg" alt="" /></a></div>
    <div class="img img2  col-xs-12 col-sm-6 col-md-6 col-lg-6"><a href="#"><img src=" http://your-website-address/themes/sp_styleshop/img/icon/bgr_spotlight4_1.jpg" alt="" /></a></div>
    </div>

    displayManufacturer

    SP Manufacture Slider – Our Brands
    Frontend Appearance:

    Backend Settings:

    Step 1: In the Pretashop Admin Panel, navigate to Modules and Services >> Modules and Services >> look for “SP Custom HTML” module >> click “Configure” button to configure.

    Step 2: In the “SP Custom HTML” configuration page, click button in the right corner to “ADD NEW MODULE”.

    Step 3: You could configure this module like the following image.

    display Home News

    SP SmartBlog Home Lastest
    Frontend Appearance:

    Backend Settings:

    Step 1: In the Pretashop Admin Panel, navigate to Modules and Services >> Modules and Services >> look for “SmartBlog Home Lastest” module.

    Step 2: You could configure this module like the following image.

    display CustomHTML5

    SP Custom HTML – Banner Top Layout2
    Frontend Appearance:

    Backend Settings:

    Step 1: In the Pretashop Admin Panel, navigate to Modules and Services >> Modules and Services >> look for “SP Custom HTML” module >> click “Configure” button to configure.

    Step 2: In the “SP Custom HTML” configuration page, click button in the right corner to “ADD NEW MODULE”.

    Step 3: You could configure this module like the following image.


    Copy and paste the following code into the content:

    <div class="shipping">
    <div class="pre-text_ft">free shipping on orders over $450.00</div>
    </div>

    display Newsletter

    SP Newsletter Block
    Frontend Appearance:

    Backend Settings:

    Step 1: In the Pretashop Admin Panel, navigate to Modules and Services >> Modules and Services >> look for “SP Newsletter Block” module.

    Step 2: You could configure its settings like the following image.


    To edit the text in this module, please follow these steps:
    In your Website’s Directory, go to themes\sp_styleshop\modules\spblocknewsletter folder. To change the text in this module, in this folder, you could open the file named blocknewsletter.tpl by your editor program.
    Find and change the text you want to edit, such as: NEWSLETTER SIGNUP, Your email…, subscribe

    displayTopSocial

    SP Theme Configuration

    Frontend Appearance:

    Backend Settings:
    1. In your Prestashop Admin Dashboard, navigate to Modules and Services >> Modules and Services >> go to MODULES LIST section, search for “SP Theme configurator” module then click on Configure.

    2. In the SP Theme Settings, choose “Social Accounts” to configure the parameters in this section. After finishing, you could go to the front-end to view the changes.

    display CustomHTML6

    SP Custom HTML – Footer Informations
    Frontend Appearance:

    Backend Settings:

    Step 1: In the Pretashop Admin Panel, navigate to Modules and Services >> Modules and Services >> look for “SP Custom HTML” module >> click “Configure” button to configure.

    Step 2: In the “SP Custom HTML” configuration page, click button in the right corner to “ADD NEW MODULE”.

    Step 3: You could configure this module like the following image.


    Copy and paste the following code into the content:

    <div class="col-md-8 col-sm-12 content_footer">
    <div class="footer-info col-md-6 col-sm-12">
    <div class="img_logo"> </div>
    <div class="text">Donec tellus Nulla lorem Nullam elit id ut elit feugiat lacus. Congue eget dapibus congue tincidunt senectus nibh risus Morbi at ligula porta, vulputate nulla vitae, accumsan sapien. Maecenas molestie maximus varius. Aliquam blandit rhoncus...</div>
    <div class="button_footer"><a href="#">Buy this theme</a></div>
    </div>
    <div class="box-right col-md-6 col-sm-12">
    <div class="our-shop col-md-6 col-sm-6">
    <div class="title">OUR SHOPS</div>
    <ul>
    <li><a href="#">Product Support</a></li>
    <li><a href="#">PC Setup & Support Services</a></li>
    <li><a href="#">Extended Service Plans</a></li>
    <li><a href="#">Community</a></li>
    <li><a href="#">Product Manuals</a></li>
    <li><a href="#">Product Registration</a></li>
    </ul>
    </div>
    <div class="orders col-md-6 col-sm-6">
    <div class="title">ORDERS</div>
    <ul>
    <li><a href="http://your-website-address/my-account">My Account</a></li>
    <li><a href="#">Order Tracking</a></li>
    <li><a href="#">Watch List</a></li>
    <li><a href="#">Customer Service</a></li>
    <li><a href="#">Returns / Exchanges</a></li>
    <li><a href="#">FAQs</a></li>
    </ul>
    </div>
    </div>
    </div>

    Contact Information Block
    Frontend Appearance:

    Backend Settings:

    Step 1: In the Pretashop Admin Panel, navigate to Modules and Services >> Modules and Services >> look for “Contact Information Block” module.

    Step 2: You could configure this module like the following image.

    To edit text in this position, go to themes\sp_styleshop\modules\blockcontactinfos folder in your Website’s Directory. In this folder, you could open the file named blockcontactinfos.tpl by your editor program.
    Find and change the following text in this file as you want:

    Lorem Ipsum is simply dummy text of the printing and typesetting industry. Lorem Ipsum is simply dummy text of the printing and typesetting industry

    SP Custom HTML – Menu Footer
    Frontend Appearance:

    Backend Settings:

    Step 1: In the Pretashop Admin Panel, navigate to Modules and Services >> Modules and Services >> look for “SP Custom HTML” module >> click “Configure” button to configure.

    Step 2: In the “SP Custom HTML” configuration page, click button in the right corner to “ADD NEW MODULE”.

    Step 3: You could configure this module like the following image.


    Copy and paste the following code into the content:

    <div class="menu-footer">
    <ul>
    <li><a href="http://your-website-address/content/4-about-us">About Us</a></li>
    <li><a href="#">Customer Service</a></li>
    <li><a href="#">Privacy Policy</a></li>
    <li><a href="#">Site Map</a></li>
    <li><a href="#">Orders and Returns</a></li>
    <li><a href="index.php?controller=contact">Contact Us </a></li>
    </ul>
    </div>

    SP Theme Configuration
    Frontend Appearance:

    Backend Settings:
    Go Here to see the backend settings.

    5.2 SP Styleshop Layout 2

    home-layout2

    displayExtraSlider4

    SP Extra Slider – Autumn Collections (left)(women)
    Frontend Appearance:

    Backend Settings:

    Step 1: In the Pretashop Admin Panel, navigate to Modules and Services >> Modules and Services >> look for “SP Extra Slider” module.

    Step 2: In the “SP Extra Slider” configuration page, click button in the right corner to “ADD NEW MODULE”.

    Step 3: You could configure this module like the following image.
    Module Class Suffix:

    ex_women col-lg-4 col-md-4 col-sm-4 col-xs-12

    display Custom HTML7

    SP Custom HTML – Banner Center Layout2 women
    Frontend Appearance:

    Backend Settings:

    Step 1: In the Pretashop Admin Panel, navigate to Modules and Services >> Modules and Services >> look for “SP Custom HTML” module >> click “Configure” button to configure.

    Step 2: In the “SP Custom HTML” configuration page, click button in the right corner to “ADD NEW MODULE”.

    Step 3: You could configure this module like the following image.

    • Module Class Suffix:
      html-center col-lg-4 col-md-4 col-sm-4 col-xs-12
    • Copy and paste the following code into the content:
      <div class="ex_wm">
      <div class="images"><img src="../themes/sp_styleshop/img/cms/cate02.jpg" alt="" /></div>
      <div class="title_shop">
      <h4>womens</h4>
      </div>
      <h3 class="title_block"><span class="style1"> <span class="title2">Autumn Collections</span></span></h3>
      <p>Lorem ipsum dolor sit amet, consectetur adipisicing elit, sed do eiusmod tempor</p>
      <div class="btn_newarr"><a href="#">view all products</a></div>
      </div>

    displayExtraSlider5

    SP Extra Slider – Autumn Collections (right)(women)
    Frontend Appearance:

    Backend Settings:

    Step 1: In the Pretashop Admin Panel, navigate to Modules and Services >> Modules and Services >> look for “SP Extra Slider” module.

    Step 2: In the “SP Extra Slider” configuration page, click button in the right corner to “ADD NEW MODULE”.

    Step 3: You could configure this module like the following image.
    Module Class Suffix:

    ex_men col-lg-4 col-md-4 col-sm-4 col-xs-12

    displayExtraSlider6

    SP Extra Slider -Autumn Collections (left) (men)
    Frontend Appearance:

    Backend Settings:

    Step 1: In the Pretashop Admin Panel, navigate to Modules and Services >> Modules and Services >> look for “SP Extra Slider” module.

    Step 2: In the “SP Extra Slider” configuration page, click button in the right corner to “ADD NEW MODULE”.

    Step 3: You could configure this module like the following image.
    Module Class Suffix:

    ex_women col-lg-4 col-md-4 col-sm-4 col-xs-12

    display Custom HTML8

    SP Custom HTML – Banner Center Layout2 men
    Frontend Appearance:

    Backend Settings:

    Step 1: In the Pretashop Admin Panel, navigate to Modules and Services >> Modules and Services >> look for “SP Custom HTML” module >> click “Configure” button to configure.

    Step 2: In the “SP Custom HTML” configuration page, click button in the right corner to “ADD NEW MODULE”.

    Step 3: You could configure this module like the following image.

    • Module Class Suffix:
      html-center col-lg-4 col-md-4 col-sm-4 col-xs-12
    • Copy and paste the following code into the content:
      <div class="ex_wm">
      <div class="images"><img src="../themes/sp_styleshop/img/cms/cate03.jpg" alt="" /></div>
      <div class="title_shop">
      <h4>Mens</h4>
      </div>
      <h3 class="title_block"><span class="style1"> <span class="title2">Autumn Collections</span></span></h3>
      <p>Lorem ipsum dolor sit amet, consectetur adipisicing elit, sed do eiusmod tempor</p>
      <div class="btn_newarr"><a href="#">view all products</a></div>
      </div>

    displayExtraSlider7

    SP Extra Slider -Autumn Collections (right) (men)
    Frontend Appearance:

    Backend Settings:

    Step 1: In the Pretashop Admin Panel, navigate to Modules and Services >> Modules and Services >> look for “SP Extra Slider” module.

    Step 2: In the “SP Extra Slider” configuration page, click button in the right corner to “ADD NEW MODULE”.

    Step 3: You could configure this module like the following image.
    Module Class Suffix:

    ex_men col-lg-4 col-md-4 col-sm-4 col-xs-12

    displayExtraSlider8

    SP Extra Slider -Autumn Collections (left) (Accessories)
    Frontend Appearance:

    Backend Settings:

    Step 1: In the Pretashop Admin Panel, navigate to Modules and Services >> Modules and Services >> look for “SP Extra Slider” module.

    Step 2: In the “SP Extra Slider” configuration page, click button in the right corner to “ADD NEW MODULE”.

    Step 3: You could configure this module like the following image.
    Module Class Suffix:

    ex_women col-lg-4 col-md-4 col-sm-4 col-xs-12

    display Custom HTML9

    SP Custom HTML – Banner Center Layout2 Accessories
    Frontend Appearance:

    Backend Settings:

    Step 1: In the Pretashop Admin Panel, navigate to Modules and Services >> Modules and Services >> look for “SP Custom HTML” module >> click “Configure” button to configure.

    Step 2: In the “SP Custom HTML” configuration page, click button in the right corner to “ADD NEW MODULE”.

    Step 3: You could configure this module like the following image.

    • Module Class Suffix:
      html-center col-lg-4 col-md-4 col-sm-4 col-xs-12
    • Copy and paste the following code into the content:
      <div class="ex_wm">
      <div class="images"><img src="../themes/sp_styleshop/img/cms/cate04.jpg" alt="" /></div>
      <div class="title_shop">
      <h4>Accessories</h4>
      </div>
      <h3 class="title_block"><span class="style1"> <span class="title2">Autumn Collections</span></span></h3>
      <p>Lorem ipsum dolor sit amet, consectetur adipisicing elit, sed do eiusmod tempor</p>
      <div class="btn_newarr"><a href="#">view all products</a></div>
      </div>

    displayExtraSlider9

    SP Extra Slider -Autumn Collections (right) (Accessories)
    Frontend Appearance:

    Backend Settings:

    Step 1: In the Pretashop Admin Panel, navigate to Modules and Services >> Modules and Services >> look for “SP Extra Slider” module.

    Step 2: In the “SP Extra Slider” configuration page, click button in the right corner to “ADD NEW MODULE”.

    Step 3: You could configure this module like the following image.
    Module Class Suffix:

    ex_men col-lg-4 col-md-4 col-sm-4 col-xs-12

    5.3 SP Styleshop Layout 3

    home-layout3

    displayExtraSlider10

    SP Extra Slider -Slider home mod
    Frontend Appearance:

    Backend Settings:

    Step 1: In the Pretashop Admin Panel, navigate to Modules and Services >> Modules and Services >> look for “SP Extra Slider” module.

    Step 2: In the “SP Extra Slider” configuration page, click button in the right corner to “ADD NEW MODULE”.

    Step 3: You could configure this module like the following image.

    display Custom HTML10

    SP Custom HTML – New Arrival Layout2
    Frontend Appearance:

    Backend Settings:

    Step 1: In the Pretashop Admin Panel, navigate to Modules and Services >> Modules and Services >> look for “SP Custom HTML” module >> click “Configure” button to configure.

    Step 2: In the “SP Custom HTML” configuration page, click button in the right corner to “ADD NEW MODULE”.

    Step 3: You could configure this module like the following image.

    Copy and paste the following code into the content:

    <div class="block_newarrival">
    <div class="box-top">
    <div class="container">
    <div>
    <div class="box-left col-md-6 col-lg-6 col-sm-6 col-xs-12">
    <div class="info col-md-6 col-lg-6 col-sm-6 col-xs-12">
    <div class="content_info">
    <h1>LEATHER & SUEDE BAGS</h1>
    <p class="text">Go hell for leather or switch it up with suede shoppers, clutches and cross-body bags.</p>
    <div class="btn_newarr"><a href="#">Shop it now!</a></div>
    </div>
    </div>
    <div class="img col-md-6 col-lg-6 col-sm-6 col-xs-12">
    <div class="images"><img src="../themes/sp_styleshop/img/cms/banner06.jpg" alt="" /></div>
    </div>
    </div>
    <div class="box-right col-md-6 col-lg-6 col-sm-6 col-xs-12">
    <div class="img col-md-6 col-lg-6 col-sm-6 col-xs-12">
    <div class="images"><img src="../themes/sp_styleshop/img/cms/banner07.jpg" alt="" /></div>
    </div>
    <div class="info col-md-6 col-lg-6 col-sm-6 col-xs-12">
    <div class="content_info">
    <h1>ACCESSORIES</h1>
    <p class="text">The little things make a big difference with our range of accessories.</p>
    <div class="btn_newarr"><a href="#">Shop it now!</a></div>
    </div>
    </div>
    </div>
    </div>
    </div>
    </div>
    <div class="box-bottom">
    <div class="container">
    <div>
    <div class="box-left col-md-6 col-lg-6 col-sm-6 col-xs-12">
    <div class="info col-md-6 col-lg-6 col-sm-6 col-xs-12">
    <div class="content_info">
    <h1>CLUTCHES</h1>
    <p class="text">Want clutch control? Take your pick of all-out embellishment and hot metal hardware, fab-factor faux fur and fringing.</p>
    <div class="btn_newarr"><a href="#">Shop it now!</a></div>
    </div>
    </div>
    <div class="img col-md-6 col-lg-6 col-sm-6 col-xs-12">
    <div class="images"><img src="../themes/sp_styleshop/img/cms/banner08.jpg" alt="" /></div>
    </div>
    <span class="women">W</span></div>
    <div class="box-right col-md-6 col-lg-6 col-sm-6 col-xs-12"><span class="men">M</span>
    <div class="img col-md-6 col-lg-6 col-sm-6 col-xs-12">
    <div class="images"><img src="../themes/sp_styleshop/img/cms/banner09.jpg" alt="" /></div>
    </div>
    <div class="info col-md-6 col-lg-6 col-sm-6 col-xs-12">
    <div class="content_info">
    <h1>HOLDALL BAGS</h1>
    <p class="text">Practical and stylish, the weekend bag accommodates all your essentials.</p>
    <div class="btn_newarr"><a href="#">Shop it now!</a></div>
    </div>
    </div>
    </div>
    </div>
    </div>
    </div>
    </div>

    displayListingtab

    SP Listing Tabs – TRENDING PRODUCTS
    Frontend Appearance:

    Backend Settings:

    Step 1: In the Pretashop Admin Panel, navigate to Modules and Services >> Modules and Services >> look for “SP Listing Tabs” module.

    Step 2: In the “SP Listing Tabs” configuration page, click button in the right corner to “ADD NEW MODULE”.

    Step 3: You could configure this module like the following image.

    6SUPPORT

    • SUPPORT – If you have any questions that are beyond the scope of this help file, please feel free to send us via: Support Tickets System
    • FAQs – Go to Here to view more the Frequently Asked Questions.

    SP FCStore

    $
    0
    0

    1GETTING STARTED

    1.1 Introduction

    Firstly, a huge thanks for purchasing this theme, your support is truly appreciated!

    This document covers the installation and use of this theme, reveals some answers to common problems and issues. We encourage you to read this document throughtly if you are experiencing any difficulties. If you have any questions that are beyond the scope of document, please feel free to contact us via our Support Tickets System.

    1.2 System Requirements

    Please make sure your hosting server meets the PrestaShop requirements:

    • Supported operating system: Windows, Mac and Linux.
    • Wamp (for Windows) or Xampp (for Windows and Mac)
    • Web server: Apache Web server 1.3 or later, Microsoft’s IIS Web server 6.0 or later.
    • PHP 5.2* or later.
    • MySQL 5.0 or later.
    • At least 32 Mb of RAM on your server (64 Mb is comfortable, the more the better).

    Note: If you can not import the theme/module file to your server due to the maximum upload and PHP memory limit, you need to increase the parameter “memory_limit=200M”; “max_execution_time=300″; “max_execution_time=1000″ & “upload_max_filesize=20M” in the file php.ini.

    1.3 PrestaShop Guide

    If you are not familiar with Prestashop, please read its guide first: http://doc.prestashop.com/display/PS16/Getting+Started

    2INSTALLATION

    There are two ways to install SP FCStore Theme

    • Quickstart Installation: By using this package, you will set the theme exactly like our Demo with sample data.
    • Manual Installation : Include of Theme layout Installation Packages. Please unzip the package and you would see the following folders:
      • module folder
      • override folder
      • sp_fcstore_template_p16_v1.0.0.zip file

    2.1 Quickstart Installation

    We provide Quickstart package for each theme which aims to ease the installation for users. It will help you save much time of installing and configuring if you plan to start your site from the beginning. Please following steps below:

    • Step 1: Download the quickstart package of SP FCStore theme
    • Step 2: Extract the downloaded package named “sp_fcstore_quickstart_p16_v1.0.0.zip” in your localhost (or your hosting) folder. In Quickstart folder you will see the extracted folder that include all sample data
    • Step 3: Start installation by opening browser and navigate to your URL (where the Quickstart uploaded) to load default Prestashop installer. Please follow these steps of the Installer so that the installation process can be set.
      • Installation Assistant (Choose your language)

    Please select the installation language

    Please note: The installation language option will not affect your store language. By default PrestaShop is offered in English. You can install additional localization packages to change the store language.

    When you are done, click the ‘Next’ button.

      • Installation Assistant (License agreements)

    Please check the license agreement.

    When you are done, click the ‘Next’ button.

      • System Compatibility

    Check the PHP settings and directory permissions. In case of any errors, please contact your hosting provider for further assistance.

    If everything is correct, click the ‘Next’ button.

      • Store Information

    Now add required information for your store: Shop name, Main activity, Country, Shop timezone and add the account info: first name, last name, email and password. Click “Next” to next step.

    When you are done, click the ‘Next’ button.

      • System Configuration

    Here is the database configuration panel, we need to create database first.

    Access your database panel and create database for your site. Add database name and then click “Create” button.

    When the database is created successfully, copy and paste its name into the “Database name” field, then click the “Test your database connection now!” button to make sure that the entered settings are correct. If they are, you will see a Database is connected message. After that, you could click the “Next” button to move to next steps.

      • Finish installation: This process could take a few minutes

    Note: For security reasons you need to delete the install/ directory on your hosting server.

    And finally, go to the Frontend or Backend as you want:

    2.2 Theme Installation

    Note: Before installing theme, you must disable the cache. In your back office, please go to ADVANCED PARAMETERS >> Performance >> find “Cache” parameter >> Set “No” to disable cache >> Click “Save”.

    SP FCStore Layout1 Theme Installation

    Note: Here we will introduce you How To Install SP FCStore Bonus Layout 1 Theme, with Layout 2, Layout 3, Layout 4, and Layout 5 do the same.

    Firstly, you must EXTRACT the “sp_fcstore_layout1_theme_p16_v1.0.0.zip” package and open the extracted folder. Here you will see:

    • module folder: contain of the smartblog.zip file, smartblogcategories.zip file and themeinstallator.zip file.
    • override folder: contain of FrontController.php” file in the folder URL: \override\classes\controller\ .
    • and the sp_fcstore_template_p16_v1.0.0.zip file.

    STEP 1: Install “smartblog.zip”, “smartbloghomelatestnews.zip” and“smartblogcategories.zip” Module.

    1. Login to your Prestashop admin panel and navigate to MODULES -> Modules. At the top of the page click the Add a new module button.

    2. Choose “smartblog.zip” file and click “Upload this module” button

    3. There is a message-box “The module was successfully downloaded.”

    4. Please find to the uploaded module and click “Install” button to run it.

    5. When a pop-up window displays, please click “Proceed with the installation” button.

    6. Finally, Module(s) installed successfully.

    Note: Do the same with the “smartblogcategories.zip” and “smartbloghomelatestnews.zip” module’s installation

    STEP 2: Install “themeinstallator” Module.

    1. Login to your Prestashop admin panel and navigate to MODULES -> Modules. At the top of the page click the Add a new module button.

    2. Select your file named “themeinstallator.zip” and click “Upload this module” button

    3. The uploading process will be started. You will see the message that the module has been successfully downloaded.

    4. The new module is located in the modules list, so you can Search its name and click Install button to start the module.

    5. Finally, you will see a notice message: "Module(s) installed successfully".


    STEP 3: Install the “sp_fcstore_template_p16_v1.0.0.zip” file.

    1. In the your Prestashop admin panel and navigate to MODULES >> Modules. Find to the module that you have installed and clicked on Configure button to configure the module.

    2. Navigate to “Import from your computer>> choose the zip theme file as named “sp_fcstore_template_p16_v1.0.0.zip>> Next.

    3. You will see a message that You are going to install the following theme SP FCStore version 1.0.0, please click “Next” button to continue.

    4. Select the module that you want to install/disable >> click “Next” button to continue the installation process.

    5. After that, a list of the installed/disabled modules will be showed out and you could click “Finish” button to finish the theme installation.

    STEP 4: Override folder: copy the "FrontController.php" file into the installation folder with the URL: override\classes\controller.

    3SP THEME CONFIGURATION

    3.1 General Settings

    1. In your Prestashop Admin Dashboard, navigate to Modules and Services >> Modules and Services >> go to MODULES LIST section, search for “SP Theme configurator” module then click on Configure.

    2. In the SP Theme Settings, choose “General” to configure the parameters in this section. After finishing, you could go to the front-end to view the changes.

    3.2 Layout Settings

    1. In your Prestashop Admin Dashboard, navigate to Modules and Services >> Modules and Services >> go to MODULES LIST section, search for “SP Theme configurator” module then click on Configure.

    2. In the SP Theme Settings, choose “Layout” to configure the parameters in this section. After finishing, you could go to the front-end to view the changes.

    3.3 Fonts

    1. In your Prestashop Admin Dashboard, navigate to Modules and Services >> Modules and Services >> go to MODULES LIST section, search for “SP Theme configurator” module then click on Configure.

    2. In the SP Theme Settings, choose “Fonts” to configure the parameters in this section. After finishing, you could go to the front-end to view the changes.

    Note: Please copy and paste the following line into Font Selector tab:

    .title-page, .blockproductscategory.block h3.title_block, .about-wrap h2, .about-wrap h3, .moduletable h3.title_block, .sp-listing-tabs .ltabs-tab, .num-time span, .lastestnews h3.title_block, #newsletter_block_home h3.title_block, .title-module-listingtab, .title-promotion, .title-deal, .testimonials .title, .testimonials .text-title, .detail-view
    

    3.4 Category Pages

    1. In your Prestashop Admin Dashboard, navigate to Modules and Services >> Modules and Services >> go to MODULES LIST section, search for "SP Theme configurator" module then click on Configure.

    2. In the SP Theme Settings, choose "Category Pages" to configure the parameters in this section. After finishing, you could go to the front-end to view the changes.

    3.5 Product Pages

    1. In your Prestashop Admin Dashboard, navigate to Modules and Services >> Modules and Services >> go to MODULES LIST section, search for "SP Theme configurator" module then click on Configure.

    2. In the SP Theme Settings, choose "Product Pages" to configure the parameters in this section. After finishing, you could go to the front-end to view the changes.

    3.6 Bonus Pages

    1. In your Prestashop Admin Dashboard, navigate to Modules and Services >> Modules and Services >> go to MODULES LIST section, search for "SP Theme configurator" module then click on Configure.

    2. In the SP Theme Settings, choose "Bonus Pages" to configure the parameters in this section. After finishing, you could go to the front-end to view the changes.

    3.7 Advanced Settings

    1. In your Prestashop Admin Dashboard, navigate to Modules and Services >> Modules and Services >> go to MODULES LIST section, search for "SP Theme configurator" module then click on Configure.

    2. In the SP Theme Settings, choose "Advanced" to configure the parameters in this section. After finishing, you could go to the front-end to view the changes.

    3.8 Social Accounts

    1. In your Prestashop Admin Dashboard, navigate to Modules and Services >> Modules and Services >> go to MODULES LIST section, search for "SP Theme configurator" module then click on Configure.

    2. In the SP Theme Settings, choose "Social Accounts" to configure the parameters in this section. After finishing, you could go to the front-end to view the changes.

    1. To configure Logo for your store, navigate to PREFERENCES > Themes in your Prestashop Admin Dashboard. Go to Logo tab to set up your logo. Click "Add File" to upload the logo image as you want and "Save".

    2. Please check the front-end to view the changes.

    3.10 Image Size Adjustment

    In your Prestashop admin dashboard, navigate to: PREFERENCES >> Images to configure the image size for category, manufacturer, supplier, product, etc that fit your layout best.

    1. Image size - You can choose the image size types that suit your products best.

    2. Image quality - You can set image quality in use on your site.

    3. Regenerate thumbnails - To see the changes after you update the image sizes, image quality; you need to re-generate the images used in your site. Select option then click Regenerate thumbnails button.

    Frontend Appearance:

    To edit Copyright, please follow these steps:
    1. In your Prestashop Admin Dashboard, navigate to Modules and Services >> Modules and Services >> go to MODULES LIST section, search for "SP Theme configurator" module then click on Configure.

    2. In the SP Theme Settings, choose "General" to configure the parameter named "Copyright" in this section. After finishing, you could go to the front-end to see the changes.

    SM Etrostore

    $
    0
    0

    Firstly, a huge thanks for purchasing this theme, your support is truly appreciated!

    This document covers the installation and use of this theme, reveals some answers to common problems and issues. We encourage you to read this document throughtly if you are experiencing any difficulties. If you have any questions that are beyond the scope of document, please feel free to contact us via our Support Tickets System.

    1 SYSTEM REQUIREMENT

    At the basic level, this theme will require the following conditions:

      • Compatible with Magento Community Edition 1.7.x; 1.8.x and 1.9.x (require: php 5.4 and Memory_limit no less than 256Mb)

    2INSTALLATION

    There are two ways to install a Magento Theme:

    • Quickstart Installation: By using this package, you will set the theme exactly like our Demo with sample data.
    • Manual Installation (including Theme Installation).

    2.1 Quickstart Installation:

    Magentech provides SM Quickstart package for each theme which aims to ease the installation for users. If you plan to start your site from the beginning, It will help you save much time of installing and configuring.

    Please follow steps below:

    • Step 1: Download the quickstart package
    • Step 2: Extract and Upload the whole Quickstart package to your server. In Quickstart folder you will see the extracted folder that include all sample data
    • Step 3: Create a Database for your Magento site
    • Note: You need to remember the database name to use in the next steps

    • Step 4: Start installation by opening browser and navigate to your URL (where the Quickstart uploaded) to load default Magento installer. Please follow each step of the Installer so that the installation process can be set.

    • Step 5: Locale Settings. Please fill fully into Required Fields (“Locale; Time Zone and Default Currency”.)

    • Step 6: In the Configuration step, input the required fields as below.
      • Database Name : sm-etrostore-quickstart( It must be the exact name of database you have just created)
      • User name : root
      • User password : no need to fill
      • Do not use "localhost" in the URL path, otherwise you could not log in to your Admin area (you should use your local IP when setting up your website hosted entirely on your own computer).

    • Step 7: Create Admin Account. Please fill out Required Fields (“First Name; Last Name; Email; Username; password and confirm password” completely.)

    • Step 8: Finish Installation and now you you can click Go to Frontend to open Homepage or click Go to Backend to open Admin Panel.

    2.2 Manual Installation

      • Step 1: Please unzip “sm_atstore_theme.zip” file and upload folders skin; media;lib;js;app from the theme package to the root of your Magento site folder on your server.

        Note: You could change the name of this folder. However, if you want your website run correctly, it need to have the same name as the database you choose.

      • Step 2: Log in to your Admin Panel (e.g. http://yourdomain/index.php/admin/)

        Note: If you are using the Admin Panel when copying folders in step 1, you need to log out and log in back.

      • Step 3: Disable Cache: Go to System >> Cache Management, click ‘Sellect All’ button, then choose ‘Disable’ and click ‘Submit’ button to complete the action.
      • Step 4: Navigate to System >> Configuration >> Design.
    • Step 5: In Package tab of Design Section, input the parameter Current Package Name with the actual theme name.

    • Step 6: You can also change the settings for Header.

    Note: After configuring in each steps( for example: Step 4, Step 5, Step6), you need to click “Save Config” button to save your changes

    2.3 Theme Setting

    Configure SM Etrostore General Setting Theme In Magento admin panel, navigate to SM Etrostore Setting and configure theme as you want.

      • Configure General with Theme color, Font size, color for the link, hover buttons, page, text, title, background … for any store.

        Note:
        Copy and paste the following Elements into “Google Font Elements”:

        .font-etro, .footer .footer-title, .block .block-title strong, .block-layered-nav .block-content .filter-wrapp dt, .sm_megamenu_wrapper_horizontal_menu .sm_megamenu_menu > li > a, .nav-container #nav > li > a, .sm_megamenu_wrapper_horizontal_menu .sm_megamenu_menu > li > div .sm_megamenu_title > a, .sm_megamenu_wrapper_horizontal_menu .sm_megamenu_menu > li > div .sm_megamenu_title > span, .feature-item-parent, .item-about-contact, .box-listingtab .ltabs-tab-label		

      • Configure Theme Layout with Layout style, Header style& Homepage style ( depend on Default pages on Web tab) to configure
      • Configure the Product Listing with Layout 1 Column, Layout 2 Columns, Layout 3 Columns,Product Shows Effect On Hover, etc.
      • Configure the Product Detail To zoom image of product, adjust Zoom Mode, Custom tab, and content, etc.
      • Configure the Product Detail To zoom image of product, adjust Zoom Mode, Custom tab, and content, etc..

        Note:You also show your brands’ information like the following image in the frontend.


        Copy and paste the following code chain into “Custom Tab Content”:
         

        <table class="data-table" style="width: 100%;" border="1">
        <tbody>
        <tr>
        <td>Brand</td>
        <td><img title="brand" src="{{media url="wysiwyg/custom-tab/logo-client.jpg"}}" alt="brand" /></td>
        </tr>
        <tr>
        <td>History</td>
        <td>Color sit amet, consectetur adipiscing elit. In gravida pellentesque ligula, vel eleifend turpis blandit vel. Nam quis lorem ut mi mattis ullamcorper ac quis dui. Vestibulum et scelerisque ante, eu sodales mi. Nunc tincidunt tempus varius. Integer ante dolor, suscipit non faucibus a, scelerisque vitae sapien.</td>
        </tr>
        </tbody>
        </table>

      • Configure Rich Snippets
      • Configure Socials : To connect with social networks such as Facebook, Twitter, Google Plus, Linkedin
      • Configure Advanced : To show popup, Cpanel, use “Add to cart, Add to wishlist, Add to Compare
      • Configure Theme Installation

    Note: Click the Import Static Blocks and CMS Pages to import all static blocks and CMS pages provided with this theme. The following notification will appear to announce that you have just imported static blocks or pages successfully.

    After importing, you need to go to CMS >> Static Block ( or Pages) to configure and select Store View for each block or page.

    2.4 Blog

    Configure Blog

    We are using Aheadworks Blog free extension from Aheadworks, so that it is not including in the quickstart package. You can download free version of Aheadworks Blog Here and follow Its Guide to install. After installing this extension, please go to the admin of blog, navigate to Blog >> Settings to configure it like our configuration and your desire.


    3CONFIGURATION
    Set Default Page
    • To set a default page for your Magento Site, in the Admin Panel you go to System>>Configuration>>Web>>Default Pages. Please click to see the Backend Settings.
    • You need to change to the website / store view that you want to change (the dropdown menu in the upper left corner). You will probably have to create a new CMS page if you want to have something different from your default home page.

    3.1 Page Configuration

    3.1.1 Home Style 1

    Frontend of Home Style 1 – Layout Position

    In the Admin Panel, please navigate to CMS >> Pages to create a new page in Page Management section. Here is the list of steps in this style’s configuration process:

    • Page Information Tab: Please click to see the Backend Settings.
    • Content Tab: Please click to see the Backend Settings.
    • Copy and paste the following code into the Content field::

    <div class="home-default homestyle1">
    	<!-- STATIC SERVICES -->
        <div class="services-wrapper full-wrapper">
           <div class="container">
    	     {{block type="cms/block" block_id="block-services-home1"}}
           </div>
    	</div>
    	<!-- CONTENT TOP -->	
        <div class="block-content-top full-wrapper">
           <div class="container">
    			<div class="rows">
    				<!-- VERTICAL MEGA -->
    				<div class="col-lg-2 col-md-2 col-sm-3 box-padding-1  hidden-xs">
    					{{block type="cms/block" block_id="vertical-megamenu"}}
    				</div>
    				<!-- IMAGE SLIDE -->
    				<div class="col-lg-6 col-md-6 col-sm-9 box-padding-2">
    					<div class="slide-home1">
    					{{block type="imageslider/list" name="imageslider.list.default1" template="sm/imageslider/default.phtml"}}
                        {{block type="cms/block" block_id="banner-slide-bottom"}}
    					</div>
    				</div>
    				<!-- STATIC IMG -->
                    <div class="col-lg-2 col-md-2 box-padding-3 hidden-sm hidden-md hidden-xs">
    					{{block type="cms/block" block_id="banner-slide-right"}}
    				</div>
    				<!-- MODULE BASIC PRODUCT -->
    				<div class="col-lg-2 col-md-2 col-sm-12 box-padding-4">
    					<div class="slider-basic-wrapper">
    						{{block type="basicproducts/list" name="basicproducts.slider.home" template="sm/basicproducts/basic-slider-home.phtml"
                                                          nb_column3="3"
                                                    }}
    					</div>
    				</div>
    			</div>
           </div>
    	</div>
    	<!-- MODULE DEAL -->
    	<div class="block-deal full-wrapper full-wrapper-img">
    		<div class="container">
    			{{block type="listingdeals/list" name="listingdeals.list.default" template="sm/listingdeals/default.phtml"
                  imgcfg_function="1"
                  imgcfg_width="160"
                  imgcfg_height="210"
                  product_ addcart_display="0"
                  product_addwishlist_display="0"
                  product_addcompare_display="0"
                }}
    			{{block type="cms/block" block_id="block-img-deal"}}
    		</div>
    	</div>
    	<!-- SUPPER CATTE V1-->
    	<div class="content-home block-suppercategories">
    		{{block type="supercategories/list" name="supercategories.list.default" template="sm/supercategories/default-home5.phtml"
                supercategories_title_text="electronics"
    			product_category="238"
            }}
    	</div>
    	<!-- SUPPER CATTE V2-->
    	<div class="content-home block-suppercategories block-suppercategories-v2">
    		{{block type="supercategories/list" name="supercategories.list.default" template="sm/supercategories/default-home5-v2.phtml"
                supercategories_title_text="Smartphones"
    			product_category="239"
            }}
    	</div>
    	<!-- BLOCK STATIC JOI -->
    	<div class="content-home block-leter-joi-our">
    		<div class="row">
    			<!-- NEW LETTER -->
    			<div class="col-lg-6 col-md-6 col-sm-6">
    				{{block type="newsletter/subscribe" name="content.newsletter" template="newsletter/subscribe-content.phtml"}}
    			</div>
    			<!-- APP -->
    			<div class="col-lg-6 col-md-6 col-sm-6">
    				{{block type="cms/block" block_id="block-joi-our"}}
    			</div>
    		</div>
    	</div>
    	<!-- SUPPER CATTE V3-->
    	<div class="content-home block-suppercategories block-suppercategories-v3">
    		{{block type="supercategories/list" name="supercategories.list.default" template="sm/supercategories/default-home5-v3.phtml"
                supercategories_title_text="Computers"
    			product_category="255"
            }}
    	</div>
    	<!-- SUPPER CATTE V4-->
    	<div class="content-home block-suppercategories block-suppercategories-v4">
    		{{block type="supercategories/list" name="supercategories.list.default" template="sm/supercategories/default-home5-v4.phtml"
                supercategories_title_text="APPLIANCES"
    			product_category="283"
            }}
    	</div>
    	<!-- BANNER CONTEN  -->
    	<div class="content-home block-bn-home5">
    		{{block type="cms/block" block_id="block-bn"}}
    	</div>
    	<!-- MODULE LISTING TAB -->
    	<div class="content-home block-listingtabs">
    		{{block type="listingtabs/list" name="listingtabs.list.default" template="sm/listingtabs/default.phtml"}}
    	</div>
    </div>

  • Design Tab: Please click to see the Backend Settings.
  • Copy and paste the following code into the Design field::

    <reference name="full_top">
            <!--block type="imageslider/list" name="imageslider.list.default" template="sm/imageslider/default.phtml">
    			</block-->
    </reference>
    <reference name="header">
           <remove name="vertical-megamenu"/>
    </reference>

    3.1.2 Home Style 2

    Frontend of Home Style 2 – Layout Position

    In the Admin Panel, please navigate to CMS >> Pages to create a new page in Page Management section. Here is the list of steps in this style’s configuration process:

    • Page Information Tab: Please click to see the Backend Settings.
    • Content Tab: Please click to see the Backend Settings.
    • Copy and paste the following code into the Content field::

    <div class="home-default homestyle2"> 
            <!-- BLOCK SLIDE -->
            <div class="block-slide full-wrapper full-wrapper-slide">
    		<div class="container">
    			<div class="col-lg-6 col-md-9 group-right no-padding">
    				{{block type="imageslider/list" name="imageslider.list.default" template="sm/imageslider/default.phtml"}}
    			</div>
    			<div class="col-lg-6 col-md-3 group-left no-padding">
    				{{block type="basicproducts/list" name="basicproducts.slider.home" template="sm/basicproducts/basic-slider-home2.phtml"
                                       nb_column3="3"
                                     }}
    			</div>
    		</div>
    	</div>
    	<!-- MODULE DEAL -->
    	<div class="block-deal content-home">
    	       {{block type="listingdeals/list" name="listingdeals.list.default" template="sm/listingdeals/default.phtml"
                        imgcfg_function="1"
                        imgcfg_width="160"
                        imgcfg_height="210"
                        product_ addcart_display="0"
                        product_addwishlist_display="0"
                        product_addcompare_display="0"
                  }}
    	</div>
    	<!-- BANNER CONTENT -->
    	<div class="content-home block-img-content">
    		<div class="row">
    			<div class="col-lg-4 col-md-4">
    				{{block type="cms/block" block_id="block-img-content-1"}}
    			</div>
    			<div class="col-lg-4 col-md-4 hidden-sm">
    				{{block type="cms/block" block_id="block-img-content-2"}}
    			</div>
    			<div class="col-lg-4 col-md-4 hidden-sm">
    				{{block type="cms/block" block_id="block-img-content-3"}}
    			</div>
    		</div>
    	</div>
    	<!-- SUPPER CATTE V1-->
    	<div class="content-home block-suppercategories">
    		{{block type="supercategories/list" name="supercategories.list.default" template="sm/supercategories/default-home2.phtml"
                       supercategories_title_text="electronics"
    		   product_category="238"
                    }}
    	</div>
    	<!-- BANNER CONTENT 1 -->
    	<div class="content-home block-bn-1">
    		{{block type="cms/block" block_id="block-bn-1"}}
    	</div>
    	<!-- SUPPER CATTE V2-->
    	<div class="content-home block-suppercategories suppercategories-v2">
    		{{block type="supercategories/list" name="supercategories.list.default" template="sm/supercategories/default-home2-v2.phtml"
    			supercategories_title_text="Smartphones"
    			product_category="239"
    		}}
    	</div>
    	<div class="content-home block-leter-joi-our">
    		<div class="row">
    			<!-- NEW LETTER -->
    			<div class="col-lg-6 col-md-6 col-sm-6">
    				{{block type="newsletter/subscribe" name="content.newsletter" template="newsletter/subscribe-content.phtml"}}
    			</div>
    			<!-- APP -->
    			<div class="col-lg-6 col-md-6 col-sm-6">
    				{{block type="cms/block" block_id="block-joi-our"}}
    			</div>
    			
    		</div>
    	</div>
    	<!-- SUPPER CATTE V3-->
    	<div class="content-home block-suppercategories suppercategories-v3">
    		{{block type="supercategories/list" name="supercategories.list.default" template="sm/supercategories/default-home2-v3.phtml"
    			supercategories_title_text="Computers"
    			product_category="255"
    		}}
    	</div>
    	<!-- BANNER CONTENT 2 -->
    	<div class="content-home block-bn-2">
    		{{block type="cms/block" block_id="block-bn-2"}}
    	</div>
    	<!-- SUPPER CATTE V4-->
    	<div class="content-home block-suppercategories suppercategories-v4">
    		{{block type="supercategories/list" name="supercategories.list.default" template="sm/supercategories/default-home2-v4.phtml"
    			supercategories_title_text="APPLIANCES"
    			product_category="283"
    		}}
    	</div>
    	<!-- BANNER BOTTOM -->
    	<div class="content-home block-img-bottom">
    		{{block type="cms/block" block_id="block-img-bottom"}}
    	</div>
    	<!-- MODULE LISTING TAB -->
    	<div class="content-home block-listingtabs">
    		{{block type="listingtabs/list" name="listingtabs.list.default" template="sm/listingtabs/default.phtml"}}
    	</div>
    </div>

  • Design Tab: Please click to see the Backend Settings.
  • 3.1.3 Home Style 3

    Frontend of Home Style 3 – Layout Position

    In the Admin Panel, please navigate to CMS >> Pages to create a new page in Page Management section. Here is the list of steps in this style’s configuration process:

    • Page Information Tab: Please click to see the Backend Settings.
    • Content Tab: Please click to see the Backend Settings.
    • Copy and paste the following code into the Content field::

    <div class="home-default homestyle3">
    	
    	<!-- STATIC SERVICES -->
        <div class="services-wrapper full-wrapper">
           <div class="container">
    	     {{block type="cms/block" block_id="block-services-home1"}}
           </div>
    	</div>
    	<!-- BLOCK SLIDE -->
    	<div class="block-slide">
    		<div class="row">
    			<div class="col-lg-6 col-md-6 col-sm-8">
    				{{block type="imageslider/list" name="imageslider.list.default1" template="sm/imageslider/default.phtml"}}
    			</div>
    			<div class="col-lg-3 col-md-3 col-sm-4">
    				{{block type="cms/block" block_id="block-img-top-1"}}
    			</div>
    			<div class="col-lg-3 col-md-3 hidden-sm">
    				{{block type="cms/block" block_id="block-img-top-2"}}
    			</div>
    		</div>
    	</div>
    	<!-- MODULE DEAL -->
    	<div class="content-home block-deal full-wrapper full-wrapper-img">
    		<div class="container">
    			{{block type="listingdeals/list" name="listingdeals.list.default" template="sm/listingdeals/default.phtml"
                  imgcfg_function="1"
                  imgcfg_width="160"
                  imgcfg_height="210"
                  product_ addcart_display="0"
                  product_addwishlist_display="0"
                  product_addcompare_display="0"
                }}
    			{{block type="cms/block" block_id="block-img-deal"}}
    		</div>
    	</div>
    	
    	<!-- SUPPER CATTE V1-->
    	<div class="content-home block-suppercategories">
    		{{block type="supercategories/list" name="supercategories.list.default" template="sm/supercategories/default-home3.phtml"
                supercategories_title_text="electronics"
    			product_category="238"
            }}
    	</div>
    	<!-- BANNER CONTENT 1 -->
    	<div class="content-homes block-bn-1-home3">
    		{{block type="cms/block" block_id="block-bn-1"}}
    	</div>
    	<!-- SUPPER CATTE V2-->
    	<div class="content-home block-suppercategories suppercategories-v2">
    		{{block type="supercategories/list" name="supercategories.list.default" template="sm/supercategories/default-home3-v2.phtml"
    			supercategories_title_text="Smartphones"
    			product_category="239"
    		}}
    	</div>
    	<!-- BANNER CONTENT 2 -->
    	<div class="content-homes block-bn-2-home3">
    		{{block type="cms/block" block_id="block-bn-2-home3">"}}
    	</div>
    	<!-- SUPPER CATTE V3-->
    	<div class="content-home block-suppercategories suppercategories-v3">
    		{{block type="supercategories/list" name="supercategories.list.default" template="sm/supercategories/default-home3-v3.phtml"
    			supercategories_title_text="Computers"
    			product_category="255"
    		}}
    	</div>
    	<!-- BANNER CONTENT 3 -->
    	<div class="content-homes block-bn-3-home3">
    		{{block type="cms/block" block_id="block-bn-3-home3">"}}
    	</div>
    	<!-- SUPPER CATTE V4-->
    	<div class="content-home block-suppercategories suppercategories-v4">
    		{{block type="supercategories/list" name="supercategories.list.default" template="sm/supercategories/default-home3-v4.phtml"
    			supercategories_title_text="APPLIANCES"
    			product_category="283"
    		}}
    	</div>
    	<!-- BANNER CONTENT 4 -->
    	<div class="content-homes block-bn-4-home3">
    		{{block type="cms/block" block_id="block-bn-2"}}
    	</div>
    	<!-- MODULE LISTING TAB -->
    	<div class="content-home block-listingtabs">
    		{{block type="listingtabs/list" name="listingtabs.list.default" template="sm/listingtabs/default.phtml"}}
    	</div>
    </div>

  • Design Tab: Please click to see the Backend Settings.
  • Copy and paste the following code into the Design field::

    <reference name="header">
           <remove name="vertical-megamenu"/>
    </reference>

    3.1.4 Home Style 4

    Frontend of Home Style 4 – Layout Position

    In the Admin Panel, please navigate to CMS >> Pages to create a new page in Page Management section. Here is the list of steps in this style’s configuration process:

    • Page Information Tab: Please click to see the Backend Settings.
    • Content Tab: Please click to see the Backend Settings.
    • Copy and paste the following code into the Content field::

    <div class="home-default homestyle4">
    	<!-- MODULE CATEGORIES -->
    	<div class="full-wrapper full-wrapper-categories block-categories">
    		<div class="container">
    			{{block type="categories/list" name="categories.list.default" template="sm/categories/default.phtml"}}
    		</div>
    	</div>
    	<!-- MODULE SUPPER CATEGORIES -->
    	<div class="full-wrapper full-wrapper-sp-categories block-suppercategories">
    		<div class="container">
    			{{block type="supercategories/list" name="supercategories.list.default" template="sm/supercategories/default-home4.phtml"
                             nbi_column2="4"
                             nbi_column3="3"
                             }}
                            {{block type="cms/block" block_id="block-img-deal"}}
    		</div>
    	</div>
    	 <!-- MODULE BASIC PRODUCT -->
        <div class="content-home block-basic-slide">
    		{{block type="basicproducts/list" name="basicproducts.list.default" template="sm/basicproducts/basic-slider-home4.phtml"}}
    	</div>
    	<!-- MODULE AW BLOG -->
        <div class="content-home full-wrapper full-wrapper-latest  block-latest-post">
    		<div class="container">
    			<div class="slider-latest-blog">
    				{{block type="blog/blog" name="latest_post" template="aw_blog/latest-post.phtml"}}
    			</div>
    		</div>
    	</div>
    	<!-- STATIC JOI -->
    	<div class="full-wrapper full-wrapper-joi block-joi">
    		<div class="container">
    			{{block type="cms/block" block_id="block-joi-our-home4"}}
    		</div>
    	</div>
    	<!-- MODULE LISTING TAB -->
    	<div class="content-home block-listingtabs">
    		{{block type="listingtabs/list" name="listingtabs.list.default" template="sm/listingtabs/default.phtml"}}
    	</div>
    </div>

  • Design Tab: Please click to see the Backend Settings.
  • Copy and paste the following code into the Design field::

    <reference name="full_top">
            <block type="imageslider/list" name="imageslider.list.default" template="sm/imageslider/default.phtml">
            </block>
    </reference>

    3.1.5 Home Style 5

    Frontend of Home Style 5 – Layout Position

    In the Admin Panel, please navigate to CMS >> Pages to create a new page in Page Management section. Here is the list of steps in this style’s configuration process:

    • Page Information Tab: Please click to see the Backend Settings.
    • Content Tab: Please click to see the Backend Settings.
    • Copy and paste the following code into the Content field::

    <div class="home-default homestyle5">
    	<div class="block-slide full-wrapper full-wrapper-slide">
    		<div class="container">
    			<div class="col-lg-6 col-md-9 group-right no-padding">
    				{{block type="imageslider/list" name="imageslider.list.default" template="sm/imageslider/default.phtml"}}
    			</div>
    			<div class="col-lg-6 col-md-3 group-left no-padding">
    				{{block type="basicproducts/list" name="basicproducts.slider.home" template="sm/basicproducts/basic-slider-home2.phtml"
                                        nb_column3="3"
                                   }}
    			</div>
    		</div>
    	</div>
    	<!-- MODULE DEAL -->
    	<div class="block-deal content-home">
    	      {{block type="listingdeals/list" name="listingdeals.list.default" template="sm/listingdeals/default.phtml"
                  imgcfg_function="1"
                  imgcfg_width="160"
                  imgcfg_height="216"
                  product_ addcart_display="0"
                  product_addwishlist_display="0"
                  product_addcompare_display="0"
                 }}
    	</div>
    	<!-- BANNER CONTENT -->
    	<div class="content-home block-img-content">
    		<div class="row">
    			<div class="col-lg-4 col-md-4 ">
    				{{block type="cms/block" block_id="block-img-content-1"}}
    			</div>
    			<div class="col-lg-4 col-md-4 hidden-sm">
    				{{block type="cms/block" block_id="block-img-content-2"}}
    			</div>
    			<div class="col-lg-4 col-md-4 hidden-sm">
    				{{block type="cms/block" block_id="block-img-content-3"}}
    			</div>
    		</div>
    	</div>
    	<!-- SUPPER CATTE V1-->
    	<div class="content-home block-suppercategories">
    		{{block type="supercategories/list" name="supercategories.list.default" template="sm/supercategories/default.phtml"}}
    	</div>
    	
    	<!-- SUPPER CATTE V2-->
    	<div class="content-home block-suppercategories suppercategories-v2">
    		{{block type="supercategories/list" name="supercategories.list.default" template="sm/supercategories/default-v2.phtml"
    			supercategories_title_text="Smartphones"
    			product_category="207"
    		}}
    	</div>
    	<div class="content-home block-leter-joi-our">
    		<div class="row">
    			<!-- NEW LETTER -->
    			<div class="col-lg-6 col-md-6 col-sm-6">
    				{{block type="newsletter/subscribe" name="content.newsletter" template="newsletter/subscribe-content.phtml"}}
    			</div>
    			<!-- APP -->
    			<div class="col-lg-6 col-md-6 col-sm-6">
    				{{block type="cms/block" block_id="block-joi-our"}}
    			</div>
    			
    		</div>
    	</div>
    	<!-- SUPPER CATTE V3-->
    	<div class="content-home block-suppercategories suppercategories-v3">
    		{{block type="supercategories/list" name="supercategories.list.default" template="sm/supercategories/default-v3.phtml"
    			supercategories_title_text="Computers"
    			product_category="208"
    		}}
    	</div>
    	<!-- SUPPER CATTE V4-->
    	<div class="content-home block-suppercategories suppercategories-v4">
    		{{block type="supercategories/list" name="supercategories.list.default" template="sm/supercategories/default-v4.phtml"
    			supercategories_title_text="APPLIANCES"
    			product_category="209"
    		}}
    	</div>
    	<!-- BANNER BOTTOM -->
    	<div class="content-home block-img-bottom">
    		{{block type="cms/block" block_id="block-img-bottom"}}
    	</div>
    	<!-- MODULE LISTING TAB -->
    	<div class="content-home block-listingtabs">
    		{{block type="listingtabs/list" name="listingtabs.list.default" template="sm/listingtabs/default.phtml"}}
    	</div>
    </div>

  • Design Tab: Please click to see the Backend Settings.
  • 3.2 Configure Megamenu

    • Step 3: In order to add menu items, go to SM Megamenu >> Menu Items Manager to add items as you want.

    Note: In the next steps, when editing items in the menus, the items (in a menu) having same level could have same configuration. Therefore, we encourage you read throughtly and find out the item’s level to configure it without any errors.

    3.2.1 Horizontal Megamenu:

    Horizontal-mega-menu

    • Horizontal Megamenu List Please click Here to view.
    • Horizontal Megamenu’s Backend Please click Here to view.

    Home
    Frontend Appearance

    • Backend Settings: Please click Here to view.

    Features

    • Frontend Appearance
    • Backend Settings: Please click Here to view.
    • Backend of ‘Dropdown Features’: Please click Here to view.
    • Copy and paste the following code into the content:

    <div class="home-menu-dropdown">
    	<ul class="item-home-store layout-home">
    		<li class="title-menu-home">Layouts</li>
    		<li><a title="Home Style 1" href="{{store url="?___store=default&___from_store=french"}}">Home Style 1</a></li>
    		<li><a title="Home Style 2" href="{{store url="?___store=french&___from_store=default"}}">Home Style 2</a></li>
    		<li><a title="Home Style 3" href="{{store url="?___store=german&___from_store=default"}}">Home Style 3</a></li>
    		<li><a title="Home Style 4" href="{{store url="?___store=argentina&___from_store=default"}}">Home Style 4</a></li>
    		<li><a title="Home Style 5" href="{{store url="?___store=bolivia&___from_store=default"}}">Home Style 5</a></li>
    		<li><a title="Boxed Layout" href="{{store url="?___store=barbados&___from_store=default"}}">Boxed Layout</a></li>
    	</ul>
    	
    	<ul class="item-home-store header-home">
    		<li class="title-menu-home">Headers</li>
    		<li><a title="Header Type 1" href="{{store url="?___store=default&___from_store=french"}}">Header Type 1</a></li>
    		<li><a title="Header Type 2" href="{{store url="?___store=german&___from_store=default"}}">Header Type 2</a></li>
    		<li><a title="Header Type 2" href="{{store url="?___store=bolivia&___from_store=default"}}">Header Type 3</a></li>
    	</ul>
    	
    	<ul class="item-home-store theme-color">
    		<li class="title-menu-home">Color Styles</li>
    		<li class="yellow"><a title="yellow" href="{{store url="?___store=english&___from_store=default"}}">Yellow</a></li>
    		<li class="magenta"><a title="Magenta" href="{{store url="?___store=andorra&___from_store=default"}}">Magenta</a></li>
    		<li class="blue"><a title="Blue" href="{{store url="?___store=belgium&___from_store=default"}}">Blue</a></li>
    		<li class="green"><a title="Green" href="{{store url="?___store=somaliland&___from_store=default"}}">Green</a></li>
    		<li class="tan"><a title="Tan" href="{{store url="?___store=benin&___from_store=default"}}">Tan</a></li>
    	</ul>
    	
    	<ul class="item-home-store detail-home">
    		<li class="title-menu-home">Product Layouts</li>
    		<li><a title="Product Detail - Full" href="{{store url="huzam-mipane.html"}}">Product Detail - Full</a></li>
    		<li><a title="Product Detail - Left Sidebar" href="{{store url="huzam-mipane.html?detail_style=2&thumbstyle=2"}}">Product Detail - Left Sidebar</a></li>
    		<li><a title="Product Detail - Right Sidebar" href="{{store url="huzam-mipane.html?detail_style=3&thumbstyle=2"}}">Product Detail - Right Sidebar</a></li>
    		<li><a title="Thumbnail  - Horizontal" href="{{store url="huzam-mipane.html?thumbstyle=1"}}">Thumbnail  - Horizontal</a></li>
    		<li><a title="Thumbnail - Vertical" href="{{store url="huzam-mipane.html.html?thumbstyle=2"}}">Thumbnail - Vertical</a></li>
    	</ul>
    	
    	<ul class="item-home-store detail-home">
    		<li class="title-menu-home">Zoom Types</li>
    		<li><a title="Product Page Inner Zoom" href="{{store url="huzam-mipane.html/?___store=andorra&___from_store=default"}}">Product Page Inner Zoom</a></li>
    		<li><a title="Product Page Outer Zoom" href="{{store url="huzam-mipane.html/?___store=default&___from_store=argentina"}}">Product Page Outer Zoom</a></li>
    		<li><a title="Product Page Lens Zoom" href="{{store url="huzam-mipane.html/?___store=bolivia&___from_store=default"}}">Product Page Lens Zoom</a></li>
    	</ul>


    	<div style="clear:both;"> </div>
    	
    	<ul class="item-home-store layout-home">
    		<li class="title-menu-home">Listing Layouts</li>
    		<li><a title="Without Sidebar" href="{{store url="shop.html?___store=german&___from_store=default&mode=grid"}}">Without Sidebar</a></li>
    		<li><a title="Left Sidebar" href="{{store url="shop.html?___store=default&___from_store=german&mode=grid"}}">Left Sidebar</a></li>
    		<li><a title="Right Sidebar" href="{{store url="shop.html?___store=argentina&___from_store=default&mode=grid"}}">Right Sidebar</a></li>
    		<li><a title="Left - Right Sidebar" href="{{store url="shop.html?___store=bolivia&___from_store=default&mode=grid""}}">Left - Right Sidebar</a></li>
    		
    	</ul>
    	
    	<ul class="item-home-store layout-home">
    		<li class="title-menu-home">About Us Layouts</li>
    		<li><a title="About Us Style 1" href="{{store url="about-us.html/?___store=default&___from_store=argentina"}}">About Us Style 1</a></li>
    		<li><a title="About Us Style 2" href="{{store url="about-us.html/?___store=french&___from_store=default"}}">About Us Style 2</a></li>
    		<li><a title="About Us Style 3" href="{{store url="about-us.html/?___store=german&___from_store=default"}}">About Us Style 3</a></li>
    		<li><a title="About Us Style 4" href="{{store url="about-us.html/?___store=argentina&___from_store=default"}}">About Us Style 4</a></li>
    	</ul>
    	
    	<ul class="item-home-store layout-home">
    		<li class="title-menu-home">Contact Us Layouts</li>
    		<li><a title="Contact Us Style 1" href="{{store url="contact-us.html/?___store=default&___from_store=argentina"}}">Contact Us Style 1</a></li>
    		<li><a title="Contact Us Style 2" href="{{store url="contact-us.html/?___store=french&___from_store=default"}}">Contact Us Style 2</a></li>
    		<li><a title="Contact Us Style 3" href="{{store url="contact-us.html/?___store=german&___from_store=default"}}">Contact Us Style 3</a></li>
    		<li><a title="Contact Us Style 4" href="{{store url="contact-us.html/?___store=argentina&___from_store=default"}}">Contact Us Style 4</a></li>
    	</ul>
    	
    	<ul class="item-home-store detail-home">
    		<li class="title-menu-home">Effect Hover Product</li>
    		<li><a title="Simple" href="{{store url="shop.html?___store=default&___from_store=german&mode=grid"}}">Simple</a></li>
    		<li><a title="Display Second Image" href="{{store url="shop.html?___store=benin&___from_store=german&mode=grid"}}">Display Second Image</a></li>
    		<li><a title="Display Slider Image" href="{{store url="shop.html?___store=barbados&___from_store=german&mode=grid"}}">Display Slider Image</a></li>
    	</ul>
    	
    	<ul class="item-home-store layout-home">
    		<li class="title-menu-home">404 Page Layout</li>
    		<li><a title="404 Page Style 1" href="{{store url="404page"}}">404 Page Style 1</a></li>
    	</ul>
    	
    
    </div>

    Computers & laptops

    • Frontend Appearance
    • Backend Settings: Please click Here to view.
    • Backend of ‘Group 1′: Please click Here to view.
    • Backend of ‘Categories’ in the ‘Group 1′: Please click Here to view.

    Note: The following items having same menu level (Level 3) as item ‘Men Collection’ could have the same configuration: ‘Women Collection’, ‘Kids Collection’.

    • Backend of ‘Maybellin face power’ in the ‘Categories’: Please click Here to view.

    Note: Other items in Computers & laptops Menu having the same menu level would have same configuration.

    • Backend of ‘Image Bottom’: Please click Here to view.
    • Backend of ‘Eye’ in the ‘Image Bottom’: Please click Here to view.
    • Copy and paste the following code into the content:

    <div class="static-bottom-link-col6">
    <a title="Static Image" href="#"><img src="{{media url="wysiwyg/image-megamenu/browneye.jpg"}}" alt="Static Image" /></a>
    </div>

    • Backend of ‘Body chanel’ in the ‘Image Bottom’: Please click Here to view.
    • Copy and paste the following code into the content:

    <div class="static-bottom-link-col6">
    <a title="Static Image" href="#"><img src="{{media url="wysiwyg/image-megamenu/chanelcollection.jpg"}}" alt="Static Image" /></a>
    </div>

    Smartphones & Tablet

    • Frontend Appearance
    • Backend Settings: Please click Here to view.

    Note: You could look at the tree diagram of Smartphones & Tablet to configure the menu easily.

    • Backend of ‘Room1′: Please click Here to view.
    • Backend of ‘Categories’ in the ‘Beds Category’: Please click Here to view.
    • Backend of ‘IMG mascara’ in the ‘Beds Category’: Please click Here to view.
    • Copy and paste the following code into the content:

    <div class="static-bottom-link-col3">
    <a title="Static Image" href="#"><img src="{{media url="wysiwyg/image-megamenu/mascara.jpg"}}" alt="Static Image" /></a>
    </div>

    Note: Other items, being used to show images and having the same menu level (level 4)in Smartphones & Tablet Menu, would have same configuration, but their image link could be different, for example: wysiwyg/image-megamenu/your-image.jpg

    • Backend of ‘Accessories’ in the ‘Beds Category’: Please click Here to view.

    Note: Other items having same menu level (Level 4) as item ‘Accessories’ could have the same configuration

    Electronics

    • Frontend Appearance
    • Backend Settings: Please click Here to view.

    Note: You could look at the tree diagram of Electronics to configure the menu easily.

    • Backend of ‘ROOM Categories’: Please click Here to view.
    • Note: Do the same with item ‘ROOM Categories 2′

    • Backend of ‘ROOM1′ in the’ROOM Categories’: Please click Here to view.
    • Note: Do the same with item ‘ROOM2′, ‘ROOM3′, ‘ROOM4′, ‘ROOM5′, ‘ROOM6′

    • Backend of ‘nails collection’ in the ‘ROOM1′: Please click Here to view.
    • Note: Other items having same menu level (Level 4) as item ‘nails collection’ could have the same configuration

    • Backend of ‘Featured Products’: Please click Here to view.
    • Backend of ‘featured product’ in the ‘Featured Products’: Please click Here to view.
    • Backend of ‘PRODUCT Basic’ in the ‘Featured Products’: Please click Here to view.
    • Copy and paste the following code into the content:

    <div class="basicproduct-content-menu">
    {{block type="basicproducts/list" name="basicproducts.list.default" template="sm/basicproducts/basic-megamenu.phtml"
    	product_source="catalog"
    	product_category="216"
    	product_order_by="best_sales"
    	product_limitation="1"
    	product_addcart_display="1"
    	product_addwishlist_display="1"
    	product_addcompare_display="1"
            nb_column1="1"
            nb_column2="1"
            imgcfg_width="300"
            imgcfg_height="350"
    }}
    </div>

    DEALS

    • Frontend Appearance
    • Backend Settings: Please click Here to view.

    About Us
    Frontend Appearance

    • Backend Setting:Please click Here to view.
    • Backend of ‘Dropdown’: Please click Here to view.
    • Copy and paste the following code into the content:

    <ul class="item-about-contact">
    		<li><a title="About Us Style 1" href="{{store url="about-us.html/?___store=default&___from_store=argentina"}}">About Us Style 1</a></li>
    		<li><a title="About Us Style 2" href="{{store url="about-us.html/?___store=french&___from_store=default"}}">About Us Style 2</a></li>
    		<li><a title="About Us Style 3" href="{{store url="about-us.html/?___store=german&___from_store=default"}}">About Us Style 3</a></li>
    		<li><a title="About Us Style 4" href="{{store url="about-us.html/?___store=argentina&___from_store=default"}}">About Us Style 4</a></li>
    	</ul>

    Contact Us
    Frontend Appearance

    • Backend Setting:Please click Here to view.
    • Backend of ‘Dropdown’: Please click Here to view.
    • Copy and paste the following code into the content:

    <ul class="item-about-contact">
    		<li><a title="Contact Us Style 1" href="{{store url="contact-us.html/?___store=default&___from_store=argentina"}}">Contact Us Style 1</a></li>
    		<li><a title="Contact Us Style 2" href="{{store url="contact-us.html/?___store=french&___from_store=default"}}">Contact Us Style 2</a></li>
    		<li><a title="Contact Us Style 3" href="{{store url="contact-us.html/?___store=german&___from_store=default"}}">Contact Us Style 3</a></li>
    		<li><a title="Contact Us Style 4" href="{{store url="contact-us.html/?___store=argentina&___from_store=default"}}">Contact Us Style 4</a></li>
    	</ul>

    3.2.2 Vertical Megamenu:

    Vertical-mega-menu

    • Vertical Megamenu List Please click Here to view.
    • Vertical Megamenu’s Backend Please click Here to view.

    Computers & Laptops

    • Frontend Appearance
    • Backend Settings: Please click Here to view.

    Note: The following items having same menu level (Level 1) as item ‘Computers & Laptops’ could have the same configuration: Cameras & Camcorders, Computers & Networking, High Chairs & Boosters, Kitchen & Camcorders, Smartphones & Ipad .

    Electronics

    • Frontend Appearance
    • Backend Settings: Please click Here to view.

    Note: You could look at the tree diagram of Electronics to configure the menu easily.

    • Backend of ‘Categories Group’: Please click Here to view.
    • Backend of ‘Category 1′ in the ‘Categories Group’: Please click Here to view.

    Note: Do the same with the items having same menu level (Level 3) such as: Category 2, Category 3

    • Backend of ‘CATEGORY 1′ in the ‘Category 1′: Please click Here to view.

    Note: Other items, being used as headers of sub-menus in Electronics Menu (for example: CATEGORY 2, CATEGORY 3) would have same configuration.

    • Backend of ‘Maybellin face power’ in the ‘Category 1′: Please click Here to view.
    • Note: Other items having same menu level (Level 4) as item ‘Maybellin face power’ in the menu could have the same configuration

    • Backend of ‘Image 1′ in the ‘Category 1′: Please click Here to view.
    • Copy and paste the following code into the content:

    <div class="static-image-menu style-effect">
    <a title="Static Image" href="#">
    <img src="{{media url="wysiwyg/image-megamenu/image-vertical-1.jpg"}}" alt="Static Image" />
    </a>
    </div>

    Note: Other items, being used to show images and having the same menu level (level 4)in Eletronics Menu, would have same configuration, but their image link could be different, for example: wysiwyg/image-megamenu/your-image.jpg

    Smartphones & Tablets

    • Frontend Appearance
    • Backend Settings: Please click Here to view.

    Note: You could look at the tree diagram of Smartphones & Tablets to configure the menu easily.

    • Backend of ‘Categories Group 1′: Please click Here to view.
    • Backend of ‘Group 1′ in the ‘Categories Group 1′: Please click Here to view.

    Note: Do the same with the items having same menu level (Level 3) such as: Group 2, Group 3

    • Backend of ‘CATEGORY 1′ in the ‘Group 1′: Please click Here to view.

    Note: Other items, being used as headers of sub-menus in Smartphones & Tablets Menu (for example: CATEGORY 2, CATEGORY 3, CATEGORY 4, CATEGORY 5, CATEGORY 6) would have same configuration.

    • Backend of ‘Office lamps’ in the ‘Group 1′: Please click Here to view.
    • Note: Other items having same menu level (Level 4) as item ‘Office lamps’ in the menu could have the same configuration

    • Backend of ‘IMG Group 2′: Please click Here to view.
    • Backend of ‘Image 1′ in the ‘IMG Group 2′: Please click Here to view.
    • Copy and paste the following code into the content:

    <div class="static-image-menu style-effect">
    <a title="Static Image" href="#">
    <img src="{{media url="wysiwyg/image-megamenu/image-vertical-4.jpg"}}" alt="Static Image" />
    </a>
    </div>

    Home Furniture

    • Frontend Appearance
    • Backend Settings: Please click Here to view.
    • Backend of ‘Office lamps’: Please click Here to view.
    • Note: Other items having same menu level (Level 2) as item ‘Office lamps’ in menu ‘Home Furniture’ could have the same configuration

    Home Appliances

    • Frontend Appearance
    • Backend Settings: Please click Here to view.
    • Backend of ‘Blanket & Throws’: Please click Here to view.
    • Note: Other items having same menu level (Level 2) as item ‘Blanket & Throws’ in menu ‘Home Appliances’ could have the same configuration

    3.3 Configure Extensions

    The SM Etrostore front-page has been integrated with the extensions in the following list:

    In SM Etrostore Administration Page, please navigate to SM Etrostore Setting field (in the right hand column, below the General and Catalog fields) to configure extensions as you want.

        • Position: SM Search Box Pro
        • Frontend Appearance

        • Backend of SM Search Box Pro: Click Here
    SM CartPro
        • Position: SM CartPro
        • Frontend Appearance

        • Backend of SM CartPro: Click Here
        • Go Here to readmore about the SM CartPro module.
    SM Megamenu
        • Position: SM Megamenu
        • Frontend Appearance

    Horizontal Megamenu

    Vertical Megamenu

        • Backend of SM Megamenu: Click Here
    SM Image Slider
        • Position: SM Camera Slide
        • Frontend Appearance

        • Backend of SM Camera Slider: Click Here
        • Go Here to readmore about the SM Image Slider module.
    SM Basic Products
        • Position: SM Basic Products
        • Frontend Appearance

        • Backend of SM Basic Products: Click Here
        • Go Here to readmore about the SM Basic Products module.
    SM Listing Deals
        • Position: SM Listing Deals
        • Frontend Appearance

        • Backend of SM Listing Deals : Click Here
    SM Super Categories
        • Position: SM Super Categories
        • Frontend Appearance


        • Backend of SM Categories: Click Here
        • Go Here to readmore about the SM Categories module.
    SM Listing Tabs
        • Position: SM Listing Tabs
        • Frontend Appearance

        • Backend of SM Listing Tabs : Click Here
        • Go Here to readmore about the SM Listing Tabs module.
    SM Categories
        • Frontend Appearance

        • Backend of SM Categories: Click Here
        • Go Here to readmore about the SM Categories module.
    SM Quickview
        • Frontend Appearance
        • When you put your cursor on a product in the frontend pages, you will see the quickview button appear and you could click on this button to view the product

        • Backend of SM Quickview: Click Here
        • Go Here to readmore about the SM Quickview module.
    SM Shopby
        • Frontend Appearance

        • Backend of SM Shopby: Click Here

    3.4 Configure Static Blocks

    The SM Etrostore front-page has the following static blocks in the theme:

    To create a new static block, go to CMS >> Static Blocks >> Add new block

    Static Block: block-services-home1

    To create the static block, go to CMS >> Static Blocks with Identifier * : “block-services-home1″

    Frontend Appearance

    • Backend Setting: Please click Here to view.

    Copy and paste the following code into the content tab of this static block:

    <li><a href="#block-services-home1">Static Block: block-services-home1</a></li>
    <div class="block-services">
    	<div class="rows">
    		<div class="col-lg-4 col-md-4 col-sm-4 put-pading put-pading1">
    			<div class="services-img img-box1">
    			</div>
    			<div class="services-info font-etro">
    				<span><strong>Free shipping on orders over $300</strong></span>
    			</div>
    		</div>
    		
    		<div class="col-lg-4 col-md-4 col-sm-4 put-pading put-pading2">
    			<div class="services-img img-box2">
    			</div>
    			<div class="services-info font-etro">
    				<span><strong>30-day returns moneyback guarantee</strong></span>
    			</div>	
    		</div>
    		
    		<div class="col-lg-4 col-md-4  col-sm-4 put-pading put-pading3">
    			<div class="services-img img-box3">
    			</div>
    			<div class="services-info font-etro">
    				<span><strong>24/7 support online consultations</strong></span>
    			</div>
    		</div>
    	</div>
    </div>

    To create the static block, go to CMS >> Static Blocks with Identifier * : “banner-slide-right”

    Frontend Appearance

    • Backend Setting: Please click Here to view.

    Copy and paste the following code into the content tab of this static block:

    <li><a href="#banner-slide-right">Static Block: banner-slide-right</a></li>
    
    <div class="block-baner-left">
    	<ul>
    		<li class="style-effect"><a href="#" title="img"><img src="{{media url="wysiwyg/static-img/home1/01.jpg"}}" alt="img" /></a></li>
    		<li class="style-effect"><a href="#" title="img"><img src="{{media url="wysiwyg/static-img/home1/02.jpg"}}" alt="img" /></a></li>
    	</ul>
    </div>

    To create the static block, go to CMS >> Static Blocks with Identifier * : “banner-slide-bottom”

    Frontend Appearance

    • Backend Setting: Please click Here to view.

    Copy and paste the following code into the content tab of this static block:

    <li><a href="#banner-slide-bottom">Static Block: banner-slide-bottom</a></li>
    
    <div class="block-baner-bottom">
    	<ul>
    		<li class="padding-img1 style-effect"><a href="#" title="img"><img src="{{media url="wysiwyg/static-img/home1/03.jpg"}}" alt="img" /></a></li>
    		<li class="padding-img2 style-effect"><a href="#" title="img"><img src="{{media url="wysiwyg/static-img/home1/04.jpg"}}" alt="img" /></a></li>
    		<li class="padding-img3 style-effect"><a href="#" title="img"><img src="{{media url="wysiwyg/static-img/home1/05.jpg"}}" alt="img" /></a></li>
    	</ul>
    </div>

    Static Block: block-img-deal

    To create the static block, go to CMS >> Static Blocks with Identifier * : “block-img-deal”

    Frontend Appearance

    • Backend Setting: Please click Here to view.

    Copy and paste the following code into the content tab of this static block:

    <li><a href="#block-img-deal">Static Block: block-img-deal</a></li>
    
    <div class="box-img-deal">
    	<div class="col-lg-3 col-md-3  col-sm-3 no-padding">
    		<div class="style-effect">
    			<a href="#" title="img"><img src="{{media url="wysiwyg/static-img/home3/5.jpg"}}" alt="img-5" /></a>
    		</div>
    	</div>
    	<div class="col-lg-3 col-md-3 col-sm-3 no-padding">
    		<div class="style-effect">
    			<a href="#" title="img"><img src="{{media url="wysiwyg/static-img/home3/6.jpg"}}" alt="img-6" /></a>
    		</div>
    	</div>
    	<div class="col-lg-3 col-md-3 col-sm-3 no-padding">
    		<div class="style-effect">
    			<a href="#" title="img"><img src="{{media url="wysiwyg/static-img/home3/7.jpg"}}" alt="img-7" /></a>
    		</div>
    	</div>
    	<div class="col-lg-3 col-md-3 col-sm-3 no-padding">
    		<div class="style-effect">
    			<a href="#" title="img"><img src="{{media url="wysiwyg/static-img/home3/8.jpg"}}" alt="img-8" /></a>
    		</div>
    	</div>
    </div>

    Static Block: block-joi-our

    To create the static block, go to CMS >> Static Blocks with Identifier * : “block-joi-our”

    Frontend Appearance

    • Backend Setting: Please click Here to view.

    Copy and paste the following code into the content tab of this static block:

    <div class="box-joi-our">
    	<div class="info-img">
    		<a href="#" title="img"><img src="{{media url="wysiwyg/static-img/home1/img-joi.jpg"}}" alt="img-joi" /></a>
    	</div>
    	<div class="info-button">
    		<a href="#"><img src="{{media url="wysiwyg/static-img/home1/img-ios.png"}}" alt="img-ios" /></a>
    		<a href="#"><img src="{{media url="wysiwyg/static-img/home1/img-androi.png"}}" alt="img-androi" /></a>
    	</div>
    </div>

    Static Block: block-bn

    To create the static block, go to CMS >> Static Blocks with Identifier * : “block-bn”

    Frontend Appearance

    • Backend Setting: Please click Here to view.

    Copy and paste the following code into the content tab of this static block:

    <div class="box-banner-bottom style-effect">
    	<a href="#" title="img"><img src="{{media url="wysiwyg/static-img/home5/9.jpg"}}" alt="img9" /></a>
    </div>

    Static Block: block-client-say

    To create the static block, go to CMS >> Static Blocks with Identifier * : “block-client-say”

    Frontend Appearance

    • Backend Setting: Please click Here to view.

    Copy and paste the following code into the content tab of this static block:

    <div class="client-say-wrapper">
    	<div class="border-block">
    		<div class="content-client-say">
    			<div class="slider-client">
    				<div class="item">
    					<div class="row">
    						<div class="col-lg-6 col-sm-6 col-md-6 info-all clien-margin">
    							<div class="image-client"><img alt="Client" src="{{media url="wysiwyg/testimonial/client-1.png"}}" /></div>
    								<div class="info-client">
    								<div class="des-client">Congue eget dapibus Nullam elit id ut elit feugiat lacus.Nulla lorem congue tincidunt senectus...</div>
    								<div class="name-client"><strong class="put-name font-etro">John doe</strong><span>Administrator, Web Designer</span></div>
    							</div>
    						</div>
    						<div class="col-lg-6 col-sm-6 col-md-6  info-all">
    							<div class="image-client"><img alt="Client" src="{{media url="wysiwyg/testimonial/client-2.png"}}" /></div>
    								<div class="info-client">
    								<div class="des-client">Donec tellus Nulla lorem Nullam elit id ut elit feugiat lacus. Congue eget dapibus congue tincidunt senectus..."</div>
    								<div class="name-client"><strong class="put-name font-etro">Hau VC</strong><span>Ceo, Company Inc.</span></div>
    							</div>
    						</div>	
    					</div>
    				</div>
    				<div class="item">
    					<div class="row">
    						<div class="col-lg-6 col-sm-6 col-md-6  info-all clien-margin">
    							<div class="image-client"><img alt="Client" src="{{media url="wysiwyg/testimonial/client-3.png"}}" /></div>
    								<div class="info-client">
    								<div class="des-client">Congue eget dapibus Nullam elit id ut elit feugiat lacus. Nulla lorem congue tincidunt senectus....</div>
    								<div class="name-client"><strong class="put-name font-etro">Quyen NV</strong><span>Leader, Company Inc.</span></div>
    							</div>
    						</div>
    						<div class="col-lg-6 col-sm-6 col-md-6  info-all">
    							<div class="image-client"><img alt="Client" src="{{media url="wysiwyg/testimonial/client-1.png"}}" /></div>
    								<div class="info-client">
    								<div class="des-client">"Donec tellus Nulla lorem Nullam elit id ut elit feugiat lacus. Congue eget dapibus congue tincidunt senectus...</div>
    								<div class="name-client"><strong class="put-name font-etro">John doe</strong><span>Administrator, Web Designer</span></div>
    							</div>
    						</div>
    					</div>			
    				</div>
    				<div class="item">
    					<div class="row">
    						<div class="col-lg-6 col-sm-6 col-md-6 info-all clien-margin">
    							<div class="image-client"><img alt="Client" src="{{media url="wysiwyg/testimonial/client-5.png"}}" /></div>
    								<div class="info-client">
    								<div class="des-client">Congue eget dapibus Nullam elit id ut elit feugiat lacus.Nulla lorem congue tincidunt senectus...</div>
    								<div class="name-client"><strong class="put-name font-etro">Cuong TD</strong><span>Develop, Web Designer</span></div>
    							</div>
    						</div>
    						<div class="col-lg-6 col-sm-6 col-md-6  info-all">
    							<div class="image-client"><img alt="Client" src="{{media url="wysiwyg/testimonial/client-4.png"}}" /></div>
    								<div class="info-client">
    								<div class="des-client">Donec tellus Nulla lorem Nullam elit id ut elit feugiat lacus. Congue eget dapibus congue tincidunt senectus..."</div>
    								<div class="name-client"><strong class="put-name font-etro">Ngan Nt</strong><span>Develop, Web Designer</span></div>
    							</div>
    						</div>	
    					</div>
    				</div>
    			</div>
    			<script type="text/javascript">// <![CDATA[
    				jQuery(document).ready(function($) {
    					var client_slider = $(".slider-client");
    					client_slider.owlCarousel({				
    						items:1,
    						mouseDrag: false,
    						startPosition: 1,
    						animateOut: 'fadeOut',
    						animateIn: 'fadeIn',
    						autoplay:false,
    						loop:true,
    						nav : false,
    						dots: false,
    						autoplaySpeed : 500,
    						navSpeed : 500,
    						dotsSpeed : 500,
    						autoplayHoverPause: true,
    						margin:50,
    					});	  
    				});	
    												
    			// ]]></script>
    		</div>
    	</div>
    </div>

    To create the static block, go to CMS >> Static Blocks with Identifier * : “footer-about”

    Frontend Appearance

    • Backend Setting: Please click Here to view.

    Copy and paste the following code into the content tab of this static block:

    <div class="footer-about">
       <img src="{{media url="wysiwyg/footer/logo-footer.png"}}" alt="img" />
         <p>Donec tellus Nulla lorem Nullam elit id ut elit feugiat lacus. Congue eget dapibus congue tincidunt senectus nibh risus Morbi at ligula porta, vulputate nulla vitae, accumsan sapien. Maecenas molestie maximus varius. Aliquam blandit rhoncus...</p> 
         <a class="footer-button-buy font-etro" href="#">Buy this theme</a>
    </div>

    To create the static block, go to CMS >> Static Blocks with Identifier * : “footer-out-shop”

    Frontend Appearance

    • Backend Setting: Please click Here to view.

    Copy and paste the following code into the content tab of this static block:

    <div class="footer-our-shop">
         <span class="footer-title">OUR SHOPS</span>
         <ul class="footer-content">
                 <li><a title="Product Support" href="#">Product Support</a></li>
                 <li><a title="PC Setup & Support Services" href="#">PC Setup & Support Services</a></li>
                 <li><a title="Extended Service Plans" href="#">Extended Service Plans</a></li>
                 <li><a title="Community" href="#">Community</a></li>
                 <li><a title="Product Manuals" href="#">Product Manuals</a></li>
                 <li><a title="Product Registration" href="#">Product Registration</a></li>
         </ul>
    </div>

    To create the static block, go to CMS >> Static Blocks with Identifier * : “footer-orders”

    Frontend Appearance

    • Backend Setting: Please click Here to view.

    Copy and paste the following code into the content tab of this static block:

    <div class="footer-orders">
         <span class="footer-title">ORDERS</span>
         <ul class="footer-content">
                 <li><a title="My account" href="{{store url="customer/account/edit"}}">My account</a></li>
                 <li><a title="Order Tracking" href="#">Order Tracking</a></li>
                 <li><a title="Watch List" href="#">Watch List</a></li>
                 <li><a title="Customer Service" href="#">Customer Service</a></li>
                 <li><a title="Returns Exchanges" href="#">Returns / Exchanges</a></li>
                 <li><a title="FAQs" href="#">FAQs</a></li>
         </ul>
    </div>

    To create the static block, go to CMS >> Static Blocks with Identifier * : “footer-contact-info”

    Frontend Appearance

    • Backend Setting: Please click Here to view.

    Copy and paste the following code into the content tab of this static block:

    <div class="footer-contact-info">
        <span class="footer-title">CONTACT INFO</span>
    	<div class="footer-contact-content">
    		<p><span>Lorem Ipsum is simply dummy text of the printing and typesetting industry. Lorem Ipsum is simply dummy text of the printing and typesetting industry.</span></p>
    		<p class="address"><span>No 1123, Marmora Road, Glasgow, D04 89GR.</span></p>
    		<p class="phone"><span><a href="tel:80123456788" title="Call: (801) 2345 - 6788">(801) 2345 - 6788</a>/<a href="tel:80123456789" title="Call: (801) 2345 - 6789">(801) 2345 - 6789</a></span></p>
    		<p class="email"><a title="Mail to: support@etrostore.com" href="mailto:name@email.com"><span>support@etrostore.com</span></a></p>
    	 </div>
    </div>

    To create the static block, go to CMS >> Static Blocks with Identifier * : “footer-link”

    Frontend Appearance

    • Backend Setting: Please click Here to view.

    Copy and paste the following code into the content tab of this static block:

    <ul class="text-center">
    		<li class="bor-link"><a href="{{store url="about-us"}}">About Us</a></li>
    		<li class="bor-link"><a href="#">Customer Service</a></li>
    		<li class="bor-link"><a href="#">Privacy Policy</a></li>
    		<li class="bor-link"><a href="{{store url="catalog/seo_sitemap/category/"}}">Site Map</a></li>
    		<li class="bor-link"><a href="#">Orders and Returns</a></li>
    		<li><a href="{{store url="contact-us"}}">Contact Us</a></li>
    		
    </ul>

    To create the static block, go to CMS >> Static Blocks with Identifier * : “footer-bottom-support”

    Frontend Appearance

    • Backend Setting: Please click Here to view.

    Copy and paste the following code into the content tab of this static block:

    <div class="row">
    	<div class="col-lg-3 col-md-3 col-sm-6">
    		<div class="icon-sp">
    			<i class="fa fa-paper-plane"></i>
    		</div>
    		<div class="content-sp">
    			<a href="#" class="font-etro"><strong>Money Back Guarantee</strong></a><br>
    			<span>30 Days Money Back</span>
    		</div>
    	</div>
    	
    	<div class="col-lg-3 col-md-3 col-sm-6 box-footer-sp">
    		<div class="icon-sp">
    			<i class="fa fa-map-marker"></i>
    		</div>
    		<div class="content-sp">
    			<a href="#" class="font-etro"><strong>Free Worldwide Shipping</strong></a><br>
    			<span>On Order Over $100</span>
    		</div>
    	</div>
    	<div class="col-lg-3 col-md-3 col-sm-6 box-footer-sp">
    		<div class="icon-sp">
    			<i class="fa fa-tag"></i>
    		</div>
    		<div class="content-sp">
    			<a href="#" class="font-etro"><strong>Member Discount</strong></a><br>
    			<span>Upto 70 % Discount</span>
    		</div>
    	</div>
    	
    	<div class="col-lg-3 col-md-3 col-sm-6 box-footer-sp">
    		<div class="icon-sp">
    			<i class="fa fa-life-ring"></i>
    		</div>
    		<div class="content-sp">
    			<a href="#" class="font-etro"><strong>24/7 Online Support</strong></a><br>
    			<span>24/7 Technical Support</span>
    		</div>
    	</div>
    	
    </div>

    To create the static block, go to CMS >> Static Blocks with Identifier * : “footer-payment”

    Frontend Appearance

    • Backend Setting: Please click Here to view.

    Copy and paste the following code into the content tab of this static block:

    <div class="payment">
    	<img src="{{media url="wysiwyg/footer/payment.png"}}" alt="payment" />
    </div>

    Static Block: block-img-content-1

    To create the static block, go to CMS >> Static Blocks with Identifier * : “block-img-content-1″

    Frontend Appearance

    • Backend Setting: Please click Here to view.

    Copy and paste the following code into the content tab of this static block:

    <div class="box-banner-left">
    	<ul>
    		<li class="style-effect"><a href="#" title="img"><img src="{{media url="wysiwyg/static-img/home1/img1.jpg"}}" alt="img1" /></a></li>
    		<li class="style-effect"><a href="#" title="img"><img src="{{media url="wysiwyg/static-img/home1/img2.jpg"}}" alt="img2" /></a></li>
    	</ul>
    </div>

    Static Block: block-img-content-2

    To create the static block, go to CMS >> Static Blocks with Identifier * : “block-img-content-2″

    Frontend Appearance

    • Backend Setting: Please click Here to view.

    Copy and paste the following code into the content tab of this static block:

    <div class="box-banner-center style-effect">
    <a href="#" title="img"><img src="{{media url="wysiwyg/static-img/home1/img3.jpg"}}" alt="img1" /></a>
    </div>

    Static Block: block-img-content-3

    To create the static block, go to CMS >> Static Blocks with Identifier * : “block-img-content-3″

    Frontend Appearance

    • Backend Setting: Please click Here to view.

    Copy and paste the following code into the content tab of this static block:

    <div class="box-banner-right">
    	<ul>
    		<li class="style-effect"><a href="#" title="img"><img src="{{media url="wysiwyg/static-img/home1/img4.jpg"}}" alt="img4" /></a></li>
    		<li class="style-effect"><a href="#" title="img"><img src="{{media url="wysiwyg/static-img/home1/img5.jpg"}}" alt="img5" /></a></li>
    	</ul>
    </div>

    Static Block: block-bn-1

    To create the static block, go to CMS >> Static Blocks with Identifier * : “block-bn-1″

    Frontend Appearance

    • Backend Setting: Please click Here to view.

    Copy and paste the following code into the content tab of this static block:

    <div class="box-bn-1 style-effect">
    	<a href="#" title="img"><img src="{{media url="wysiwyg/static-img/home2/img-bn-1.jpg"}}" alt="img1" /></a>
    </div>

    Static Block: block-bn-2

    To create the static block, go to CMS >> Static Blocks with Identifier * : “block-bn-2″

    Frontend Appearance

    • Backend Setting: Please click Here to view.

    Copy and paste the following code into the content tab of this static block:

    <div class="box-bn-1 style-effect">
    	<a href="#" title="img"><img src="{{media url="wysiwyg/static-img/home2/img-bn-2.jpg"}}" alt="img1" /></a>
    </div>

    Static Block: block-img-bottom

    To create the static block, go to CMS >> Static Blocks with Identifier * : “block-img-bottom”

    Frontend Appearance

    • Backend Setting: Please click Here to view.

    Copy and paste the following code into the content tab of this static block:

    <div class="box-banner-bottom style-effect">
    	<a href="#" title="img"><img src="{{media url="wysiwyg/static-img/home1/img-bottom.jpg"}}" alt="img1" /></a>
    </div>

    Static Block: block-img-top-1

    To create the static block, go to CMS >> Static Blocks with Identifier * : “block-img-top-1″

    Frontend Appearance

    • Backend Setting: Please click Here to view.

    Copy and paste the following code into the content tab of this static block:

    <div class="box-img-slide">
    	<div class="img-1">
    		<div class="img-1-margin style-effect"> <a href="#" title="img"><img src="{{media url="wysiwyg/static-img/home3/1.jpg"}}" alt="img-1" /></a></div> 
    		<div class=" style-effect"> <a href="#" title="img"><img src="{{media url="wysiwyg/static-img/home3/2.jpg"}}" alt="img-2" /></a></div>
    	</div>
    </div>

    Static Block: block-img-top-2

    To create the static block, go to CMS >> Static Blocks with Identifier * : “block-img-top-2″

    Frontend Appearance

    • Backend Setting: Please click Here to view.

    Copy and paste the following code into the content tab of this static block:

    <div class="box-img-slide2">
    	<div class="img-1">
    		<div class="img-1-margin style-effect"><a href="#" title="img"><img src="{{media url="wysiwyg/static-img/home3/3.jpg"}}" alt="img-1" /></a></div>
    		<div class="style-effect"><a href="#" title="img"><img src="{{media url="wysiwyg/static-img/home3/4.jpg"}}" alt="img-2" /></a></div>
    	</div>
    </div>

    Static Block: block-img-deal

    To create the static block, go to CMS >> Static Blocks with Identifier * : “block-img-deal”

    Frontend Appearance

    • Backend Setting: Please click Here to view.

    Copy and paste the following code into the content tab of this static block:

    <div class="box-img-deal">
    	<div class="col-lg-3 col-md-3  col-sm-3 no-padding">
    		<div class="style-effect">
    			<a href="#" title="img"><img src="{{media url="wysiwyg/static-img/home3/5.jpg"}}" alt="img-5" /></a>
    		</div>
    	</div>
    	<div class="col-lg-3 col-md-3 col-sm-3 no-padding">
    		<div class="style-effect">
    			<a href="#" title="img"><img src="{{media url="wysiwyg/static-img/home3/6.jpg"}}" alt="img-6" /></a>
    		</div>
    	</div>
    	<div class="col-lg-3 col-md-3 col-sm-3 no-padding">
    		<div class="style-effect">
    			<a href="#" title="img"><img src="{{media url="wysiwyg/static-img/home3/7.jpg"}}" alt="img-7" /></a>
    		</div>
    	</div>
    	<div class="col-lg-3 col-md-3 col-sm-3 no-padding">
    		<div class="style-effect">
    			<a href="#" title="img"><img src="{{media url="wysiwyg/static-img/home3/8.jpg"}}" alt="img-8" /></a>
    		</div>
    	</div>
    </div>

    Static Block: block-bn-2-home3

    To create the static block, go to CMS >> Static Blocks with Identifier * : “block-bn-2-home3″

    Frontend Appearance

    • Backend Setting: Please click Here to view.

    Copy and paste the following code into the content tab of this static block:

    <div class="box-bn-1 style-effect">
    	<a href="#" title="img"><img src="{{media url="wysiwyg/static-img/home3/img-bn-2.jpg"}}" alt="img1" /></a>
    </div>

    Static Block: block-bn-3-home3

    To create the static block, go to CMS >> Static Blocks with Identifier * : “block-bn-3-home3″

    Frontend Appearance

    • Backend Setting: Please click Here to view.

    Copy and paste the following code into the content tab of this static block:

    <div class="box-bn-1 style-effect">
    	<a href="#" title="img"><img src="{{media url="wysiwyg/static-img/home3/img-bn-3.jpg"}}" alt="img1" /></a>
    </div>

    Static Block: header-banner

    To create the static block, go to CMS >> Static Blocks with Identifier * : “header-banner”

    Frontend Appearance

    • Backend Setting: Please click Here to view.

    Copy and paste the following code into the content tab of this static block:

    <div class="box-img-cat">
    	<div class=" img-1"><a href="#" title="img"><img src="{{media url="wysiwyg/static-img/home3/img-header.jpg"}}" alt="img-cat3" /></a></div>
    </div>

    Static Block: block-joi-our-home4

    To create the static block, go to CMS >> Static Blocks with Identifier * : “block-joi-our-home4″

    Frontend Appearance

    • Backend Setting: Please click Here to view.

    Copy and paste the following code into the content tab of this static block:

    <div class="box-joi-our">
    	<div class="info-joi">
    		<div class="info-title font-etro">
    			<h2>Join Our Family</h2>
    		</div>
    		<div class="info-contetn">
    			<span>Lorem ipsum dolor sit amet, consectetuer adipiscing elit, sed diam nonummy nibh euismod tincidunt ut laoreet dolore magna aliquam erat volutpat. Ut wisi enim ad minim veniam, quis nostrud exerci tation ullamcorper suscipit lobortis. Lorem ipsum dolor sit amet, consectetuer adipiscing elit, sed diam nonummy nibh euismod tincidunt ut laoreet dolore magna aliquam erat volutpat. Ut wisi enim ad minim veniam, quis nostrud exerci tation ullamcorper suscipit lobortis. Lorem ipsum dolor sit amet, consectetuer adipiscing elit, sed diam nonummy nibh euismod tincidunt ut laoreet dolore magna aliquam erat volutpat. Ut wisi enim ad minim veniam, quis nostrud exerci tation ullamcorper suscipit lobortis. Ut wisi enim ad minim veniam, quis nostrud exerci tation ullamcorper suscipit lobortis. Lorem ipsum dolor sit amet, consectetuer adipiscing elit, sed diam nonummy nibh euismod tincidunt ut laoreet dolore magna aliquam erat volutpat. Ut wisi enim ad minim veniam, quis nostrud exerci tation ullamcorper suscipit lobortis. </span>
    		</div>
    		
    	</div>
    	<div class="info-button">
    		<a href="#"><img src="{{media url="wysiwyg/static-img/home1/img-ios.png"}}" alt="img-ios" /></a>
    		<a href="#"><img src="{{media url="wysiwyg/static-img/home1/img-androi.png"}}" alt="img-androi" /></a>
    	</div>
    </div>

    3.5 How To Edit Copyright in Admin Panel

    Frontend Appearance

    In the Administrator page, Please navigate to SM Etrostore Setting; find SM Etrostore Setting Module to configure the “Copyright” parameter as image below:

    3.6 How To Customize the Social symbols in admin panel

    Frontend Appearance

    In the Administrator page, please go to SM Etrostore Setting; find SM Etrostore Setting Module to configure the “Social Style” parameter as image below:

    3.7 Customize HTML

    WISHLIST

    Frontend Appearance

    In your Website’s Directory, go to app\design\frontend\sm-etrostore\default\template\page\html\header-style folder. To enable WISHLISTbutton in the homepage, in this folder, you could open the file named header-1.phtml by your editor program.
    Find and change the following code to enable/disable this button in the frontend:

    <!-- WISHLIST -->
    			                    <div class=" sn header-compare">
    			                    	<?php echo $this->getChildHtml('headerCompare') ?>
    			                    </div>

    • Backend Setting: Please click Here to view.

    COMPARE

    Frontend Appearance

    In your Website’s Directory, go to app\design\frontend\sm-etrostore\default\template\page\html\header-style folder. To enable COMPAREbutton in the homepage, in this folder, you could open the file named header-1.phtml by your editor program.
    Find and change the following code to enable/disable this button in the frontend:

    <!-- COMPARE -->
    			                    <div class=" sn header-wishlist">
    									<a class="fa fa-heart-o" href="<?php echo $this->getUrl('wishlist') ?>"></a>
    			                    </div>

    • Backend Setting: Please click Here to view.

    NEWSLETTER

    1. NEWSLETTER CONTENT
    Frontend Appearance

    In your Website’s Directory, go to app\design\frontend\sm-etrostore\default\template\newsletter folder. To change the text in this part, in this folder, you could open the file named subscribe-content.phtml by your editor program.
    Find and change the following text in this file as you want:

    NEWSLETTER, SIGNUP, REGISTER OUR NEWS LETTER FOR EXCLUSIVE BENEFITS, Your Email Address, Subscribe

    • Backend Setting: Please click Here to view.

    2. FOOTER NEWSLETTER

    Frontend Appearance

    In your Website’s Directory, go to app\design\frontend\sm-etrostore\default\template\newsletter folder. To change the text in this part, in this folder, you could open the file named subscribe.phtml by your editor program.
    Find and change the following text in this file as you want:

    NEWSLETTER SIGNUP, Your email... , Subscribe

    • Backend Setting: Please click Here to view.

    4SUPPORT

    • SUPPORT – If you have any questions that are beyond the scope of this help file, please feel free to send us via: Support Tickets System
    • FAQs – Go to Here to view more the Frequently Asked Questions.


    SM Topshop

    $
    0
    0

    Firstly, a huge thanks for purchasing this theme, your support is truly appreciated!

    This document covers the installation and use of this theme, reveals some answers to common problems and issues. We encourage you to read this document throughtly if you are experiencing any difficulties. If you have any questions that are beyond the scope of document, please feel free to contact us via our Support Tickets System.

    1 SYSTEM REQUIREMENT

    At the basic level, this theme will require the following conditions:

      • Compatible with Magento Community Edition 1.7.x; 1.8.x and 1.9.x (require: php 5.4 and Memory_limit no less than 256Mb)

    2INSTALLATION

    There are two ways to install a Magento Theme:

    • Quickstart Installation: By using this package, you will set the theme exactly like our Demo with sample data.
    • Manual Installation (including Theme Installation).

    2.1 Quickstart Installation:

    Magentech provides SM Quickstart package for each theme which aims to ease the installation for users. If you plan to start your site from the beginning, It will help you save much time of installing and configuring.

    Please follow steps below:

    • Step 1: Download the quickstart package
    • Step 2: Extract and Upload the whole Quickstart package to your server. In Quickstart folder you will see the extracted folder that include all sample data
    • Step 3: Create a Database for your Magento site
    • Note: You need to remember the database name to use in the next steps

    • Step 4: Start installation by opening browser and navigate to your URL (where the Quickstart uploaded) to load default Magento installer. Please follow each step of the Installer so that the installation process can be set.

    • Step 5: Locale Settings. Please fill fully into Required Fields (“Locale; Time Zone and Default Currency”.)

    • Step 6: In the Configuration step, input the required fields as below.
      • Database Name : sm-topshop-quickstart( It must be the exact name of database you have just created)
      • User name : root
      • User password : no need to fill
      • Do not use "localhost" in the URL path, otherwise you could not log in to your Admin area (you should use your local IP when setting up your website hosted entirely on your own computer).

    • Step 7: Create Admin Account. Please fill out Required Fields (“First Name; Last Name; Email; Username; password and confirm password” completely.)

    • Step 8: Finish Installation and now you you can click Go to Frontend to open Homepage or click Go to Backend to open Admin Panel.

    2.2 Manual Installation

      • Step 1: Please unzip “sm_topshop_theme.zip” file and upload folders skin; media;lib;js;app from the theme package to the root of your Magento site folder on your server.

        Note: You could change the name of this folder. However, if you want your website run correctly, it need to have the same name as the database you choose.

      • Step 2: Log in to your Admin Panel (e.g. http://yourdomain/index.php/admin/)

        Note: If you are using the Admin Panel when copying folders in step 1, you need to log out and log in back.

      • Step 3: Disable Cache: Go to System >> Cache Management, click ‘Sellect All’ button, then choose ‘Disable’ and click ‘Submit’ button to complete the action.
      • Step 4: Navigate to System >> Configuration >> Design.
    • Step 5: In Package tab of Design Section, input the parameter Current Package Name with the actual theme name.

    • Step 6: You can also change the settings for Header.

    Note: After configuring in each steps( for example: Step 4, Step 5, Step6), you need to click “Save Config” button to save your changes

    2.3 Theme Setting

    Configure SM Topshop General Setting Theme In Magento admin panel, navigate to SM Topshop Setting and configure theme as you want.

      • Configure General with Theme color, Font size, color for the link, hover buttons, page, text, title, background … for any store.

        Note:
        Copy and paste the following Elements into “Google Font Elements”:

        .full_top .deal-wrapper .title-home h2, .listingtab-wrapper-default ul.ltabs-tabs li, .title-home h2, .price-box, .supercategories-wrap .sj-listing-tabs .ltabs-tabs-container .ltabs-tabs li, .postTitle h2, .footer .footer-middle .block .title, .sidebar .block.block-layered-nav .block-title, .block-layered-nav .block-content .filter-wrapp dt,
        .home-menu-dropdown .item-home-store .title-menu-home, .sm_megamenu_wrapper_horizontal_menu .sm_megamenu_menu > li > div .sm_megamenu_title > span, .sm_megamenu_wrapper_vertical_menu .sm_megamenu_menu > li > div .sm_megamenu_title > span, .header-style-2 .minicart-header .sm-cartpro .cartpro-title, .homestyle4 .hotdeal-custom-wrapper .sm-custom .timer-custom, .static-service-1-index5 .title, .blog-index-list .sidebar .block .block-title, .sidebar .block .block-title

      • Configure Theme Layout with Layout style, Header style& Homepage style ( depend on Default pages on Web tab) to configure
      • Configure the Product Listing with Layout 1 Column, Layout 2 Columns, Layout 3 Columns,Product Shows Effect On Hover, etc.
      • Configure the Product Detail To zoom image of product, adjust Zoom Mode, Custom tab, and content, etc.
      • Configure the Product Detail To zoom image of product, adjust Zoom Mode, Custom tab, and content, etc..
      • Configure Rich Snippets
      • Configure Socials : To connect with social networks such as Facebook, Twitter, Google Plus, Linkedin
      • Configure Advanced : To show popup, Cpanel, use “Add to cart, Add to wishlist, Add to Compare
      • Configure Theme Installation

    Note: Click the Import Static Blocks and CMS Pages to import all static blocks and CMS pages provided with this theme. The following notification will appear to announce that you have just imported static blocks or pages successfully.

    After importing, you need to go to CMS >> Static Block ( or Pages) to configure and select Store View for each block or page.

    2.4 Blog

    Configure Blog

    We are using Aheadworks Blog free extension from Aheadworks, so that it is not including in the quickstart package. You can download free version of Aheadworks Blog Here and follow Its Guide to install. After installing this extension, please go to the admin of blog, navigate to Blog >> Settings to configure it like our configuration and your desire.


    3CONFIGURATION
    Set Default Page
    • To set a default page for your Magento Site, in the Admin Panel you go to System>>Configuration>>Web>>Default Pages. Please click to see the Backend Settings.
    • You need to change to the website / store view that you want to change (the dropdown menu in the upper left corner). You will probably have to create a new CMS page if you want to have something different from your default home page.

    3.1 Page Configuration

    3.1.1 Home Style 1

    Frontend of Home Style 1 – Layout Position
    home-layout1
    In the Admin Panel, please navigate to CMS >> Pages to create a new page in Page Management section. Here is the list of steps in this style’s configuration process:

    • Page Information Tab: Please click to see the Backend Settings.
    • Content Tab: Please click to see the Backend Settings.
    • Copy and paste the following code into the Content field::

    <div class="home-default homestyle1">
    
    	<div class="wow fadeInUp">
    		<div class="banner-wrapper box-content">
    			{{block type="cms/block" block_id="static-image-1"}}
    		</div>
    	</div>
    
    	<div class="wow fadeInUp">
    		<div class="box-content listingtab-wrapper-default">
    
    		{{block type="listingtabs/list" name="listingtabs.list.default" template="sm/listingtabs/default.phtml"
    		listingtabs_title_text=""
    		filter_order_by="lastest_product,price,best_sales"
    		field_preload="price"
    		nbi_column1="4"
    		nbi_column2="3"
    		nbi_column3="2"
    		nbi_column4="1"
    		nav="1"
    		}}
    
    		</div>
    	</div>
    
    	<div class="wow fadeInUp">
    		<div class="banner-wrapper box-content">
    			{{block type="cms/block" block_id="static-image-2"}}
    		</div>
    	</div>
    
    	<div class="wow fadeInUp">
    		<div class="box-content supercategories-wrap fashion-cate">
    			{{block type="supercategories/list" name="supercategories.list.default" template="sm/supercategories/default.phtml"
    			pretext="static_c_fashion"
    			posttext="banner_s_p_fashion"
    			}}
    		</div>
    	</div>
    
    	<div class="wow fadeInUp">
    		<div class="box-content supercategories-wrap furniture-cate">
    			{{block type="supercategories/list" name="supercategories.list.default.1" template="sm/supercategories/default.phtml"
    			product_category="207"
    			pretext="static_c_furniture"
    			posttext="banner_s_p_furniture"
    			}}
    		</div>
    	</div>
    
    	<div class="wow fadeInUp">
    		<div class="box-content supercategories-wrap computer-cate">
    			{{block type="supercategories/list" name="supercategories.list.default.2" template="sm/supercategories/default.phtml"
    			product_category="208"
    			pretext="static_c_computer"
    			posttext="banner_s_p_computer"
    			}}
    		</div>
    	</div>
    
    	<div class="wow fadeInUp">
    		<div class="box-content supercategories-wrap healthy-cate">
    			{{block type="supercategories/list" name="supercategories.list.default.3" template="sm/supercategories/default.phtml"
    			product_category="209"
    			pretext="static_c_healthy"
    			posttext="banner_s_p_healthy"
    			}}
    		</div>
    	</div>
    	
    	<div class="wow fadeInUp">
    		<div class="box-content latest-post-wrapper">
    				<div class="slider-latest-blog">
    					{{block type="blog/blog" name="latest_post" template="aw_blog/latest-post.phtml"}}
    				</div>
    		</div>
    	</div>	
    
    	<div class="wow fadeInUp">
    		<div class="brand-wrapper">
    			{{block type="cms/block" block_id="brand-block"}}
    		</div>
    	</div>
    </div>

  • Design Tab: Please click to see the Backend Settings.
  • Copy and paste the following code into the Design field::

    <reference name="full_top_container">
            <block type="imageslider/list" name="imageslider.list.default" template="sm/imageslider/default.phtml">
    			</block>
    			<block type="deal/list" name="deal.list.default1" template="sm/deal/default.phtml"
    			deal_title_text="Hot Deals"
    			nb_column1="1"
    			nb_column2="1"
    			nb_column3="1"
    			nb_column4="1"
    			></block>
    </reference>

    3.1.2 Home Style 2

    Frontend of Home Style 2 – Layout Position
    home-layout2
    In the Admin Panel, please navigate to CMS >> Pages to create a new page in Page Management section. Here is the list of steps in this style’s configuration process:

    • Page Information Tab: Please click to see the Backend Settings.
    • Content Tab: Please click to see the Backend Settings.
    • Copy and paste the following code into the Content field::

    <div class="home-default homestyle2">
    	<div class="wow fadeInUp">
    		<div class="top-full">
    			<div class="row">
    				<div class="col-lg-3 vertical-menu-box">
    					{{block type="cms/block" block_id="megamenu-vertical"}}
    				</div>
    				<div class="col-lg-9 slideshow-box">
    					{{block type="imageslider/list" name="imageslider.list.default" template="sm/imageslider/default.phtml"}}
    				</div>
    			</div>
    		</div>
    	</div>
    
    	<div class="wow fadeInUp">
    		<div class="banner-wrapper box-content">
    			{{block type="cms/block" block_id="static-image-1-index2"}}
    		</div>
    	</div>
    	
    	<div class="wow fadeInUp">
    		<div class="brand-wrapper">
    			{{block type="cms/block" block_id="brand-block"}}
    		</div>
    	</div>
    
    	<div class="wow fadeInUp">
    		<div class="box-content listingtab-wrapper-default">
    
    		{{block type="listingtabs/list" name="listingtabs.list.default2" template="sm/listingtabs/default.phtml"
    		listingtabs_title_text=""
    		filter_order_by="lastest_product,price,best_sales"
    		field_preload="price"
    		nbi_column1="4"
    		nbi_column2="3"
    		nbi_column3="2"
    		nbi_column4="1"
    		nav="1"
    		}}
    
    		</div>
    	</div>
    
    	<div class="wow fadeInUp">
    		<div class="banner-wrapper box-content">
    			{{block type="cms/block" block_id="static-image-2"}}
    		</div>
    	</div>
    
    	<div class="wow fadeInUp">
    		<div class="box-content supercategories-wrap fashion-cate">
    			{{block type="supercategories/list" name="supercategories.list.default" template="sm/supercategories/default.phtml"
    			pretext="static_c_fashion"
    			posttext="banner_s_p_fashion"
    			}}
    		</div>
    	</div>
    
    	<div class="wow fadeInUp">
    		<div class="box-content supercategories-wrap furniture-cate">
    			{{block type="supercategories/list" name="supercategories.list.default.1" template="sm/supercategories/default.phtml"
    			product_category="207"
    			pretext="static_c_furniture"
    			posttext="banner_s_p_furniture"
    			}}
    		</div>
    	</div>
    
    	<div class="wow fadeInUp">
    		<div class="box-content supercategories-wrap computer-cate">
    			{{block type="supercategories/list" name="supercategories.list.default.2" template="sm/supercategories/default.phtml"
    			product_category="208"
    			pretext="static_c_computer"
    			posttext="banner_s_p_computer"
    			}}
    		</div>
    	</div>
    
    
    	<div class="wow fadeInUp">
    		<div class="box-content supercategories-wrap healthy-cate">
    			{{block type="supercategories/list" name="supercategories.list.default.3" template="sm/supercategories/default.phtml"
    			product_category="209"
    			pretext="static_c_healthy"
    			posttext="banner_s_p_healthy"
    			}}
    		</div>
    	</div>
    
    	<div class="wow fadeInUp">
    		<div class="box-content">
    			<div class="row">
    				<div class="col-lg-4 col-md-4 col-sm-4 newsletter-box">
    					{{block type="newsletter/subscribe" name="newsletter.index2" template="newsletter/subscribe-index2.phtml"}}
    				</div>
    				<div class="col-lg-8 col-md-8 col-sm-8 latest-post-wrapper">
    					<div class="slider-latest-blog">
    						{{block type="blog/blog" name="latest_post_index2" template="aw_blog/latest-post-index2.phtml"}}
    					</div>
    				</div>
    			</div>
    		</div>
    	</div>	
    
    </div>

  • Design Tab: Please click to see the Backend Settings.
  • 3.1.3 Home Style 3

    Frontend of Home Style 3 – Layout Position
    home-layout3
    In the Admin Panel, please navigate to CMS >> Pages to create a new page in Page Management section. Here is the list of steps in this style’s configuration process:

    • Page Information Tab: Please click to see the Backend Settings.
    • Content Tab: Please click to see the Backend Settings.
    • Copy and paste the following code into the Content field::

    <div class="home-default homestyle3">
    	<div class="wow fadeInUp">
    		<div class="top-full">
    			<div class="row">
    				<div class="col-lg-3 col-md-3 col-sm-12 vertical-menu-virtual">
    				</div>
    				<div class="col-lg-6 col-md-6 col-sm-12 slideshow-box">
    					{{block type="imageslider/list" name="imageslider.list.default" template="sm/imageslider/default.phtml"}}
    				</div>
    				<div class="col-lg-3 col-md-3 col-sm-12 banner-box">
    					{{block type="cms/block" block_id="static-image-1-index3"}}
    				</div>
    			</div>
    		</div>
    	</div>
    
    	<div class="wow fadeInUp">
    		<div class="banner-wrapper box-content">
    			{{block type="cms/block" block_id="static-image-1-index2"}}
    		</div>
    	</div>
    	
    	<div class="wow fadeInUp">
    		<div class="row featured-deal-wrap">
    			<div class="col-lg-9 col-md-9 col-sm-8 col-xs-12 slider-basic-wrapper">
    				{{block type="basicproducts/list" name="basicproducts.slider.home" template="sm/basicproducts/basic-slider-home.phtml"
    					basicproducts_title_text="Featured Products"
    					product_order_by="price"
    					nb_column1="3"				
    					nb_column2="3"				
    					nb_column3="2"
    					nb_column4="2"
    					nb_column5="1"
    				}}
    			</div>
    			<div class="col-lg-3 col-md-3 col-sm-4 col-xs-12 deal-wrapper slidebar">
    				{{block type="deal/list" name="deal.list.slider" template="sm/deal/slider-deal.phtml"
    					nb_column4="2"
    					nb_column5="1"
    					posttext=""
    				}}
    			</div>
    		</div>
    	</div>
    
    	<div class="wow fadeInUp">
    		<div class="row">
    			<div class="col-lg-9 col-md-9 col-sm-8 left9-wrapper">
    				{{block type="cms/block" block_id="static-image-2-index3"}}
    				<div class="supercategories-wrap">
    					{{block type="supercategories/list" name="supercategories.list.default" template="sm/supercategories/default.phtml"
    						pretext="static_c_fashion"
    						posttext="banner_s_p_fashion"
    						product_limitation_a_slider="4"
    					}}
    				</div>
    				<div class="supercategories-wrap furniture-cate">
    					{{block type="supercategories/list" name="supercategories.list.default.1" template="sm/supercategories/default.phtml"
    						product_category="207"
    						pretext="static_c_furniture"
    						posttext="banner_s_p_furniture"
    						product_limitation_a_slider="4"
    					}}	
    				</div>				
    				<div class="supercategories-wrap computer-cate">
    					{{block type="supercategories/list" name="supercategories.list.default.2" template="sm/supercategories/default.phtml"
    						product_category="208"
    						pretext="static_c_computer"
    						posttext="banner_s_p_computer"
    						product_limitation_a_slider="4"
    					}}
    				</div>					
    			</div>
    			<div class="col-lg-3 col-md-3 col-sm-4 slidebar">
    				<div class="slider-basic-wrapper">
    					{{block type="basicproducts/list" name="basicproducts.slider.home" template="sm/basicproducts/basic-slider-home.phtml"
    						basicproducts_title_text="Best sellers"
    						product_order_by="best_sales"
    						nb_column1="1"
    						nb_column2="1"				
    						nb_column3="1"				
    						nb_column4="2"
    						nb_column5="1"
    					}}
    				</div>
    				{{block type="cms/block" block_id="static-image-3-index3"}}
    				<div class="slider-basic-wrapper">
    					{{block type="basicproducts/list" name="basicproducts.slider.home" template="sm/basicproducts/basic-slider-home.phtml"
    						basicproducts_title_text="New Products"
    						product_order_by="created_at"
    						nb_column1="1"
    						nb_column2="1"				
    						nb_column3="1"				
    						nb_column4="2"
    						nb_column5="1"
    					}}
    				</div>
    				{{block type="cms/block" block_id="static-image-4-index3"}}
    				<div class="latest-post-wrapper">
    					<div class="slider-latest-blog">
    						{{block type="blog/blog" name="latest_post_index3" template="aw_blog/latest-post-index3.phtml"}}
    					</div>
    				</div>	
    			</div>
    		</div>
    	</div>
    	
    	<div class="wow fadeInUp">
    		<div class="brand-wrapper">
    			{{block type="cms/block" block_id="brand-block"}}
    		</div>
    	</div>
    </div>

  • Design Tab: Please click to see the Backend Settings.
  • 3.1.4 Home Style 4

    Frontend of Home Style 4 – Layout Position
    home-layout4
    In the Admin Panel, please navigate to CMS >> Pages to create a new page in Page Management section. Here is the list of steps in this style’s configuration process:

    • Page Information Tab: Please click to see the Backend Settings.
    • Content Tab: Please click to see the Backend Settings.
    • Copy and paste the following code into the Content field::

    <div class="home-default homestyle4">
    
    	<div class="wow fadeInUp">
    		<div class="banner-wrapper box-content">
    			{{block type="cms/block" block_id="static-image-1-index4"}}
    		</div>
    	</div>
    
    	<div class="wow fadeInUp">
    		<div class="box-content hotdeal-custom-wrapper">
    
    		{{block type="custom/list" template="sm/custom/default.phtml"}}
    			<div class="slider-basic-wrapper">
    				{{block type="basicproducts/list" name="basicproducts.slider.home" template="sm/basicproducts/basic-slider-home.phtml"
    					basicproducts_title_text="Hot deals"
    					product_order_by="created_at"
    					product_category="201"
    					nb_column1="4"				
    					nb_column2="4"				
    				}}
    			</div>
    
    		</div>
    	</div>
    
    	<div class="wow fadeInUp">
    		<div class="banner-wrapper box-content banner-2">
    			{{block type="cms/block" block_id="static-image-2"}}
    		</div>
    	</div>
    
    	<div class="wow fadeInUp">
    		<div class="box-content supercategories-wrap women-cate">
    			{{block type="supercategories/list" name="supercategories.list.default.1" template="sm/supercategories/default.phtml"
    			product_category="247"
    			product_limitation_a_slider="4"
    			pretext="banner-c-women"
    			posttext=""
    			}}
    		</div>
    	</div>
    
    	<div class="wow fadeInUp">
    		<div class="box-content supercategories-wrap men-cate supercate-right">
    			{{block type="supercategories/list" name="supercategories.list.default.1" template="sm/supercategories/default.phtml"
    			product_category="245"
    			product_limitation_a_slider="4"
    			pretext="banner-c-men"
    			posttext=""
    			}}
    		</div>
    	</div>
    
    	<div class="wow fadeInUp">
    		<div class="box-content supercategories-wrap shoe-cate">
    			{{block type="supercategories/list" name="supercategories.list.default.1" template="sm/supercategories/default.phtml"
    			product_category="214"
    			product_limitation_a_slider="4"
    			pretext="banner-c-shoe"
    			posttext=""
    			}}
    		</div>
    	</div>
    
    	<div class="wow fadeInUp">
    		<div class="banner-wrapper box-content">
    			{{block type="cms/block" block_id="static-image-2-index4"}}
    		</div>
    	</div>
    
    	<div class="wow fadeInUp">
    		<div class="box-content latest-post-wrapper">
    			<div class="slider-latest-blog">
    				{{block type="blog/blog" name="latest_post" template="aw_blog/latest-post-index4.phtml"}}
    			</div>
    		</div>
    	</div>
    	
    	<div class="wow fadeInUp">
    		<div class="brand-wrapper">
    			{{block type="cms/block" block_id="brand-block"}}
    		</div>
    	</div>
    </div>

  • Design Tab: Please click to see the Backend Settings.
  • Copy and paste the following code into the Design field::

    <reference name="full_top">
            <block type="imageslider/list" name="imageslider.list.default" template="sm/imageslider/default.phtml">
    			</block>
    </reference>

    3.1.5 Home Style 5

    Frontend of Home Style 5 – Layout Position
    home-layout5
    In the Admin Panel, please navigate to CMS >> Pages to create a new page in Page Management section. Here is the list of steps in this style’s configuration process:

    • Page Information Tab: Please click to see the Backend Settings.
    • Content Tab: Please click to see the Backend Settings.
    • Copy and paste the following code into the Content field::

    <div class="home-default homestyle5">
    	<div class="wow fadeInUp">
    		<div class="top-full">
    			<div class="row">
    				<div class="col-lg-3 col-md-3 hidden-sm vertical-menu-virtual">
    					{{block type="cms/block" block_id="megamenu-vertical"}}
    				</div>
    				<div class="col-lg-7 col-md-7 col-sm-12 slideshow-box">
    					{{block type="imageslider/list" name="imageslider.list.default" template="sm/imageslider/default.phtml"}}
    				</div>
    				<div class="col-lg-2 col-md-2 hidden-sm hidden-xs banner-box">
    					{{block type="cms/block" block_id="static-image-1-index5"}}
    				</div>
    			</div>
    		</div>
    	</div>
    
    	<div class="wow fadeInUp">
    		<div class="banner-wrapper box-content">
    			{{block type="cms/block" block_id="static-service-1-index5"}}
    		</div>
    	</div>
    	
    	<div class="wow fadeInUp">
    		<div class="row">
    			<div class="col-lg-3 col-md-3 col-sm-4 col-xs-6 slidebar deal-wrapper">
    				{{block type="deal/list" name="deal.list.slider" template="sm/deal/slider-deal.phtml"
    					posttext=""
    					nb_column5="1"	
    				}}
    			</div>
    			<div class="col-lg-9 col-md-9 col-sm-8 col-xs-6  slider-basic-wrapper">
    				{{block type="basicproducts/list" name="basicproducts.slider.home" template="sm/basicproducts/basic-slider-home.phtml"
    					basicproducts_title_text="Featured Products"
    					product_order_by="price"
    					nb_column1="3"				
    					nb_column2="3"				
    					nb_column3="2"		
    					nb_column4="1"		
    					nb_column5="1"		
    				}}
    			</div>
    		</div>
    	</div>
    
    	
    	<div class="wow fadeInUp">
    		<div class="row box-content">
    			<div class="col-lg-3 col-md-3 col-sm-4 col-xs-12 slidebar">
    				<div class="slider-basic-wrapper">
    					{{block type="basicproducts/list" name="basicproducts.slider.home" template="sm/basicproducts/basic-slider-home.phtml"
    						basicproducts_title_text="New Products"
    						product_order_by="created_at"
    						nb_column1="1"
    						nb_column2="1"
    						nb_column3="1"
    					}}
    				</div>
    			</div>
    			<div class="col-lg-9 col-md-9 col-sm-8 col-xs-12 banner-custom-wrapper">
    				<div class="banner-wrapper">
    					{{block type="cms/block" block_id="static-image-2-index5"}}
    				</div>
    			</div>
    		</div>
    	</div>
    
    	<div class="wow fadeInUp">
    		<div class="box-content supercategories-wrap women-cate">
    			{{block type="supercategories/list" name="supercategories.list.default.1" template="sm/supercategories/default.phtml"
    			product_category="247"
    			product_limitation_a_slider="5"
    			pretext=""
    			posttext=""
    			}}
    		</div>
    	</div>
    
    	<div class="wow fadeInUp">
    		<div class="box-content supercategories-wrap men-cate">
    			{{block type="supercategories/list" name="supercategories.list.default.1" template="sm/supercategories/default.phtml"
    			product_category="245"
    			product_limitation_a_slider="5"
    			pretext=""
    			posttext=""
    			}}
    		</div>
    	</div>
    
    	<div class="wow fadeInUp">
    		<div class="banner-wrapper box-content">
    			{{block type="cms/block" block_id="static-image-2-index4"}}
    		</div>
    	</div>
    
    	<div class="wow fadeInUp">
    		<div class="box-content supercategories-wrap shoe-cate">
    			{{block type="supercategories/list" name="supercategories.list.default.1" template="sm/supercategories/default.phtml"
    			product_category="214"
    			product_limitation_a_slider="5"
    			pretext=""
    			posttext=""
    			}}
    		</div>
    	</div>
    
    	<div class="wow fadeInUp">
    		<div class="box-content latest-post-wrapper">
    			<div class="slider-latest-blog">
    				{{block type="blog/blog" name="latest_post" template="aw_blog/latest-post-index4.phtml"}}
    			</div>
    		</div>
    	</div>
    
    	<div class="wow fadeInUp">
    		<div class="brand-wrapper">
    			{{block type="cms/block" block_id="brand-block"}}
    		</div>
    	</div>
    </div>

  • Design Tab: Please click to see the Backend Settings.
  • 3.2 Configure Megamenu

    • Step 3: In order to add menu items, go to SM Megamenu >> Menu Items Manager to add items as you want.

    Note: In the next steps, when editing items in the menus, the items (in a menu) having same level could have same configuration. Therefore, we encourage you read throughtly and find out the item’s level to configure it without any errors.

    3.2.1 Horizontal Megamenu:

    Horizontal-mega-menu

    • Horizontal Megamenu List Please click Here to view.
    • Horizontal Megamenu’s Backend Please click Here to view.

    Home
    Frontend Appearance

    • Backend Settings: Please click Here to view.

    Features

    • Frontend Appearance
    • Backend Settings: Please click Here to view.
    • Backend of ‘Dropdown Features’: Please click Here to view.
    • Copy and paste the following code into the content:

    <div class="home-menu-dropdown">
    	<ul class="item-home-store layout-home">
    		<li class="title-menu-home">Layouts</li>
    		<li><a title="Home Style 1" href="{{store url="?___store=default&___from_store=french"}}">Home Style 1</a></li>
    		<li><a title="Home Style 2" href="{{store url="?___store=french&___from_store=default"}}">Home Style 2</a></li>
    		<li><a title="Home Style 3" href="{{store url="?___store=german&___from_store=default"}}">Home Style 3</a></li>
    		<li><a title="Home Style 4" href="{{store url="?___store=argentina&___from_store=default"}}">Home Style 4</a></li>
    		<li><a title="Home Style 5" href="{{store url="?___store=bolivia&___from_store=default"}}">Home Style 5</a></li>
    		<li><a title="Boxed Layout" href="{{store url="?___store=somaliland&___from_store=default"}}">Boxed Layout</a></li>
    	</ul>
    
    	<ul class="item-home-store header-home">
    		<li class="title-menu-home">Headers</li>
    		<li><a title="Header Type 1" href="{{store url="?___store=default&___from_store=french"}}">Header Type 1</a></li>
    		<li><a title="Header Type 2" href="{{store url="?___store=french&___from_store=default"}}">Header Type 2</a></li>
    		<li><a title="Header Type 3" href="{{store url="?___store=german&___from_store=default"}}">Header Type 3</a></li>
    		<li><a title="Header Type 4" href="{{store url="?___store=argentina&___from_store=default"}}">Header Type 4</a></li>
    		<li><a title="Header Type 5" href="{{store url="?___store=bolivia&___from_store=default"}}">Header Type 5</a></li>
    	</ul>
    	
    	<ul class="item-home-store theme-color">
    		<li class="title-menu-home">Color Styles</li>
    		<li class="blue"><a title="Blue" href="{{store url="?___store=belgium&___from_store=default"}}">Blue</a></li>
    		<li class="brown"><a title="Brown" href="{{store url="?___store=australia&___from_store=default"}}">Brown</a></li>
    		<li class="cyan"><a title="Cyan" href="{{store url="?___store=japan&___from_store=default"}}">Cyan</a></li>
    		<li class="green"><a title="Green" href="{{store url="?___store=andorra&___from_store=default"}}">Green</a></li>
    		<li class="orange"><a title="Orange" href="{{store url="?___store=vietnam&___from_store=default"}}">Orange</a></li>
    		<li class="pink"><a title="Pink" href="{{store url="?___store=benin&___from_store=default"}}">Pink</a></li>
    		<li class="teal"><a title="Teal" href="{{store url="?___store=barbados&___from_store=default"}}">Teal</a></li>
    		<li class="red"><a title="Red" href="{{store url="?___store=default&___from_store=default"}}">Red</a></li>
    	</ul>	
    			
    	<ul class="item-home-store layout-home">
    		<li class="title-menu-home">Listing Layouts</li>
    		<li><a title="Without Sidebar" href="{{store url="shop.html?___store=german&___from_store=default&mode=grid"}}">Without Sidebar</a></li>
    		<li><a title="Left Sidebar" href="{{store url="shop.html?___store=default&___from_store=german&mode=grid"}}">Left Sidebar</a></li>
    		<li><a title="Right Sidebar" href="{{store url="shop.html?___store=argentina&___from_store=default&mode=grid"}}">Right Sidebar</a></li>
    		<li><a title="Left - Right Sidebar" href="{{store url="shop.html?___store=bolivia&___from_store=default&mode=grid""}}">Left - Right Sidebar</a></li>
    		<li><a title="2 Product Columns" href="{{store url="shop.html?___store=bolivia&___from_store=default&mode=grid"}}">2 Product Columns</a></li>
    		<li><a title="3 Product Columns" href="{{store url="shop.html?___store=default&___from_store=benin&mode=grid"}}">3 Product Columns</a></li>
    		<li><a title="4 Product Columns" href="{{store url="shop.html?___store=belgium&___from_store=default&mode=grid"}}">4 Product Columns</a></li>
    		<li><a title="5 Product Columns" href="{{store url="shop.html?___store=benin&___from_store=default&mode=grid"}}">5 Product Columns</a></li>
    	</ul>
    	
    	<ul class="item-home-store detail-home">
    		<li class="title-menu-home">Product Detail Layouts</li>
    		<li><a title="Product Detail - Full" href="{{store url="shop/sazen-kutemas.html"}}">Product Detail - Full</a></li>
    		<li><a title="Product Detail - Left Sidebar" href="{{store url="shop/sazen-kutemas.html?detail_style=2&thumbstyle=0"}}">Product Detail - Left Sidebar</a></li>
    		<li><a title="Product Detail - Right Sidebar" href="{{store url="shop/sazen-kutemas.html?detail_style=3&thumbstyle=0"}}">Product Detail - Right Sidebar</a></li>
    		<li><a title="Thumbnail  - Horizontal" href="{{store url="shop/sazen-kutemas.html?thumbstyle=1"}}">Thumbnail  - Horizontal</a></li>
    		<li><a title="Thumbnail - Vertical" href="{{store url="shop/sazen-kutemas.html?thumbstyle=0"}}">Thumbnail - Vertical</a></li>
    	</ul>
    	
    	<div style="clear:both;"> </div>
    	
    	<ul class="item-home-store layout-home">
    		<li class="title-menu-home">Contact Us Layouts</li>
    		<li><a title="Contact Us Style 1" href="{{store url="contact-us.html/?___store=default&___from_store=argentina"}}">Contact Us Style 1</a></li>
    		<li><a title="Contact Us Style 2" href="{{store url="contact-us.html/?___store=french&___from_store=default"}}">Contact Us Style 2</a></li>
    		<li><a title="Contact Us Style 3" href="{{store url="contact-us.html/?___store=german&___from_store=default"}}">Contact Us Style 3</a></li>
    		<li><a title="Contact Us Style 4" href="{{store url="contact-us.html/?___store=argentina&___from_store=default"}}">Contact Us Style 4</a></li>
    	</ul>
    	
    	<ul class="item-home-store layout-home">
    		<li class="title-menu-home">About Us Layouts</li>
    		<li><a title="About Us Style 1" href="{{store url="about-us.html/?___store=default&___from_store=argentina"}}">About Us Style 1</a></li>
    		<li><a title="About Us Style 2" href="{{store url="about-us.html/?___store=french&___from_store=default"}}">About Us Style 2</a></li>
    		<li><a title="About Us Style 3" href="{{store url="about-us.html/?___store=german&___from_store=default"}}">About Us Style 3</a></li>
    		<li><a title="About Us Style 4" href="{{store url="about-us.html/?___store=argentina&___from_store=default"}}">About Us Style 4</a></li>
    	</ul>
    
    	<ul class="item-home-store detail-home">
    		<li class="title-menu-home">Effect on Hover Product</li>
    		<li><a title="Simple" href="{{store url="shop.html?___store=french&___from_store=default&mode=grid"}}">Simple</a></li>
    		<li><a title="Display Second Image" href="{{store url="shop.html?___store=default&from_store=german&mode=grid"}}">Display Second Image</a></li>
    		<li><a title="Display Slider Image" href="{{store url="shop.html?___store=barbados&___from_store=default&mode=grid"}}">Display Slider Image</a></li>
    	</ul>
    	
    	<ul class="item-home-store layout-home">
    		<li class="title-menu-home">404 Page Layout</li>
    		<li><a title="404 Page Style 1" href="{{store url="404page"}}">404 Page Style 1</a></li>
    	</ul>
    
    	<ul class="item-home-store detail-home">
    		<li class="title-menu-home">Zoom Types</li>
    		<li><a title="Product Page Inner Zoom" href="{{store url="shop/sazen-kutemas.html/?___store=default&___from_store=argentina"}}">Product Page Inner Zoom</a></li>
    		<li><a title="Product Page Outer Zoom" href="{{store url="shop/sazen-kutemas.html/?___store=andorra&___from_store=default"}}">Product Page Outer Zoom</a></li>
    		<li><a title="Product Page Lens Zoom" href="{{store url="shop/sazen-kutemas.html/?___store=bolivia&___from_store=default"}}">Product Page Lens Zoom</a></li>
    	</ul>
    
    </div>

    Shop

    • Frontend Appearance
    • Backend Settings: Please click Here to view.
    • Backend of ‘Group 1′: Please click Here to view.

    Note: You could do the same with the configuration of Group 2

    • Backend of ‘Accessories’ in the ‘Group 1′: Please click Here to view.

    Note: The item named ‘Dress’, ‘Chairs & Sofas’ having same menu level (Level 3) as item ‘Accessories’ could have the same configuration. However, you should be aware that the Parent Item of ‘Chairs & Sofas’ is different.

    • Backend of ‘Clock’ in the ‘Accessories’: Please click Here to view.

    Note: Other items in Shop Menu having the same menu level (Level 4) would have same configuration. However, you should be aware that the Parent Item of each group is different.

      • Backend of ‘Product right’: Please click Here to view.
      • Backend of ‘Eye’ in the ‘Image Bottom’: Please click Here to view.
      • Copy and paste the following code into the content:

    <div class="basicproduct-content-menu">
    {{block type="basicproducts/list" name="basicproducts.list.default" template="sm/basicproducts/basic-megamenu.phtml"
    	product_source="catalog"
    	product_category="202"
    	product_order_by="lastest_product"
    	product_limitation="1"
    }}
    </div>

    Collection

    • Frontend Appearance
    • Backend Settings: Please click Here to view.
    • Backend of ‘Categories’: Please click Here to view.
    • Note: Do the same with item ‘ROOM Categories 2′

    • Backend of ‘Beds Category’ in the’Categories’: Please click Here to view.
    • Backend of ‘Beds’ in the’Beds Category’: Please click Here to view.
    • Note: Other items having same menu level in the Collection Menu could have the same configuration

    • Backend of ‘Image 1′: Please click Here to view.
    • Copy and paste the following code into the content:

    <div class="static-image-menu">
    <a title="Static Image" href="#">
    <img src="{{media url="wysiwyg/image-megamenu/img-megamenu-4.jpg"}}" alt="Static Image" />
    </a>
    </div>

    • Backend of ‘Image 2′: Please click Here to view.
    • Copy and paste the following code into the content:

    <div class="static-image-menu">
    <a title="Static Image" href="#">
    <img src="{{media url="wysiwyg/image-megamenu/img-megamenu-5.jpg"}}" alt="Static Image" />
    </a>
    </div>

    Accessories

    • Frontend Appearance
    • Backend Settings: Please click Here to view.
    • Backend of ‘Decorative’ in ‘Accessories’: Please click Here to view.
    • Note: Other items having same menu level (Level 2) in the Accessories Menu could have the same configuration

    Blog

    • Frontend Appearance
    • Backend Settings: Please click Here to view.

    About Us
    Frontend Appearance

    • Backend Setting:Please click Here to view.
    • Backend of ‘Dropdown’: Please click Here to view.
    • Copy and paste the following code into the content:

    <ul class="item-about-contact">
    		<li><a title="About Us Style 1" href="{{store url="about-us.html/?___store=default&___from_store=argentina"}}">About Us Style 1</a></li>
    		<li><a title="About Us Style 2" href="{{store url="about-us.html/?___store=french&___from_store=default"}}">About Us Style 2</a></li>
    		<li><a title="About Us Style 3" href="{{store url="about-us.html/?___store=german&___from_store=default"}}">About Us Style 3</a></li>
    		<li><a title="About Us Style 4" href="{{store url="about-us.html/?___store=argentina&___from_store=default"}}">About Us Style 4</a></li>
    	</ul>

    Contact Us
    Frontend Appearance

    • Backend Setting:Please click Here to view.
    • Backend of ‘Dropdown’: Please click Here to view.
    • Copy and paste the following code into the content:

    <ul class="item-about-contact">
    		<li><a title="Contact Us Style 1" href="{{store url="contact-us.html/?___store=default&___from_store=argentina"}}">Contact Us Style 1</a></li>
    		<li><a title="Contact Us Style 2" href="{{store url="contact-us.html/?___store=french&___from_store=default"}}">Contact Us Style 2</a></li>
    		<li><a title="Contact Us Style 3" href="{{store url="contact-us.html/?___store=german&___from_store=default"}}">Contact Us Style 3</a></li>
    		<li><a title="Contact Us Style 4" href="{{store url="contact-us.html/?___store=argentina&___from_store=default"}}">Contact Us Style 4</a></li>
    	</ul>

    3.2.2 Vertical Megamenu:

    Vertical-mega-menu

    • Vertical Megamenu List Please click Here to view.
    • Vertical Megamenu’s Backend Please click Here to view.

    Fashion

    • Frontend Appearance
    • Backend Settings: Please click Here to view.
    • Backend of ‘Menu Group’ in the ‘Fashion’ Please click Here to view.
    • Backend of ‘Group 1′ in the ‘Menu Group’Please click Here to view.
    • Note: Others items having same menu level (Level 3) as item ‘Group 1′ in Fashion could have the same configuration.

    • Backend of ‘T-Shirt’ in the ‘Group 1′Please click Here to view.
    • Note: Others items having same menu level (Level 4) as item ‘Group 1′ in Fashion could have the same configuration.

    Computer

    • Frontend Appearance
    • Backend Settings: Please click Here to view.
    • Backend of ‘Categories Group’ in the ‘Computer’ Please click Here to view.
    • Backend of ‘Category 1′ in the ‘Categories Group’Please click Here to view.
    • Note: Others items having same menu level (Level 3) as item ‘Category 1′ in Computer could have the same configuration.

    • Backend of ‘Beds’ in the ‘Category 1′Please click Here to view.
    • Note: Others items having same menu level (Level 4) as item ‘Beds’ in Computer could have the same configuration.

    • Backend of ‘Image’ in the ‘Computer’ Please click Here to view.
    • Copy and paste the following code into the content:

    <div class="static-image-menu ab-right">
    <a title="Static Image" href="#">
    <img src="{{media url="wysiwyg/image-megamenu/img-megamenu.jpg"}}" alt="Static Image" />
    </a>
    </div>

    Furniture

    • Frontend Appearance
    • Backend Settings: Please click Here to view.
    • Backend of ‘Categories Group’ in the ‘furniture’ Please click Here to view.
    • Backend of ‘Category 1′ in the ‘Categories Group’Please click Here to view.
    • Note: Others items having same menu level (Level 3) as item ‘Category 1′ in furniture could have the same configuration.

    • Backend of ‘Col1′ in the ‘Category 1′Please click Here to view.
    • Note: Others items having same menu level (Level 4) as item ‘Col1′ in Furniture could have the same configuration.

    • Backend of ‘Chairs & Sofas’ in the ‘Col1′Please click Here to view.
    • Note: Others items having same menu level (Level 5) as item ‘Chairs & Sofas’ in Furniture could have the same configuration.

    • Backend of ‘Image Group’ in the ‘Furniture’ Please click Here to view.
    • Copy and paste the following code into the content:

    <ul class="image-list">
    <li><a title="Static Image" href="#"><img src="{{media url="wysiwyg/image-megamenu/img-megamenu-2.jpg"}}" alt="Static Image" /></a></li>
    <li><a title="Static Image" href="#"><img src="{{media url="wysiwyg/image-megamenu/img-megamenu-3.jpg"}}" alt="Static Image" /></a></li>
    </ul>

    Smartphone

    • Frontend Appearance
    • Backend Settings: Please click Here to view.
    • Backend of ‘Categories Group’ in the ‘Smartphone’ Please click Here to view.
    • Backend of ‘Group 1′ in the ‘Categories Group’Please click Here to view.
    • Note: Others items having same menu level (Level 3) as item ‘Group 1′ in Smartphone could have the same configuration.

    • Backend of ‘Col1′ in the ‘Group 1′Please click Here to view.
    • Note: Others items having same menu level (Level 4) as item ‘Col1′ in Smartphone could have the same configuration.

    • Backend of ‘T-Shirt’ in the ‘Col1′Please click Here to view.
    • Note: Others items having same menu level (Level 5) as item ‘T-Shirt’ in Smartphone could have the same configuration.

    • Backend of ‘Popular Products’ in the ‘Smartphone’ Please click Here to view.
    • Copy and paste the following code into the content:

    <div class="basicproduct-content-menu">
    {{block type="basicproducts/list" name="basicproducts.list.default" template="sm/basicproducts/basic-megamenu.phtml"
    	product_source="catalog"
    	product_category="202"
    	product_order_by="lastest_product"
    	product_limitation="3"
    }}
    </div>

    Healthy & Beauty

    • Frontend Appearance
    • Backend Settings: Please click Here to view.
    • Backend of ‘Women’ in the ‘Healthy & Beauty’ Please click Here to view.

    Note: You could see the configuration of Healthy & Beauty menu to configure these menus: Sport Clothing, Accessories, Hat, Watch & Jewelry, Kitchen, More Category .

    More Categories

    • Frontend Appearance
    • Backend Settings: Please click Here to view.

    3.3 Configure Extensions

    The SM Topshop front-page has been integrated with the extensions in the following list:

    In SM Topshop Administration Page, please navigate to SM Topshop Setting field (in the right hand column, below the General and Catalog fields) to configure extensions as you want.

        • Position: SM Search Box Pro
        • Frontend Appearance

        • Backend of SM Search Box Pro: Click Here
    SM CartPro
        • Position: SM CartPro
        • Frontend Appearance

        • Backend of SM CartPro: Click Here
        • Go Here to readmore about the SM CartPro module.
    SM Megamenu
        • Position: SM Megamenu
        • Frontend Appearance

    Horizontal Megamenu

    Vertical Megamenu

        • Backend of SM Megamenu: Click Here
    SM Image Slider
        • Position: SM Camera Slider
        • Frontend Appearance

        • Backend of SM Camera Slider: Click Here
        • Go Here to readmore about the SM Image Slider module.
    SM Deal
        • Position: SM Deal
        • Frontend Appearance

        • Backend of SM Deal: Click Here
        • Go Here to readmore about the SM Deal module.
    SM Listing Tabs
        • Position: SM Listing Tabs
        • Frontend Appearance

        • Backend of SM Listing Tabs : Click Here
        • Go Here to readmore about the SM Listing Tabs module.
    SM Super Categories
        • Position: SM Super Categories
        • Frontend Appearance

        • Backend of SM Super Categories: Click Here
        • Go Here to readmore about the SM Categories module.
    SM Basic Products
        • Position: SM Basic Products
        • Frontend Appearance

        • Backend of SM Basic Products: Click Here
        • Go Here to readmore about the SM Basic Products module.
    SM Custom
        • Position: SM Custom
        • Frontend Appearance

        • Backend of SM Custom: Click Here
    SM Image Instagram
        • Position: SM Image Instagram
        • Frontend Appearance
        • When you go to the Blog page, you will see the module on the right bottom side of the page.

        • Backend of SM Image Instagram: Click Here
        • Go Here to readmore about the SM Image Instagram module.
    SM Quickview
        • Frontend Appearance
        • When you put your cursor on a product in the frontend pages, you will see the quickview button appear and you could click on this button to view the product

        • Backend of SM Quickview: Click Here
        • Go Here to readmore about the SM Quickview module.
    SM Shopby
        • Frontend Appearance
        • When you go to the Shop page, you will see the module on the left side of the page.

        • Backend of SM Shopby: Click Here

    3.4 Configure Static Blocks

    The SM Topshop front-page has the following static blocks in the theme:

    To create a new static block, go to CMS >> Static Blocks >> Add new block

    Static Block: hotline

    To create the static block, go to CMS >> Static Blocks with Identifier * : “hotline”

    Frontend Appearance

    • Backend Setting: Please click Here to view.

    Copy and paste the following code into the content tab of this static block:

    Call Support Free : (044) 6789 839

    To create the static block, go to CMS >> Static Blocks with Identifier * : “banner-full-top”

    Frontend Appearance

    • Backend Setting: Please click Here to view.

    Copy and paste the following code into the content tab of this static block:

    <a href="#" title="Static Image"><img class="img-static" src="{{media url="wysiwyg/home-page-image/home-1/banner-full-top.jpg"}}" alt="Image static" /></a>

    To create the static block, go to CMS >> Static Blocks with Identifier * : “banner-link-deal”

    Frontend Appearance

    • Backend Setting: Please click Here to view.

    Copy and paste the following code into the content tab of this static block:

    <ul>
    <li><a href="#"><img src="{{media url="wysiwyg/home-page-image/home-1/plicy-1.png"}}" alt="" /></a></li>
    <li><a href="#"><img src="{{media url="wysiwyg/home-page-image/home-1/plicy-2.png"}}" alt="" /></a></li>
    <li><a href="#"><img src="{{media url="wysiwyg/home-page-image/home-1/plicy-3.png"}}" alt="" /></a></li>
    </ul>

    Static Block: static-image-1

    To create the static block, go to CMS >> Static Blocks with Identifier * : “static-image-1″

    Frontend Appearance

    • Backend Setting: Please click Here to view.

    Copy and paste the following code into the content tab of this static block:

    <div class="row banner-list static-image-1">
    	<div class="col-lg-4 col-md-4 col-xs-4">
    		<a class="first-image" title="Static Image" href="#"><img class="img-static" src="{{media url="wysiwyg/home-page-image/home-1/image-1.jpg"}}" alt="Static Image" /></a>
    	</div>
    	<div class="col-lg-8 col-md-8 col-xs-8">
    		<div class="row">
    			<div class="col-lg-6 col-md-6 col-xs-6">
    				<a class="first-image" title="Static Image" href="#"><img class="img-static" src="{{media url="wysiwyg/home-page-image/home-1/image-2.jpg"}}" alt="Static Image" /></a>
    			</div>		
    			<div class="col-lg-6 col-md-6 col-xs-6 newsletter-wrap">
    				{{block type="newsletter/subscribe" name="newsletter" template="newsletter/subscribe.phtml"}}
    			</div>		
    		</div>
    		<div class="row">
    			<div class="col-lg-12 col-md-12">
    				<a class="first-image" title="Static Image" href="#"><img class="img-static" src="{{media url="wysiwyg/home-page-image/home-1/image-3.jpg"}}" alt="Static Image" /></a>
    			</div>		
    		</div>
    	</div>
    </div>

    Static Block: static-image-2

    To create the static block, go to CMS >> Static Blocks with Identifier * : “static-image-2″

    Frontend Appearance

    • Backend Setting: Please click Here to view.

    Copy and paste the following code into the content tab of this static block:

    <div class="row banner-list">
    	<div class="col-lg-12 col-md-12">
    		<a class="first-image" title="Static Image" href="#"><img class="img-static" src="{{media url="wysiwyg/home-page-image/home-1/image-4.jpg"}}" alt="Static Image" /></a>
    	</div>
    </div>

    Static Block: brand-block

    To create the static block, go to CMS >> Static Blocks with Identifier * : “brand-block”

    Frontend Appearance

    • Backend Setting: Please click Here to view.

    Copy and paste the following code into the content tab of this static block:

    <div class="title-home"><h2>Our brand</h2></div>
    <div class="brand-content">
    	<ul class="list-brands row">
    		<li class="col-lg-2 col-md-2 col-sm-3"><a href="#" title="Brand"><img src="{{media url="wysiwyg/brand/br01.jpg"}}" alt="Brand" /></a></li>
    		<li class="col-lg-2 col-md-2 col-sm-3"><a href="#" title="Brand"><img src="{{media url="wysiwyg/brand/br02.jpg"}}" alt="Brand" /></a></li>
    		<li class="col-lg-2 col-md-2 col-sm-3"><a href="#" title="Brand"><img src="{{media url="wysiwyg/brand/br03.jpg"}}" alt="Brand" /></a></li>
    		<li class="col-lg-2 col-md-2 col-sm-3"><a href="#" title="Brand"><img src="{{media url="wysiwyg/brand/br04.jpg"}}" alt="Brand" /></a></li>
    		<li class="col-lg-2 col-md-2 col-sm-3"><a href="#" title="Brand"><img src="{{media url="wysiwyg/brand/br05.jpg"}}" alt="Brand" /></a></li>
    		<li class="col-lg-2 col-md-2 col-sm-3"><a href="#" title="Brand"><img src="{{media url="wysiwyg/brand/br06.jpg"}}" alt="Brand" /></a></li>
    		<li class="col-lg-2 col-md-2 col-sm-3"><a href="#" title="Brand"><img src="{{media url="wysiwyg/brand/br07.jpg"}}" alt="Brand" /></a></li>
    		<li class="col-lg-2 col-md-2 col-sm-3"><a href="#" title="Brand"><img src="{{media url="wysiwyg/brand/br08.jpg"}}" alt="Brand" /></a></li>
    		<li class="col-lg-2 col-md-2 col-sm-3"><a href="#" title="Brand"><img src="{{media url="wysiwyg/brand/br09.jpg"}}" alt="Brand" /></a></li>
    		<li class="col-lg-2 col-md-2 col-sm-3"><a href="#" title="Brand"><img src="{{media url="wysiwyg/brand/br10.jpg"}}" alt="Brand" /></a></li>
    	</ul>
    </div>

    To create the static block, go to CMS >> Static Blocks with Identifier * : “about-us-footer”

    Frontend Appearance

    • Backend Setting: Please click Here to view.

    Copy and paste the following code into the content tab of this static block:

    <img src="{{media url="wysiwyg/footer/footer-logo.png"}}" alt="Topshop - Responsive Magento Theme for Multipurpose" />
    <p>There are many variations of passages of Lorem Ipsum available, but the majority have suffered alteration in some form, by injected humour, or randomised words which don't look even slightly believable. If you are going to use a passage of Lorem Ipsum, you need to be sure there isn't anything embarrassing hidden in the middle of text.</p>

    Static Block: ft-contact-us

    To create the static block, go to CMS >> Static Blocks with Identifier * : “ft-contact-us”

    Frontend Appearance

    • Backend Setting: Please click Here to view.

    Copy and paste the following code into the content tab of this static block:

    <div class="block ft-contact-us">
    	<div class="title">
    		Store Information
    	</div>
    	<div class="content">
    		<p class="address">
    		<i class="fa fa-home"></i>Ranelagh Place, Liverpool, L3 5UL, England
    		</p>
    		<p class="phone">
    		<i class="fa fa-phone"></i><a href="#" title="Telephone">8 (495) 989 906 743</a>
    		</p>
    		<p class="email">
    		<i class="fa fa-envelope"></i><a href="mailto:topshop@co.uk.com" title="Mail to: topshop@co.uk.com">topshop@co.uk.com</a>
    		</p>
    	</div>
    </div>

    Static Block: ft-information

    To create the static block, go to CMS >> Static Blocks with Identifier * : “ft-information”

    Frontend Appearance

    • Backend Setting: Please click Here to view.

    Copy and paste the following code into the content tab of this static block:

    <div class="block ft-information">
    	<div class="title">
    		INFORMATION
    	</div>
    	<div class="content">
    		<ul>
    			<li><a href="{{config path="web/secure/base_url"}}about-us.html" title="About Us">About Us</a></li>
    			<li><a href="#" title="Jobs">Jobs</a></li>
    			<li><a href="#" title="Delivery Information">Delivery Information</a></li>
    			<li><a href="#" title="Privacy Policy">Privacy Policy</a></li>
    			<li><a href="#" title="Term and Conditions">Term and Conditions</a></li>
    		</ul>
    	</div>
    </div>

    Static Block: ft-my-account

    To create the static block, go to CMS >> Static Blocks with Identifier * : “ft-my-account”

    Frontend Appearance

    • Backend Setting: Please click Here to view.

    Copy and paste the following code into the content tab of this static block:

    <div class="block ft-my-account">
    	<div class="title">
    		MY ACCOUNT
    	</div>
    	<div class="content">
    		<ul>
    			<li><a href="{{config path="web/secure/base_url"}}customer/account/" title="My account">My account</a></li>
    			<li><a href="{{config path="web/secure/base_url"}}customer/login/" title="Login">Login</a></li>
    			<li><a href="{{config path="web/secure/base_url"}}checkout/cart/" title="My Cart">My Cart</a></li>
    			<li><a href="{{config path="web/secure/base_url"}}wishlist/" title="My Wishlist">My Wishlist</a></li>
    			<li><a href="{{config path="web/secure/base_url"}}catalog/product_compare/" title="My Compare">My Compare</a></li>
    		</ul>
    	</div>
    </div>

    To create the static block, go to CMS >> Static Blocks with Identifier * : “ft-category-footer”

    Frontend Appearance

    • Backend Setting: Please click Here to view.

    Copy and paste the following code into the content tab of this static block:

    <div class="block ft-category">
    	<div class="content">
    		<ul>
    			<li><label title="WATCHES">WATCHES : </label></li>
    			<li><a href="#" title="Watches">Watches</a></li>
    			<li><a href="#" title="Titan Watches">Titan Watches</a></li>
    			<li><a href="#" title="Casio Watches">Casio Watches</a></li>
    			<li><a href="#" title="Fastrack Watches">Fastrack Watches</a></li>
    			<li><a href="#" title="Timex Watches">Timex Watches</a></li>
    			<li><a href="#" title="Fossil Watches">Fossil Watches</a></li>
    			<li><a href="#" title="Diesel Watches">Diesel Watches</a></li>
    			<li><a href="#" title="Luxury Watches ">Luxury Watches </a></li>
    			<li><a href="#" title="View all">View all</a></li>
    		</ul>
    		<ul>
    			<li><label title="CLOTHING">CLOTHING: </label></li>
    			<li><a href="#" title="Shirts">Shirts</a></li>
    			<li><a href="#" title="Jeans">Jeans</a></li>
    			<li><a href="#" title="T shirts">T shirts</a></li>
    			<li><a href="#" title="Kurtis ">Kurtis </a></li>
    			<li><a href="#" title="Sarees">Sarees</a></li>
    			<li><a href="#" title="Levis Jeans">Levis Jeans</a></li>
    			<li><a href="#" title="Killer Jeans">Killer Jeans</a></li>
    			<li><a href="#" title="Pepe Jeans ">Pepe Jeans </a></li>
    			<li><a href="#" title="Arrow Shirts ">Arrow Shirts </a></li>
    			<li><a href="#" title="Ethnic Wear ">Ethnic Wear </a></li>
    			<li><a href="#" title="Formal Shirts  ">Formal Shirts  </a></li>
    			<li><a href="#" title="Peter England Shirts  ">Peter England Shirts  </a></li>
    			<li><a href="#" title="View all">View all</a></li>
    		</ul>
    		<ul>
    			<li><label title="FOOTWEAR">FOOTWEAR : </label></li>
    			<li><a href="#" title="Shoes ">Shoes </a></li>
    			<li><a href="#" title="Casual Shoes ">Casual Shoes </a></li>
    			<li><a href="#" title="Adidas Shoes">Adidas Shoes</a></li>
    			<li><a href="#" title="Gas Shoes">Gas Shoes</a></li>
    			<li><a href="#" title=" Puma Shoes "> Puma Shoes </a></li>
    			<li><a href="#" title="Reebok Shoes ">Reebok Shoes </a></li>
    			<li><a href="#" title="Woodland Shoes ">Woodland Shoes </a></li>
    			<li><a href="#" title="Red tape Shoes ">Red tape Shoes </a></li>
    			<li><a href="#" title="Nike Shoes ">Nike Shoes </a></li>
    			<li><a href="#" title="View all">View all</a></li>
    		</ul>
    	</div>
    </div>

    To create the static block, go to CMS >> Static Blocks with Identifier * : “payment-footer”

    Frontend Appearance

    • Backend Setting: Please click Here to view.

    Copy and paste the following code into the content tab of this static block:

    <img src="{{media url="wysiwyg/payment/payment.png"}}" alt="Payment" />

    Static Block: static-image-1-index2

    To create the static block, go to CMS >> Static Blocks with Identifier * : “static-image-1-index2″

    Frontend Appearance

    • Backend Setting: Please click Here to view.

    Copy and paste the following code into the content tab of this static block:

    <div class="row banner-list static-image-1-index2">
    	<div class="col-lg-4 col-md-4 col-sm-4">
    		<a class="first-image" title="Static Image" href="#"><img class="img-static" src="{{media url="wysiwyg/home-page-image/home-1/image-1.jpg"}}" alt="Static Image" /></a>
    	</div>
    	<div class="col-lg-8 col-md-8 col-sm-8">
    		<div class="row">
    			<div class="col-lg-6 col-md-6 col-sm-6">
    				<a class="first-image" title="Static Image" href="#"><img class="img-static" src="{{media url="wysiwyg/home-page-image/home-1/image-2.jpg"}}" alt="Static Image" /></a>
    			</div>		
    			<div class="col-lg-6 col-md-6 col-sm-6 box-margin-bottom">
    				<a class="first-image" title="Static Image" href="#"><img class="img-static" src="{{media url="wysiwyg/home-page-image/home-2/image-1.jpg"}}" alt="Static Image" /></a>
    			</div>		
    		</div>
    		<div class="row">
    			<div class="col-lg-12 col-md-12">
    				<a class="first-image" title="Static Image" href="#"><img class="img-static" src="{{media url="wysiwyg/home-page-image/home-1/image-3.jpg"}}" alt="Static Image" /></a>
    			</div>		
    		</div>
    	</div>
    </div>

    Static Block: static-image-1-index3

    To create the static block, go to CMS >> Static Blocks with Identifier * : “static-image-1-index3″

    Frontend Appearance

    • Backend Setting: Please click Here to view.

    Copy and paste the following code into the content tab of this static block:

    <div class="row banner-list static-image-1-index3">
    			<div class="col-lg-12 col-md-12 col-sm-6 col-xs-6 box-margin-bottom">
    				<a class="first-image" title="Static Image" href="#"><img class="img-static" src="{{media url="wysiwyg/home-page-image/home-3/image-1.jpg"}}" alt="Static Image" /></a>
    			</div>	
    			<div class="col-lg-12 col-md-12 col-sm-6 col-xs-6">
    				<a class="first-image" title="Static Image" href="#"><img class="img-static" src="{{media url="wysiwyg/home-page-image/home-3/image-2.jpg"}}" alt="Static Image" /></a>
    			</div>		
    </div>

    Static Block: static-image-2-index3

    To create the static block, go to CMS >> Static Blocks with Identifier * : “static-image-2-index3″

    Frontend Appearance

    • Backend Setting: Please click Here to view.

    Copy and paste the following code into the content tab of this static block:

    <div class="row banner-list static-image-2-index3">
    	<div class="col-lg-12 col-md-12 box-margin-bottom">
    		<a class="first-image" title="Static Image" href="#"><img class="img-static" src="{{media url="wysiwyg/home-page-image/home-3/image-3.jpg"}}" alt="Static Image" /></a>
    	</div>
    </div>

    Static Block: static-image-3-index3

    To create the static block, go to CMS >> Static Blocks with Identifier * : “static-image-3-index3″

    Frontend Appearance

    • Backend Setting: Please click Here to view.

    Copy and paste the following code into the content tab of this static block:

    <div class="row banner-list box-margin-bottom">
    	<div class="col-lg-12 col-md-12">
    		<a class="first-image" title="Static Image" href="#"><img class="img-static" src="{{media url="wysiwyg/home-page-image/home-3/image-4.jpg"}}" alt="Static Image" /></a>
    	</div>
    </div>

    Static Block: static-image-4-index3

    To create the static block, go to CMS >> Static Blocks with Identifier * : “static-image-4-index3″

    Frontend Appearance

    • Backend Setting: Please click Here to view.

    Copy and paste the following code into the content tab of this static block:

    <div class="row banner-list">
    	<div class="col-lg-12 col-md-12 box-margin-bottom">
    		<a class="first-image" title="Static Image" href="#"><img class="img-static" src="{{media url="wysiwyg/home-page-image/home-3/image-5.jpg"}}" alt="Static Image" /></a>
    	</div>
    </div>

    To create the static block, go to CMS >> Static Blocks with Identifier * : “banner-full-top-h4″

    Frontend Appearance

    • Backend Setting: Please click Here to view.

    Copy and paste the following code into the content tab of this static block:

    <a href="#" title="Static Image"><img class="img-static" src="{{media url="wysiwyg/home-page-image/home-4/banner-full-top.jpg"}}" alt="Image static" /></a>

    Static Block: static-image-1-index4

    To create the static block, go to CMS >> Static Blocks with Identifier * : “static-image-1-index4″

    Frontend Appearance

    • Backend Setting: Please click Here to view.

    Copy and paste the following code into the content tab of this static block:

    <div class="row banner-list static-image-1-index4">
    	<div class="col-lg-4 col-md-4 col-sm-4">
    		<a class="first-image" title="Static Image" href="#"><img class="img-static" src="{{media url="wysiwyg/home-page-image/home-1/image-1.jpg"}}" alt="Static Image" /></a>
    	</div>
    	<div class="col-lg-8 col-md-8 col-sm-8">
    		<div class="row">
    			<div class="col-lg-6 col-md-6 col-sm-6">
    				<a class="first-image" title="Static Image" href="#"><img class="img-static" src="{{media url="wysiwyg/home-page-image/home-1/image-2.jpg"}}" alt="Static Image" /></a>
    			</div>		
    			<div class="col-lg-6 col-md-6 col-sm-6 box-margin-bottom">
    				<a class="first-image" title="Static Image" href="#"><img class="img-static" src="{{media url="wysiwyg/home-page-image/home-2/image-1.jpg"}}" alt="Static Image" /></a>
    			</div>		
    		</div>
    		<div class="row">
    			<div class="col-lg-12 col-md-12">
    				<a class="first-image" title="Static Image" href="#"><img class="img-static" src="{{media url="wysiwyg/home-page-image/home-4/image-1.jpg"}}" alt="Static Image" /></a>
    			</div>		
    		</div>
    	</div>
    </div>

    To create the static block, go to CMS >> Static Blocks with Identifier * : “banner-c-women”

    Frontend Appearance

    • Backend Setting: Please click Here to view.

    Copy and paste the following code into the content tab of this static block:

    <div class="banner-c-brand">
    	<div class="banner">
    		<a class="first-image" title="Static Image" href="#"><img class="img-static" src="{{media url="wysiwyg/categories-image/banner_c_women.jpg"}}" alt="Static Image" /></a>
    	</div>
    </div>

    To create the static block, go to CMS >> Static Blocks with Identifier * : “banner-c-men”

    Frontend Appearance

    • Backend Setting: Please click Here to view.

    Copy and paste the following code into the content tab of this static block:

    <div class="banner-c-brand">
    	<div class="banner">
    		<a class="first-image" title="Static Image" href="#"><img class="img-static" src="{{media url="wysiwyg/categories-image/banner_c_men.jpg"}}" alt="Static Image" /></a>
    	</div>
    </div>

    To create the static block, go to CMS >> Static Blocks with Identifier * : “banner-c-shoe”

    Frontend Appearance

    • Backend Setting: Please click Here to view.

    Copy and paste the following code into the content tab of this static block:

    <div class="banner-c-brand">
    	<div class="banner">
    		<a class="first-image" title="Static Image" href="#"><img class="img-static" src="{{media url="wysiwyg/categories-image/banner_c_chair.jpg"}}" alt="Static Image" /></a>
    	</div>
    </div>

    Static Block: static-image-2-index4

    To create the static block, go to CMS >> Static Blocks with Identifier * : “static-image-2-index4″

    Frontend Appearance

    • Backend Setting: Please click Here to view.

    Copy and paste the following code into the content tab of this static block:

    <div class="row banner-list static-image-2-index4">
    	<div class="col-lg-6 col-md-6 col-sm-6">
    		<a class="first-image" title="Static Image" href="#"><img class="img-static" src="{{media url="wysiwyg/home-page-image/home-4/image-2.jpg"}}" alt="Static Image" /></a>
    	</div>
    	<div class="col-lg-6 col-md-6 col-sm-6">
    		<a class="first-image" title="Static Image" href="#"><img class="img-static" src="{{media url="wysiwyg/home-page-image/home-4/image-3.jpg"}}" alt="Static Image" /></a>
    	</div>
    </div>

    Static Block: static-image-1-index5

    To create the static block, go to CMS >> Static Blocks with Identifier * : “static-image-1-index5″

    Frontend Appearance

    • Backend Setting: Please click Here to view.

    Copy and paste the following code into the content tab of this static block:

    <div class="row banner-list">
    	<div class="col-lg-12 col-md-12">
    		<a class="first-image" title="Static Image" href="#"><img class="img-static" src="{{media url="wysiwyg/home-page-image/home-5/image-1.jpg"}}" alt="Static Image" /></a>
    	</div>	
    </div>

    Static Block: static-service-1-index5

    To create the static block, go to CMS >> Static Blocks with Identifier * : “static-service-1-index5″

    Frontend Appearance

    • Backend Setting: Please click Here to view.

    Copy and paste the following code into the content tab of this static block:

    <div class="static-service-1-index5">
    	<div class="row">
    		<div class="col-lg-4 col-md-4 col-sm-4 col-xs-4 item-service">
    			<div class="icon">
    				<span class="fa fa-paper-plane"></span>
    			</div>
    			<div class="info">
    				<p class="title">Free Shipping</p>
    				<p class="desc">On orders over $99.99</p>
    			</div>
    		</div>
    		<div class="col-lg-4 col-md-4 col-sm-4 col-xs-4  item-service">
    			<div class="icon">
    				<span class="fa fa-money"></span>
    			</div>
    			<div class="info">
    				<p class="title">Money Back 100%</p>
    				<p class="desc">Within 30 Days after delivery</p>
    			</div>
    		</div>
    		<div class="col-lg-4 col-md-4 col-sm-4 col-xs-4  item-service">
    			<div class="icon">
    				<span class="fa fa-phone"></span>
    			</div>
    			<div class="info">
    				<p class="title">Support 24/7</p>
    				<p class="desc">Support 100%</p>
    			</div>
    		</div>
    	</div>
    </div>

    Static Block: static-image-2-index5

    To create the static block, go to CMS >> Static Blocks with Identifier * : “static-image-2-index5″

    Frontend Appearance

    • Backend Setting: Please click Here to view.

    Copy and paste the following code into the content tab of this static block:

    <div class="row banner-list static-image-2-index5">
    	<div class="col-lg-6 col-md-6 col-sm-6 col-xs-6">
    		<div class="row box-margin-bottom">
    			<div class="col-lg-12 col-md-12">
    				<a class="first-image" title="Static Image" href="#"><img class="img-static" src="{{media url="wysiwyg/home-page-image/home-5/image-2.jpg"}}" alt="Static Image" /></a>
    			</div>		
    		</div>
    		<div class="row">
    			<div class="col-lg-12 col-md-12">
    				<a class="first-image" title="Static Image" href="#"><img class="img-static" src="{{media url="wysiwyg/home-page-image/home-5/image-3.jpg"}}" alt="Static Image" /></a>
    			</div>		
    		</div>
    	</div>
    	<div class="col-lg-6 col-md-6 col-sm-6 col-xs-6">
    		<a class="first-image" title="Static Image" href="#"><img class="img-static" src="{{media url="wysiwyg/home-page-image/home-5/image-4.jpg"}}" alt="Static Image" /></a>
    	</div>
    </div>

    3.5 How To Edit Copyright in Admin Panel

    Frontend Appearance

    In the Administrator page, Please navigate to SM Topshop Setting; find SM Topshop Setting Module to configure the “Copyright” parameter as image below:

    3.6 How To Customize the Social symbols in admin panel

    Frontend Appearance

    In the Administrator page, please go to SM Topshop Setting; find SM Topshop Setting Module to configure the “Social Style” parameter as image below:

    3.7 Customize HTML

    Frontend Appearance

    In your Website’s Directory, go to app\design\frontend\sm-topshop\default\template\page\html\header-style folder. In this folder, you could open the files named header-1.phtml, header-2.phtml, header-3.phtml, header-4.phtml, header-5.phtml by your editor program to configure this part.

    • Backend Setting: Please click Here to view.

    NEWSLETTER

    1. NEWSLETTER
    Frontend Appearance

    In your Website’s Directory, go to app\design\frontend\sm-topshop\default\template\newsletter folder. To change the text in this part, in this folder, you could open the file named subscribe.phtml by your editor program.
    Find and change the following text in this file as you want:

    SUBCRIBE EMAIL, Lorem Ipsum is simply dummy text of the printing and typesetting industry dummy, Sign up for our newsletter, Submit

    • Backend Setting: Please click Here to view.

    2. NEWSLETTER POP-UP
    Frontend Appearance

    In your Website’s Directory, go to app\design\frontend\sm-topshop\default\template\newsletter folder. To change the text SUBMIT in the red button, in this folder, you could open the file named subscribe-popup.phtml by your editor program, and find the word Submit to change.

    • Backend Setting: Please click Here to view.

    To edit other text, go to CMS >> Static Blocks to create the static block with Identifier * : “popup-newsletter”

    • Please click Here to view.

    Copy and paste the following code into the content tab of this static block:

    <h2>NEWSLETTER</h2>
    <p>Subscribe to the Topshop mailing list to receive updates on new arrivals, special offers and other discount information.</p>

    4SUPPORT

    • SUPPORT – If you have any questions that are beyond the scope of this help file, please feel free to send us via: Support Tickets System
    • FAQs – Go to Here to view more the Frequently Asked Questions.


    SM Styleshop

    $
    0
    0

    Firstly, a huge thanks for purchasing this theme, your support is truly appreciated!

    This document covers the installation and use of this theme, reveals some answers to common problems and issues. We encourage you to read this document throughtly if you are experiencing any difficulties. If you have any questions that are beyond the scope of document, please feel free to contact us via our Support Tickets System.

    1 SYSTEM REQUIREMENT

    At the basic level, this theme will require the following conditions:

      • Compatible with Magento Community Edition 2.0
      • Composer (latest stable version)
      • Apache 2.2 or late
      • PHP: 5.5.x,5.6.x and Memory_limit no less than 256Mb)
      • In the future if the conditions change, please check the Magento 2 documentation

    2INSTALLATION

    There are two ways to install a Magento Theme:

    • Quickstart Installation: Suitable if you have your first installation and want to get a whole new fresh site as our Demo.
    • Manual Installation (including Theme Installation):Suitable if your store is full with content that you don’t want to overwrite.

    2.1 Quickstart Installation:

    Magentech provides SM Quickstart package for each theme which aims to ease the installation for users. Please note that with Quickstart, all your existing data will be overwritten. Thus, if you plan to start your site from the beginning, it will help you save much time of installing and configuring.

    Please follow steps below:

    • Step 1: Download the quickstart package
    • Step 2: Extract and Upload the whole Quickstart package to your server. In Quickstart folder you will see the extracted folder that include all sample data
    • Step 3: Create a Database for your Magento site
    • Note: You need to remember the database name to use in the next steps

      • Step 4:Import database sm-styleshop.sql under the folder sql
      • Step 6: Start installation by opening browser and navigate to your URL (where the Quickstart uploaded) to load default Magento installer and follow each step of the Installer so that the installation process can be set.

      • Step 7: Choose Start Readiness Check. After Start Readiness Check is completed, select Next .


      When you click on “Start Readiness Check”,the error could occur like the below image

      You need to open your php.ini file and set always_populate_raw_post_data to -1.

      • Step 8: Enter server and database in step 2 and then click on Next.

      • Step 9: Put your website link and continue to click on Next.

      • Step 10: Customize your store: you can choose Time Zone, Currency and Languages.

      • Step 11: You need to Create Admin Account. Enter your information and move to the next step.

      • Step 12: In this step, you should click on the button: Install Now.


      It will take some minutes to complete this installation process. If your window is the same as below, CONGRAT! You install this quickstart package successfully

      2.2 Manual Installation

        • Step 1: Please unzip “sm_styleshop_theme.zip” file and upload folders app; pub from the theme package to the root of your Magento site folder on your server.

          Note: You could change the name of this folder. However, if you want your website run correctly, it need to have the same name as the database you choose.

        • Step 2: Log in to your Admin Panel (e.g. http://yourdomain.com/admin/)

          Note: If you are using the Admin Panel when copying folders in step 1, you need to log out and log in back.

        • Step 3: Disable Cache: Go to >> Tools >> Cache Management, click ‘Sellect All’ button, then choose ‘Disable’ and click ‘Submit’ button to complete the action.
        • Step 4: Navigate to Stores>> Settings>> Configuration >> Design. In Design tab, select Design Theme field with the Sm Styleshop.
      • Step 5: Click “Save Config” button to save your changes.
    3CONFIGURATION

    Page Configuration

    Set Default Page

    • To set a default page for your Magento Site, in the Admin Panel you go to Stores>> Settings >>Configuration>>Web>>Default Pages. Please click to see the Backend Settings.
    • You need to change to the website / store view that you want to change (the dropdown menu in the upper left corner). You will probably have to create a new CMS page if you want to have something different from your default home page.

    Home Style 1

    Frontend of Home Style 1 – Layout Position
    home-layout1
    In the Admin Panel, please navigate to Content >> Elements >> Pages to create a new page in Pages section. Here is the list of steps in this style’s configuration process:

    • Page Information Tab: Please click to see the Backend Settings.
    • Content Tab: Please click to see the Backend Settings.
    • Copy and paste the following code into the Content field::

    {{block class="Magento\\Cms\\Block\\Block" block_id="banner-1"}}
    {{block class="Sm\BasicProducts\Block\BasicProducts" template="Sm_BasicProducts::sm/basicproducts/collection.phtml" title="Collection"}}
    {{block class="Magento\\Cms\\Block\\Block" block_id="banner-full-1"}}
    {{block class="Sm\BasicProducts\Block\BasicProducts" template="Sm_BasicProducts::sm/basicproducts/product-list.phtml" title="" product_source="catalog" product_category="20" product_limitation="4" nb_column1="2" nb_column2="2" nb_column3="2"}}
    {{block class="Magento\\Cms\\Block\\Block" block_id="banner-center"}}
    {{block class="Sm\BasicProducts\Block\BasicProducts" template="Sm_BasicProducts::sm/basicproducts/product-list.phtml" title="" product_source="catalog" product_category="11" product_limitation="4" nb_column1="2" nb_column2="2" nb_column3="2"}}
    {{block class="Magento\\Cms\\Block\\Block" block_id="banner-bottom"}}
    {{block class="Magento\\Cms\\Block\\Block" block_id="slider-brand"}}
    {{block class="Magento\\Cms\\Block\\Block" block_id="latest-updates"}}

  • Design Tab: Please click to see the Backend Settings.
  • Copy and paste the following code into the Layout Update XML field::

    <referenceContainer name="columns">
    	<block class="Sm\ImageSlider\Block\ImageSlider" name="imageslider" before="-" template="Sm_ImageSlider::default.phtml"/>
    </referenceContainer>

    4SUPPORT

    • SUPPORT – If you have any questions that are beyond the scope of this help file, please feel free to send us via: Support Tickets System
    • FAQs – Go to Here to view more the Frequently Asked Questions.

    SM Paradise

    SP Countdown Products Slider

    $
    0
    0
    This guide will help you install SP Countdown Products Slider – Ver 1.0.0 module step by step.


    1 Installation - Back to top

    • Firstly, you must install Prestashop version 1.6.x. Please Click Here to read more about How To Install Prestashop version 1.6.x
    • Secondly, when you are ready to install SP Countdown Products Slider, please follow 5 steps as following:

    Step 1: Login to your Prestashop admin panel and go to Back Office >> Modules and Services >> Modules and Services . At the top of the page, click the Add a new module button.

    Step 2: Click "Choose a file" button to select your module .zip file named as "sp_countdown_products_slider_p1.6-res_v1.0.0.zip" that you have downloaded, then click "Upload this module" button.

    Step 3: The new module will be located in the module list. Please search the name of module and click on the Install button to install the module.

    Step 4:When seeing a notification message as following, please click "Proceed with the installation" button to finish the installation process:

    Step 5: When the uploading process is done, you will see the message denoting that:"Module(s) installed successfully". Please click "Edit" button to configure this module.

    2 Configuration - Back to top


    You could see the appearance of SP Countdown Products Slider module as following:

    To configure this module, please find the module that you have completely installed in the module list and start setting its options.
     

    Let's look at the parameters in detail:

    • Title - Enter the title of the module.
    • Display Title Module - Allow to show/hide title of the module.
    • Module Class Suffix - Enter the suffix which is applied to the CSS class of module. This allows to style an individual module easily.
    • Status - Allow to enable/disable the status of the module.
    • Hook into - Select Hook into in the list box. Please click Here to read more How To Create Custom CMS Hook Page.
    • Column - Enter the quantity of columns you want to display
    • Open Link – Allow to choose one of three
      • New window.
      • Same window.
      • Popup window.

    • To – Allow to set date with format 2015-10-30 and Countdown timer = input date – current date.
    • Product Field to Order By – Set Product Field to Order By: “Name/ID/Date Add/Price/Sell/Position/Random”.
    • Ordering Direction – Allow to order ascending/descending direction for field.
    • Count – Allow to set the number of product to be displayed in this block.

    • Size image (W x H) - Allow to sellect the size image from the dropdown menu.
    • Display Name - Allow to display the product names in the module
    • Name Maxleghth - Allow to set the maximum number of characters allowed in the name area
    • Display Description - Allow to display the description of each product.
    • Description Maxlength - Allow to set the maximum number of characters allowed in the description area
    • Display Price - Allow to display the product price.
    • Display Add to Cart Button - Allow to display Add to Cart Button button
    • Display Add to Wishlist Button - Allow to display Add to Wishlist button
    • Display Add to Compare Button - Allow to display Add to Compare button
    • Display Detail Link - Allow to display Detail Link of each product
    • Display New - Allow to show/hide image new
    • Display Sale - Allow to show/hide image sale
    • Display Detail Link - Allow to display Detail Link of each product

    • Auto Play – Allow to enable/disable auto play for slider.
    • Auto Interval Timeout – Allow to set speed of timer (Larger = Slower).
    • Auto Play Speed – Allow to set transition speed of slider with unit of milisecond.
    • Auto Play Hover Pause – Allow slideshow effect stop when hover OR NOT.
    • Start Position Item – Allow to set item that is displayed at first when you run slider.
    • Mouse Drag – Allow to Show Mouse Drag or not
    • Touch Drag – Allow to Show Touch Drag or not.
    • Show Navigation – Allow to Show Navigation or not.
    • Effect – Allow to choose style of effect.
    • Delay – Allow to set a timer to delay the execution of the next item in the queue. Larger = Slower
    • Duration – Determining how long the animation will run. Larger = Slower
    • Loop – Allow to Show Loop or not..

    3SUPPORT - Back to top

    Thank you so much for using this extension, your support is truly appreciated. If you have any questions that are beyond the scope of this document, please feel free to contact us via our Support Tickets System


    SP Paradise

    $
    0
    0

    1GETTING STARTED

    1.1 Introduction

    Firstly, a huge thanks for purchasing this theme, your support is truly appreciated!

    This document covers the installation and use of this theme, reveals some answers to common problems and issues. We encourage you to read this document throughtly if you are experiencing any difficulties. If you have any questions that are beyond the scope of document, please feel free to contact us via our Support Tickets System.

    1.2 System Requirements

    Please make sure your hosting server meets the PrestaShop requirements:

    • Supported operating system: Windows, Mac and Linux.
    • Wamp (for Windows) or Xampp (for Windows and Mac)
    • Web server: Apache Web server 1.3 or later, Microsoft’s IIS Web server 6.0 or later.
    • PHP 5.2* or later.
    • MySQL 5.0 or later.
    • At least 32 Mb of RAM on your server (64 Mb is comfortable, the more the better).

    Note: If you can not import the theme/module file to your server due to the maximum upload and PHP memory limit, you need to increase the parameter “memory_limit=200M”; “max_execution_time=300″; “max_execution_time=1000″ & “upload_max_filesize=20M” in the file php.ini.

    1.3 PrestaShop Guide

    If you are not familiar with Prestashop, please read its guide first: http://doc.prestashop.com/display/PS16/Getting+Started

    2INSTALLATION

    There are two ways to install SP Paradise Theme

    • Quickstart Installation: By using this package, you will set the theme exactly like our Demo with sample data.
    • Manual Installation : Include of Theme layout Installation Packages. Please unzip the package and you would see the following folders:
      • module folder
      • override folder
      • sp_paradise_template_p16_v1.0.0.zip file

    2.1 Quickstart Installation

    We provide Quickstart package for each theme which aims to ease the installation for users. It will help you save much time of installing and configuring if you plan to start your site from the beginning. Please following steps below:

    • Step 1: Download the quickstart package of SP Paradise theme
    • Step 2: Extract the downloaded package named “sp_paradise_quickstart_p16_v1.0.0.zip” in your localhost (or your hosting) folder. In Quickstart folder you will see the extracted folder that include all sample data
    • Step 3: Start installation by opening browser and navigate to your URL (where the Quickstart uploaded) to load default Prestashop installer. Please follow these steps of the Installer so that the installation process can be set.
      • Installation Assistant (Choose your language)

    Please select the installation language

    Please note: The installation language option will not affect your store language. By default PrestaShop is offered in English. You can install additional localization packages to change the store language.

    When you are done, click the ‘Next’ button.

      • Installation Assistant (License agreements)

    Please check the license agreement.

    When you are done, click the ‘Next’ button.

      • System Compatibility

    Check the PHP settings and directory permissions. In case of any errors, please contact your hosting provider for further assistance.

    If everything is correct, click the ‘Next’ button.

      • Store Information

    Now add required information for your store: Shop name, Main activity, Country, Shop timezone and add the account info: first name, last name, email and password. Click “Next” to next step.

    When you are done, click the ‘Next’ button.

      • System Configuration

    Here is the database configuration panel, we need to create database first.

    Access your database panel and create database for your site. Add database name and then click “Create” button.

    When the database is created successfully, copy and paste its name into the “Database name” field, then click the “Test your database connection now!” button to make sure that the entered settings are correct. If they are, you will see a Database is connected message. After that, you could click the “Next” button to move to next steps.

      • Finish installation: This process could take a few minutes

    Note: For security reasons you need to delete the install/ directory on your hosting server.

    And finally, go to the Frontend or Backend as you want:

    2.2 Theme Installation

    Note: Before installing theme, you must disable the cache. In your back office, please go to ADVANCED PARAMETERS >> Performance >> find “Cache” parameter >> Set “No” to disable cache >> Click “Save”.

    SP Paradise Layout1 Theme Installation

    Note: Here we will introduce you How To Install SP Paradise Bonus Layout 1 Theme, with Layout 2, Layout 3, Layout 4, and Layout 5 do the same.

    Firstly, you must EXTRACT the “sp_paradise_layout1_theme_p16_v1.0.0.zip” package and open the extracted folder. Here you will see:

    • module folder: contain of the smartblog.zip file, smartblogcategories.zip file and themeinstallator.zip file.
    • override folder: contain of FrontController.php” file in the folder URL: \override\classes\controller\ .
    • and the sp_paradise_template_p16_v1.0.0.zip file.

    STEP 1: Install “smartblog.zip”, “smartbloghomelatestnews.zip” and“smartblogcategories.zip” Module.

    1. Login to your Prestashop admin panel and navigate to MODULES -> Modules. At the top of the page click the Add a new module button.

    2. Choose “smartblog.zip” file and click “Upload this module” button

    3. There is a message-box “The module was successfully downloaded.”

    4. Please find to the uploaded module and click “Install” button to run it.

    5. When a pop-up window displays, please click “Proceed with the installation” button.

    6. Finally, Module(s) installed successfully.

    Note: Do the same with the “smartblogcategories.zip” and “smartbloghomelatestnews.zip” module’s installation

    STEP 2: Install “themeinstallator” Module.

    1. Login to your Prestashop admin panel and navigate to MODULES -> Modules. At the top of the page click the Add a new module button.

    2. Select your file named “themeinstallator.zip” and click “Upload this module” button

    3. The uploading process will be started. You will see the message that the module has been successfully downloaded.

    4. The new module is located in the modules list, so you can Search its name and click Install button to start the module.

    5. Finally, you will see a notice message: "Module(s) installed successfully".


    STEP 3: Install the “sp_paradise_template_p16_v1.0.0.zip” file.

    1. In the your Prestashop admin panel and navigate to MODULES >> Modules. Find to the module that you have installed and clicked on Configure button to configure the module.

    2. Navigate to “Import from your computer>> choose the zip theme file as named “sp_paradise_template_p16_v1.0.0.zip>> Next.

    3. You will see a message that You are going to install the following theme SP Paradise version 1.0.0, please click “Next” button to continue.

    4. Select the module that you want to install/disable >> click “Next” button to continue the installation process.

    5. After that, a list of the installed/disabled modules will be showed out and you could click “Finish” button to finish the theme installation.

    STEP 4: Override folder: copy the "FrontController.php" file into the installation folder with the URL: override\classes\controller.

    3SP THEME CONFIGURATION

    3.1 General Settings

    1. In your Prestashop Admin Dashboard, navigate to Modules and Services >> Modules and Services >> go to MODULES LIST section, search for “SP Theme configurator” module then click on Configure.

    2. In the SP Theme Settings, choose “General” to configure the parameters in this section. After finishing, you could go to the front-end to view the changes.

    3.2 Layout Settings

    1. In your Prestashop Admin Dashboard, navigate to Modules and Services >> Modules and Services >> go to MODULES LIST section, search for “SP Theme configurator” module then click on Configure.

    2. In the SP Theme Settings, choose “Layout” to configure the parameters in this section. After finishing, you could go to the front-end to view the changes.

    3.3 Fonts

    1. In your Prestashop Admin Dashboard, navigate to Modules and Services >> Modules and Services >> go to MODULES LIST section, search for “SP Theme configurator” module then click on Configure.

    2. In the SP Theme Settings, choose “Fonts” to configure the parameters in this section. After finishing, you could go to the front-end to view the changes.

    Note: Please copy and paste the following line into Font Selector tab:
    1.

    h1,h2,h3,h4,h5, h6,.article-title, .name, .comment-reply-title, .date_added, .sdstitle_block, h5.product-name, .item-title, h1.product_name ,#attributes fieldset label, .post_title, .spcat-tab-label, span.one

    2.

    h3.title_block:before, h3.title_block:after, div.new_product h3.title_block:before, div.new_product h3.title_block:after, span.one:before, span.one:after

    3.4 Category Pages

    1. In your Prestashop Admin Dashboard, navigate to Modules and Services >> Modules and Services >> go to MODULES LIST section, search for “SP Theme configurator” module then click on Configure.

    2. In the SP Theme Settings, choose “Category Pages” to configure the parameters in this section. After finishing, you could go to the front-end to view the changes.

    3.5 Product Pages

    1. In your Prestashop Admin Dashboard, navigate to Modules and Services >> Modules and Services >> go to MODULES LIST section, search for “SP Theme configurator” module then click on Configure.

    2. In the SP Theme Settings, choose “Product Pages” to configure the parameters in this section. After finishing, you could go to the front-end to view the changes.

    3.6 Bonus Pages

    1. In your Prestashop Admin Dashboard, navigate to Modules and Services >> Modules and Services >> go to MODULES LIST section, search for “SP Theme configurator” module then click on Configure.

    2. In the SP Theme Settings, choose “Bonus Pages” to configure the parameters in this section. After finishing, you could go to the front-end to view the changes.

    3.7 Advanced Settings

    1. In your Prestashop Admin Dashboard, navigate to Modules and Services >> Modules and Services >> go to MODULES LIST section, search for “SP Theme configurator” module then click on Configure.

    2. In the SP Theme Settings, choose “Advanced” to configure the parameters in this section. After finishing, you could go to the front-end to view the changes.

    3.8 Social Accounts

    1. In your Prestashop Admin Dashboard, navigate to Modules and Services >> Modules and Services >> go to MODULES LIST section, search for “SP Theme configurator” module then click on Configure.

    2. In the SP Theme Settings, choose “Social Accounts” to configure the parameters in this section. After finishing, you could go to the front-end to view the changes.

    1. To configure Logo for your store, navigate to PREFERENCES > Themes in your Prestashop Admin Dashboard. Go to Logo tab to set up your logo. Click “Add File” to upload the logo image as you want and “Save”.

    2. Please check the front-end to view the changes.

    3.10 Image Size Adjustment

    In your Prestashop admin dashboard, navigate to: PREFERENCES >> Images to configure the image size for category, manufacturer, supplier, product, etc that fit your layout best.

    1. Image size - You can choose the image size types that suit your products best.

    2. Image quality - You can set image quality in use on your site.

    3. Regenerate thumbnails - To see the changes after you update the image sizes, image quality; you need to re-generate the images used in your site. Select option then click Regenerate thumbnails button.

    Frontend Appearance:

    To edit Copyright, please follow these steps:
    1. In your Prestashop Admin Dashboard, navigate to Modules and Services >> Modules and Services >> go to MODULES LIST section, search for “SP Theme configurator” module then click on Configure.

    2. In the SP Theme Settings, choose “General” to configure the parameter named “Copyright”in this section. After finishing, you could go to the front-end to see the changes.

    3.12 Edit Payment

    Frontend Appearance:

    To edit Payment, please follow these steps:
    1. In your Prestashop Admin Dashboard, navigate to Modules and Services >> Modules and Services >> go to MODULES LIST section, search for “SP Theme configurator” module then click on Configure.

    2. In the SP Theme Settings, choose “General” to configure the parameter named “Upload your own payment image” in this section. After finishing, you could go to the front-end to see the changes.

    3.13 Edit Pop-up

    Frontend Appearance:

    To edit this pop-up, please follow these steps:
    1. Change the image:
    In your Website’s Directory, go to themes\sp_paradise\css\modules\spblocknewsletter\img folder. To change the image in this pop-up, you could replace our sample image named bg_popup.jpg by your image with the same name as our sample image.

    2. Change the text:
    In your Website’s Directory, go to themes\sp_paradise\modules\spblocknewsletter folder. To change the text in this pop-up, in this folder, you could open the file named spblocknewsletterpopup.tpl by your editor program.
    Find and change the following text in this file as you want:

    Subscribe to the Paradis mailing list to receive updates on new arrivals, special offers and other


    3. After finishing, you could go to the front-end to see the changes.

    4SP MEGA MENU CONFIGURATION

    displayMenu: SP Mega Menu


    1. Navigate to Modules -> Modules >> look for SP Mega Menu >> Click the Configure button to access the module configuration page.

    2. In the SP Mega Menu Panel, you could configure Add New Module by click on the button like the following image:

    3. In the configuration page of new module, you could configure General Options as follows

    4. In the configuration page of new module, you could configure Menu Information as follows

    5. In order to add menu items, to add items as you want, you need to click this button.

    6. Menu list of Mega Menu You need to look at the menu list to configure easily.

    7. To configure each item, you need to click “Edit” button as follows:

    Go Here to readmore about the SP Mega Menu module.

    Note: In the next steps, when editing items in the menus, the items (in a menu) having same level could have same configuration. Therefore, we encourage you read throughtly and find out the item’s level to configure it without any errors.

    Shop
    Frontend Appearance

    • Backend Settings : Please click Here to view.
    • Backend Settings of Item ‘Flowers Wedding’: Please click Here to view.
    • Backend Settings of Item ‘Flowers Birthday’: Please click Here to view.

    Note: The items named ‘Flowers Valentine’, ‘Flowers Spring’, ‘Flowers Winter’ having same menu level as item ‘Flowers Birthday’could have same configuration

    Birthday
    Frontend Appearance

    • Backend Settings : Please click Here to view.
    • Backend Settings of Item ‘Flowers Wedding’: Please click Here to view.

    Note: The items named ‘Flowers Birthday’, ‘Flowers Valentine’ having same menu level as item ‘Flowers Wedding’ could have same configuration

    • Backend Settings of Item ‘Featured product’: Please click Here to view.

    Occasion
    Frontend Appearance

    • Backend Settings : Please click Here to view.
    • Backend Settings of Item ‘Lips Submenu 1′: Please click Here to view.

    Note: The items named ‘Lips Submenu 2′, ‘Lips Submenu 3′, ‘Lips Submenu 4′ having same menu level as item ‘Lips Submenu 1′ could have same configuration

    Flower
    Frontend Appearance

    • Backend Settings : Please click Here to view.

    Blog
    Frontend Appearance

    • Backend Settings : Please click Here to view.
    • Copy and paste the following code into the URL Tab:

    index.php?fc=module&module=smartblog&controller=category

    • Backend Settings of Item ‘Blog Large Image’: Please click Here to view.
    • Copy and paste the following code into the URL Tab:

    index.php?fc=module&module=smartblog&controller=category?SP_blogStyle=blog-large_image

    • Backend Settings of Item ‘Blog Listing Grid’: Please click Here to view.
    • Copy and paste the following code into the URL Tab:

    index.php?fc=module&module=smartblog&controller=category?SP_blogStyle=blog-grid

    About Us
    Frontend Appearance

    • Backend Settings : Please click Here to view.

    Contact Us
    Frontend Appearance

    • Backend Settings : Please click Here to view.
    • Copy and paste the following code into the URL Tab:

    index.php?controller=contact

    • Backend Settings of Item ‘Contact Page 1′ : Please click Here to view.
    • Copy and paste the following code into the URL Tab:

    index.php?controller=contact?SP_contactStyle=contact-v1

    Note: You could do the same with these items having same level in this menu: Contact Page 2, Contact Page 3, Contact Page 4. However, the items’ URLs are different.

    • Copy and paste the following code into the URL Tab of Contact Page 2:
      index.php?controller=contact?SP_contactStyle=contact-v2
    • Copy and paste the following code into the URL Tab of Contact Page 3:
      index.php?controller=contact?SP_contactStyle=contact-v3
    • Copy and paste the following code into the URL Tab of Contact Page 4:
      index.php?controller=contact?SP_contactStyle=contact-v4

    5SP VERTICAL MEGA MENU CONFIGURATION

    displayVerticalMenu: SP Vertical MegaMenu

    Vertical-menu
    1. Navigate to Modules -> Modules >> look for SP Vertical Megamenu >> Click the Configure button to access the module configuration page.

    2. In the SP Vertical Megamenu Panel, you could configure Settings as follows

    3. In the SP Vertical Megamenu Panel, you could configure Menu Information as follows

    4. In order to add menu items, to add items as you want, you need to click this button.

    5. Menu list of Vertical Megamenu You need to look at the menu list to configure easily.

    6. To configure each item, you need to click “Edit” button as follows:

    Go Here to readmore about the SP Vertical Megamenu module.

    Note: In the next steps, when editing items in the menus, the items (in a menu) having same level could have same configuration. Therefore, we encourage you read throughtly and find out the item’s level to configure it without any errors.

    Flowers Wedding
    Frontend Appearance

    • Backend Settings : Please click Here to view.
    • Backend Settings of Item ‘Wedding’: Please click Here to view.

    Note: The items named ‘Chanel’, ‘Mascara’, ‘Cosme-Decom’ having same menu level as item ‘Wedding’ could have same configuration

    • Backend Settings of Item ‘Offical Cosme-decom’ in ‘Wedding’: Please click Here to view.

    Note: The items having same menu level as item ‘Offical Cosme-decom’ could have same configuration

    • Backend Settings of Item ‘Poroduct Feature’: Please click Here to view.
    • Copy and paste the following code into the content:

    <p><img src="../themes/sp_paradise/img/cms/image-thum.jpg" alt="" /></p>

    Flowers Party
    Frontend Appearance

    • Backend Settings : Please click Here to view.
    • Backend Settings of Item ‘Feature Product’: Please click Here to view.
    • Backend Settings of Item ‘Sub Category’: Please click Here to view.
    • Backend Settings of Item ‘Flower Spring’ in ‘Sub Category’: Please click Here to view.

    Note: The items named ‘Flower Summer’, ‘Flower Autumn’, ‘Flower Winter’ having same menu level as item ‘Flower Spring’ could have same configuration

    • Backend Settings of Item ‘Flower Tulip’ in ‘Flower Spring’ Please click Here to view.

    Note: The items having same menu level as item ‘Flower Tulip’ could have same configuration

    Flower Winter
    Frontend Appearance

    • Backend Settings : Please click Here to view.
    • Backend Settings of Item ‘Flower’: Please click Here to view.

    Note: The items named ‘Cookware’ having same menu level as item ‘Flower’ could have same configuration

    • Backend Settings of Item ‘Flower Tulip’ in ‘Flower’ Please click Here to view.

    Note: The items having same menu level as item ‘Flower Tulip’ could have same configuration

    • Backend Settings of Item ‘Poroduct Feature’: Please click Here to view.
    • Copy and paste the following code into the content:

    <p><img src="../themes/sp_paradise/img/cms/img-cart-item.jpg" alt="" /></p>

    Valentine Flower
    Frontend Appearance

    • Backend Settings : Please click Here to view.

    Note: The other items having same menu level as item ‘Valentine Flower’ could have same configuration

    6EXTENSIONS CONFIGURATION

    6.1 SP Paradise Layout 1

    home-default

    display CustomHTML1

    SP Custom HTML – Contact Html
    Frontend Appearance:

    Backend Settings:

    Step 1: In the Pretashop Admin Panel, navigate to Modules and Services >> Modules and Services >> look for “SP Custom HTML” module >> click “Configure” button to configure.

    Step 2: In the “SP Custom HTML” configuration page, click button in the right corner to “ADD NEW MODULE”.

    Step 3: You could configure this module like the following image.


    Copy and paste the following code into the content:

    <div class="contact-html">Contact us 24/7: +44 573 222 7439</div>

    display CustomHTML2

    SP Custom HTML – Text Message
    Frontend Appearance:

    Backend Settings:

    Step 1: In the Pretashop Admin Panel, navigate to Modules and Services >> Modules and Services >> look for “SP Custom HTML” module >> click “Configure” button to configure.

    Step 2: In the “SP Custom HTML” configuration page, click button in the right corner to “ADD NEW MODULE”.

    Step 3: You could configure this module like the following image.


    Copy and paste the following code into the code field:

    <div class="text-message">Delivery from $50.00 and easy return</div>

    display CustomHTML3

    SP Custom HTML – Find Our
    Frontend Appearance:

    Backend Settings:

    Step 1: In the Pretashop Admin Panel, navigate to Modules and Services >> Modules and Services >> look for “SP Custom HTML” module >> click “Configure” button to configure.

    Step 2: In the “SP Custom HTML” configuration page, click button in the right corner to “ADD NEW MODULE”.

    Step 3: You could configure this module like the following image.


    Copy and paste the following code into the code field:

    <div class="find-our"><a href="index.php?controller=contact">Find our address</a></div>

    displayTopNav

    1. SP Block Currencies

    Frontend Appearance:

    Backend Settings:

    In the Pretashop Admin Panel, navigate to Modules and Services >> Modules and Services >> look for “SP Currency Block>> click “Enable” button to enable this module.

    2. SP Block Languages

    Frontend Appearance:

    Backend Settings:

    Step 1: To add language as you want. For example: To add “Arabic” language, in your Admin Panel >> navigate to LOCALIZATION >> Languages >> click button in the right corner to “ADD NEW”.

    Step 2: Fill information into the required field (*) as below:

    Step 3: Click “Save” button and view shop to see the changes.

    Note: When you add any language as you want, for example: Arabic language as above. At the frontend , some images will display “?” image as following:

    .

    To resolve this error, please make the steps following:

    1. In your administator, please find to position of this module, for example: Position – displayHtml1: Should You buy now; Module: SP Custom HTML.

    .

    2. And click source code to add “../” at before the image url >> Click “OK”.

    .

    3. Click “Save” button and go to the frontend to view the changes.

    button-wishlist.tpl

    Frontend Appearance:

    Backend Settings: To configure this position, please go to themes\sp_paradise folder and find a file named button-wishlist.tpl in your Website’s Directory

    displayCart

    SP Cart Block

    Frontend Appearance:

    Backend Settings:

    Step 1: In the Pretashop Admin Panel, navigate to Modules and Services >> Modules and Services >> look for “SP Cart Block” module >> click “Configure” button to configure.

    Step 2: In the “SP Cart Block” configuration page, click button in the right corner to “ADD NEW MODULE”.

    Step 3: You could configure this module like the following image.

    displayUserinfo

    SP User Info Block

    Frontend Appearance:

    Backend Settings:

    In the Pretashop Admin Panel, navigate to Modules and Services >> Modules and Services >> look for “SP User Info Block” module >> click “Enable” button to enable this module.

    SP Search Block

    Frontend Appearance:

    Backend Settings:

    Step 1: In the Pretashop Admin Panel, navigate to Modules and Services >> Modules and Services >> look for “SP Search Pro” module >> click “Configure” button to configure.

    Step 2: In the “SP Search Pro” configuration page, click button in the right corner to “ADD NEW MODULE”.

    Step 3: You could configure this module like the following image.

    displaySlideShow1

    Sp slider for your homepage

    Frontend Appearance:

    Backend Settings:

    Step 1: In the Pretashop Admin Panel, navigate to Modules and Services >> Modules and Services >> look for “SP Home Slider” module >> click “Configure” button to configure.

    Step 2: In the “SP Slider For Your Homepage” configuration page, click button in the right corner to “ADD NEW MODULE”.

    Step 3: You could configure this module like the following image.

    Step 4: In the last part named Slides List of this configuration page, click button in the right corner to add new slide and edit slide’s information as follows:

    • Sample 1: Please click Here to view
      Copy and paste the following code into the source code field:
      <div class="box-text">
      <div class="image-foliage"><a href="#"> <img src="../themes/sp_paradise/img/cms/la.png" alt="#" /> </a></div>
      <div class="title-top"><strong>Lookbook Flower 2015</strong></div>
      <h3>Country<br />Style Flower</h3>
      <p>It is a long established fact that a reader will be<br />distracted by the readable content of a page <br />when looking at its layout.</p>
      </div>
      <div class="now"><a href="#">Explore now</a></div>
    • Sample 2: Please click Here to view

      Note: The code in the source code field of sample 2 could be the same as that of the sample 1

    • Sample 3: Please click Here to view

      Note: The code in the source code field of sample 3 could be the same as that of the sample 1

    displayHome

    SP Custom HTML – Flower
    Frontend Appearance:

    Backend Settings:

    Step 1: In the Pretashop Admin Panel, navigate to Modules and Services >> Modules and Services >> look for “SP Custom HTML” module >> click “Configure” button to configure.

    Step 2: In the “SP Custom HTML” configuration page, click button in the right corner to “ADD NEW MODULE”.

    Step 3: You could configure this module like the following image.


    Copy and paste the following code into the code field:

    <div class="explore">
    <div class="item odd">
    <div class="image list-image-static"><a href="#"><img src="../themes/sp_paradise/img/cms/banner1-1.jpg" alt="#" /></a></div>
    <div class="text">
    <div class="origin">Start From $50.00</div>
    <div class="title">
    <h5><a href="#">Flower <strong class="down">Party</strong> </a></h5>
    </div>
    <a class="more" href="#">Shop The Collection</a></div>
    </div>
    <div class="item even">
    <div class="text">
    <div class="origin">Start From $50.00</div>
    <div class="title">
    <h5><a href="#">Flower <strong class="down">Wedding</strong></a></h5>
    </div>
    <a class="more" href="#">Shop The Collection</a></div>
    <div class="image list-image-static"><a href="#"><img src="../themes/sp_paradise/img/cms/banner1-2.jpg" alt="#" /></a></div>
    </div>
    <div class="item odd">
    <div class="image list-image-static"><a href="#"><img src="../themes/sp_paradise/img/cms/banner1-3.jpg" alt="#" /></a></div>
    <div class="text">
    <div class="origin">Start From $50.00</div>
    <div class="title">
    <h5><a href="#">Flower <strong class="down">Valentine</strong></a></h5>
    </div>
    <a class="more" href="#">Shop The Collection</a></div>
    </div>
    <div class="item even">
    <div class="text">
    <div class="origin">Start From $50.00</div>
    <div class="title">
    <h5><a href="#">Flower <strong class="down">Birthday</strong></a></h5>
    </div>
    <a class="more" href="#">Shop The Collection</a></div>
    <div class="image list-image-static"><a href="#"><img src="../themes/sp_paradise/img/cms/banner1-4.jpg" alt="#" /></a></div>
    </div>
    </div>

    display CustomHTML4

    SP Custom HTML – Should You buy now
    Frontend Appearance:

    Backend Settings:

    Step 1: In the Pretashop Admin Panel, navigate to Modules and Services >> Modules and Services >> look for “SP Custom HTML” module >> click “Configure” button to configure.

    Step 2: In the “SP Custom HTML” configuration page, click button in the right corner to “ADD NEW MODULE”.

    Step 3: You could configure this module like the following image.


    Copy and paste the following code into the code field:

    <div class="banner clearfix">
    <h3>Should You buy now ?</h3>
    <ul>
    <li class="item item-first col-sm-4">
    <div class="image list-image-static"><a class="first" href="#"> <img src="../themes/sp_paradise/img/cms/banner1-5.jpg" alt="image" /> </a></div>
    <div class="text">
    <div class="des">
    <h4>discount 20% off</h4>
    <p>Sale up to 60% on 50+ products in clude wedding flower</p>
    <a class="shop-now" href="#">Shop Now</a></div>
    </div>
    </li>
    <li class="item item-center  col-sm-4">
    <div class="image list-image-static"><a class="first" href="#"> <img src="../themes/sp_paradise/img/cms/banner1-6.jpg" alt="image" /> </a></div>
    <div class="text">
    <h5>Spring Summer 2016</h5>
    <h4>Sales <strong>Campaign</strong></h4>
    <h6>Paradis Store, Portland Street, Manchester City, Manchester</h6>
    <a class="shop-now" href="#">Shop Now</a></div>
    </li>
    <li class="item item-last  col-sm-4">
    <div class="image list-image-static"><a href="#"><img src="../themes/sp_paradise/img/cms/banner1-7.jpg" alt="image" /> </a></div>
    <div class="text">
    <div class="des">
    <h4>peony collection</h4>
    <p>These Colorful arrangementswill be the talk of every table</p>
    <a class="shop-now" href="#">Shop Now</a></div>
    </div>
    </li>
    </ul>
    </div>

    displayExtraSlider

    SP Extra Slider – New Arrivals
    Frontend Appearance:

    Backend Settings:

    Step 1: In the Pretashop Admin Panel, navigate to Modules and Services >> Modules and Services >> look for “SP Extra Slider” module.

    Step 2: In the “SP Extra Slider” configuration page, click button in the right corner to “ADD NEW MODULE”.

    Step 3: You could configure this module like the following image.

    Note: To configure the title, please feel free to copy and paste the following code into the title field:

    <span class="one">New Arrivals </span><span>It uses a dictionary of over 200 Latin words, combined with a handful of model sentence structures</span>

    display CustomHTML5

    SP Custom HTML – Should You buy now
    Frontend Appearance:

    Backend Settings:

    Step 1: In the Pretashop Admin Panel, navigate to Modules and Services >> Modules and Services >> look for “SP Custom HTML” module >> click “Configure” button to configure.

    Step 2: In the “SP Custom HTML” configuration page, click button in the right corner to “ADD NEW MODULE”.

    Step 3: You could configure this module like the following image.


    Copy and paste the following code into the code field:

    <div class="banner-video">
    <div id="thumnail">
    <div class="image-thumnail"><a href="#"><img src="../themes/sp_paradise/img/cms/thumnail_video.jpg" alt="#" /></a></div>
    <div id="des">
    <h3 class="tittle">Flower wrapping</h3>
    <p>Video Instructions How to Pack for The Most Beautiful Flowers</p>
    <div class="button-video"> </div>
    </div>
    </div>
    <div id="video"><iframe src="http://www.youtube.com/embed/4Lz-3OhcC9w" width="300" height="400">
    								</div>
    								</iframe></div>
    </div>

    displaySuperCategory1

    SP Super Category – Our Products
    Frontend Appearance:

    Backend Settings:

    Step 1: In the Pretashop Admin Panel, navigate to Modules and Services >> Modules and Services >> look for “SP Super Category” module.

    Step 2: In the “SP Super Category” configuration page, click button in the right corner to “ADD NEW MODULE”.

    Step 3: You could configure this module like the following image.

    display Home News

    SP SmartBlog Home Lastest
    Frontend Appearance:

    Backend Settings:

    Step 1: In the Pretashop Admin Panel, navigate to Modules and Services >> Modules and Services >> look for “SmartBlog Home Lastest” module.

    Step 2: You could configure this module like the following image.

    SP Theme Configuration

    Frontend Appearance:

    Backend Settings: Go Here to see the backend settings.

    display Newsletter

    SP Newsletter Block
    Frontend Appearance:

    Backend Settings:

    Step 1: In the Pretashop Admin Panel, navigate to Modules and Services >> Modules and Services >> look for “SP Newsletter Block” module.

    Step 2: You could configure its settings like the following image.


    To edit the text in this module, please follow these steps:
    In your Website’s Directory, go to themes\sp_paradise\modules\spblocknewsletter folder. To change the text in this module, in this folder, you could open the file named blocknewsletter.tpl by your editor program.
    Find and change the text you want to edit, such as: Newsletter, Enter your email

    displayLogoBottom

    SP Custom HTML – Logo Bottom
    Frontend Appearance:

    Backend Settings:

    Step 1: In the Pretashop Admin Panel, navigate to Modules and Services >> Modules and Services >> look for “SP Custom HTML” module >> click “Configure” button to configure.

    Step 2: In the “SP Custom HTML” configuration page, click button in the right corner to “ADD NEW MODULE”.

    Step 3: You could configure this module like the following image.


    Copy and paste the following code into the code field:

    <div class="logo-bottom"><a href="#">logo</a>
    <p>Paradis, a local Sudbury florist has served the Sudbury, area since 1975. When you work with Flower Towne, youll immediately see why the Charbonneau family has a reputation for delivering quality, value and service.</p>
    </div>

    displayAdsense

    SP Custom HTML – Adsense
    Frontend Appearance:

    Backend Settings:

    Step 1: In the Pretashop Admin Panel, navigate to Modules and Services >> Modules and Services >> look for “SP Custom HTML” module >> click “Configure” button to configure.

    Step 2: In the “SP Custom HTML” configuration page, click button in the right corner to “ADD NEW MODULE”.

    Step 3: You could configure this module like the following image.


    Copy and paste the following code into the code field:

    <div class="clearfix list-image-static"><a href="#"><img class="faydienwuvvajtdegdog" src="../themes/sp_paradise/img/cms/adsense_banner.jpg" alt="" /></a></div>

    1. SP Custom HTML – My Account
    Frontend Appearance:

    Backend Settings:

    Step 1: In the Pretashop Admin Panel, navigate to Modules and Services >> Modules and Services >> look for “SP Custom HTML” module >> click “Configure” button to configure.

    Step 2: In the “SP Custom HTML” configuration page, click button in the right corner to “ADD NEW MODULE”.

    Step 3: You could configure this module like the following image.


    Copy and paste the following code into the content:

    <div class="footer-links">
    <h3 class="title">My Account</h3>
    <ul>
    <li><a href="../my-account">My Account</a></li>
    <li><a href="../my-account">Log in</a></li>
    <li><a href="../order">My Cart</a></li>
    <li><a href="../module/blockwishlist/mywishlist">My Wishlist</a></li>
    <li><a href="../products-comparison">My Compare</a></li>
    </ul>
    </div>

    2. SP Custom HTML – Information
    Frontend Appearance:

    Backend Settings:

    Step 1: In the Pretashop Admin Panel, navigate to Modules and Services >> Modules and Services >> look for “SP Custom HTML” module >> click “Configure” button to configure.

    Step 2: In the “SP Custom HTML” configuration page, click button in the right corner to “ADD NEW MODULE”.

    Step 3: You could configure this module like the following image.


    Copy and paste the following code into the content:

    <div class="footer-links">
    <h3 class="title">Information</h3>
    <ul>
    <li><a href="../content/4-about-us">About Us</a></li>
    <li><a href="#">Jobs</a></li>
    <li><a href="#">Delivery Information</a></li>
    <li><a href="#">Privacy Policy</a></li>
    <li><a href="#">Term and Conditions</a></li>
    <li><a href="index.php?controller=contact">Contact Us</a></li>
    </ul>
    </div>

    3. SP Custom HTML – Why Buy From Us
    Frontend Appearance:

    Backend Settings:

    Step 1: In the Pretashop Admin Panel, navigate to Modules and Services >> Modules and Services >> look for “SP Custom HTML” module >> click “Configure” button to configure.

    Step 2: In the “SP Custom HTML” configuration page, click button in the right corner to “ADD NEW MODULE”.

    Step 3: You could configure this module like the following image.


    Copy and paste the following code into the content:

    <div class="footer-links">
    <h3 class="title">Why buy from us ?</h3>
    <ul>
    <li><a href="#">Support 24/7</a></li>
    <li><a href="#">Free Shipping</a></li>
    <li><a href="#">Secure Shopping</a></li>
    <li><a href="#">International Shipping</a></li>
    <li><a href="#">Affiliates</a></li>
    <li><a href="#">Return Shipping</a></li>
    </ul>
    </div>

    4. SP Custom HTML – Collections
    Frontend Appearance:

    Backend Settings:

    Step 1: In the Pretashop Admin Panel, navigate to Modules and Services >> Modules and Services >> look for “SP Custom HTML” module >> click “Configure” button to configure.

    Step 2: In the “SP Custom HTML” configuration page, click button in the right corner to “ADD NEW MODULE”.

    Step 3: You could configure this module like the following image.


    Copy and paste the following code into the content:

    <div class="footer-links">
    <h3 class="title">Collections</h3>
    <ul>
    <li><a href="#">Mother's Day</a></li>
    <li><a href="#">Women's Day</a></li>
    <li><a href="#">Teacher's Day</a></li>
    <li><a href="#">Valentine's Day</a></li>
    <li><a href="#">Happy Birthday</a></li>
    <li><a href="#">Independence Day</a></li>
    </ul>
    </div>

    Contact Information Block
    Frontend Appearance:

    Backend Settings:

    Step 1: In the Pretashop Admin Panel, navigate to Modules and Services >> Modules and Services >> look for “Contact Information Block” module.

    Step 2: You could configure this module like the following image.

    6.2 SP Paradise Layout 2

    home-layout2

    WelcomeText

    SP Theme Configuration

    Frontend Appearance:

    Backend Settings: Go Here to configure the Guest welcome msg Tab.

    displaySlideShow2

    Sp slider for your homepage

    Frontend Appearance:

    Backend Settings:

    Step 1: In the Pretashop Admin Panel, navigate to Modules and Services >> Modules and Services >> look for “SP Home Slider” module >> click “Configure” button to configure.

    Step 2: In the “SP Slider For Your Homepage” configuration page, click button in the right corner to “ADD NEW MODULE”.

    Step 3: You could configure this module like the following image.

    Step 4: In the last part named Slides List of this configuration page, click button in the right corner to add new slide and edit slide’s information as follows:

    • Sample 4: Please click Here to view
      Copy and paste the following code into the source code field:
      <div class="box-text">
      <div class="title-top"><strong>Bring Your Special Days Wonderful</strong></div>
      <h3>Bring Your Special Days Wonderful</h3>
      </div>
      <div class="now"><a href="#">Shop now</a></div>
    • Sample 5: Please click Here to view

      Note: The code in the source code field of sample 5 could be the same as that of the sample 4

    • Sample 6: Please click Here to view

      Note: The code in the source code field of sample 6 could be the same as that of the sample 4

    display CustomHTML6

    SP Custom HTML – Banner Top Layout2
    Frontend Appearance:

    Backend Settings:

    Step 1: In the Pretashop Admin Panel, navigate to Modules and Services >> Modules and Services >> look for “SP Custom HTML” module >> click “Configure” button to configure.

    Step 2: In the “SP Custom HTML” configuration page, click button in the right corner to “ADD NEW MODULE”.

    Step 3: You could configure this module like the following image.


    Copy and paste the following code into the content:

    <div class="banner2">
    <div class="row">
    <ul>
    <li class="col-sm-6 list-image-static"><a class="img1" href="#"><img src="../themes/sp_paradise/img/cms/banner2-1.jpg" alt="#" /></a></li>
    <li class="col-sm-6 list-image-static"><a class="img2" href="#"><img src="../themes/sp_paradise/img/cms/banner2-2.jpg" alt="#" /></a></li>
    </ul>
    </div>
    </div>

    content-v2.tpl

    Frontend Appearance:

    To edit the text in this position, please follow these steps:
    In your Website’s Directory, go to themes\sp_paradise folder. To change the text in this module, in this folder, you could open the file named content-v2.tpl by your editor program.
    Find and change the text you want to edit here, for example: You can choose Category from here

    displayDeal

    SP Deal
    Frontend Appearance:


    Backend Settings:

    Step 1: In the Pretashop Admin Panel, navigate to Modules and Services >> Modules and Services >> look for “SP Deal” module.

    Step 2: In the “SP Deal” configuration page, click button in the right corner to “ADD NEW MODULE”.

    Step 3: You could configure this module like the following image.

    display CustomHTML7

    SP Custom HTML – Banner Top Layout2
    Frontend Appearance:

    Backend Settings:

    Step 1: In the Pretashop Admin Panel, navigate to Modules and Services >> Modules and Services >> look for “SP Custom HTML” module >> click “Configure” button to configure.

    Step 2: In the “SP Custom HTML” configuration page, click button in the right corner to “ADD NEW MODULE”.

    Step 3: You could configure this module like the following image.


    Copy and paste the following code into the content:

    <div class="banner2">
    <div class="row">
    <div class="col-sm-6 list-image-static"><a class="img img1" href="#"><img src="../themes/sp_paradise/img/cms/banner2-3.jpg" alt="#" /></a></div>
    <div class="col-sm-6 list-image-static"><a class="img img2" href="#"><img src="../themes/sp_paradise/img/cms/banner2-4.jpg" alt="#" /></a></div>
    </div>
    </div>

    displayExtraSlider2

    SP Extra Slider – What Trending
    Frontend Appearance:

    Backend Settings:

    Step 1: In the Pretashop Admin Panel, navigate to Modules and Services >> Modules and Services >> look for “SP Extra Slider” module.

    Step 2: In the “SP Extra Slider” configuration page, click button in the right corner to “ADD NEW MODULE”.

    Step 3: You could configure this module like the following image.

    display CustomHTML8

    SP Custom HTML – Banner Center Layout2
    Frontend Appearance:

    Backend Settings:

    Step 1: In the Pretashop Admin Panel, navigate to Modules and Services >> Modules and Services >> look for “SP Custom HTML” module >> click “Configure” button to configure.

    Step 2: In the “SP Custom HTML” configuration page, click button in the right corner to “ADD NEW MODULE”.

    Step 3: You could configure this module like the following image.


    Copy and paste the following code into the content:

    <div class="banner3 clearfix">
    <div class="row">
    <ul>
    <li class="item item-1 list-image-static col-sm-6 col-xs-12"><a class="first" href="#"> <img src="../themes/sp_paradise/img/cms/banner2-5.jpg" alt="image" /> </a></li>
    <li class="item item-2 list-image-static  col-sm-6 col-xs-12"><a class="last" href="#"> <img src="../themes/sp_paradise/img/cms/banner2-6.jpg" alt="image" /> </a></li>
    </ul>
    </div>
    </div>

    display CustomHTML9

    SP Custom HTML – Banner Center layout 2 – A Splendid
    Frontend Appearance:

    Backend Settings:

    Step 1: In the Pretashop Admin Panel, navigate to Modules and Services >> Modules and Services >> look for “SP Custom HTML” module >> click “Configure” button to configure.

    Step 2: In the “SP Custom HTML” configuration page, click button in the right corner to “ADD NEW MODULE”.

    Step 3: You could configure this module like the following image.


    Copy and paste the following code into the content:

    <div class="banner4 list-image-static"><a href="#"><img src="../themes/sp_paradise/img/cms/banner2-7.jpg" alt="" /></a></div>

    displaySuperCategory2

    SP Super Category – Our Products
    Frontend Appearance:

    Backend Settings:

    Step 1: In the Pretashop Admin Panel, navigate to Modules and Services >> Modules and Services >> look for “SP Super Category” module.

    Step 2: In the “SP Super Category” configuration page, click button in the right corner to “ADD NEW MODULE”.

    Step 3: You could configure this module like the following image.

    display CustomHTML10

    SP Custom HTML – Banner Bottom Layout 2
    Frontend Appearance:

    Backend Settings:

    Step 1: In the Pretashop Admin Panel, navigate to Modules and Services >> Modules and Services >> look for “SP Custom HTML” module >> click “Configure” button to configure.

    Step 2: In the “SP Custom HTML” configuration page, click button in the right corner to “ADD NEW MODULE”.

    Step 3: You could configure this module like the following image.


    Copy and paste the following code into the content:

    <div class="banner5">
    <h3 class="title_block"><strong>Today Offer</strong></h3>
    <div class="row">
    <ul>
    <li class="col-sm-6 list-image-static"><a class="img1" href="#"><img src="../themes/sp_paradise/img/cms/banner2-8.jpg" alt="#" /></a></li>
    <li class="col-sm-6 list-image-static"><a class="img2" href="#"><img src="../themes/sp_paradise/img/cms/banner2-9.jpg" alt="#" /></a></li>
    <li class="col-sm-6 list-image-static"><a class="img1" href="#"><img src="../themes/sp_paradise/img/cms/banner2-10.jpg" alt="#" /></a></li>
    <li class="col-sm-6 list-image-static"><a class="img2" href="#"><img src="../themes/sp_paradise/img/cms/banner2-11.jpg" alt="#" /></a></li>
    </ul>
    </div>
    </div>

    6.3 SP Paradise Layout 3

    home-layout3

    displaySlideShow3

    Sp slider for your homepage

    Frontend Appearance:

    Backend Settings:

    Step 1: In the Pretashop Admin Panel, navigate to Modules and Services >> Modules and Services >> look for “SP Home Slider” module >> click “Configure” button to configure.

    Step 2: In the “SP Slider For Your Homepage” configuration page, click button in the right corner to “ADD NEW MODULE”.

    Step 3: You could configure this module like the following image.

    Step 4: In the last part named Slides List of this configuration page, click button in the right corner to add new slide and edit slide’s information as follows:

    • Sample 7: Please click Here to view
      Copy and paste the following code into the source code field:
      <div class="box-text">
      <div class="title-top"><strong>Bring Your Special Days Wonderful</strong></div>
      <h3>Bring Your Special Days Wonderful</h3>
      </div>
      <div class="now"><a href="#">Shop now</a></div>
    • Sample 8: Please click Here to view

      Note: The code in the source code field of sample 8 could be the same as that of the sample 7

    • Sample 9: Please click Here to view

      Note: The code in the source code field of sample 9 could be the same as that of the sample 7

    display CustomHTML11

    SP Custom HTML – Image Top Layout 3
    Frontend Appearance:

    Backend Settings:

    Step 1: In the Pretashop Admin Panel, navigate to Modules and Services >> Modules and Services >> look for “SP Custom HTML” module >> click “Configure” button to configure.

    Step 2: In the “SP Custom HTML” configuration page, click button in the right corner to “ADD NEW MODULE”.

    Step 3: You could configure this module like the following image.


    Copy and paste the following code into the content:

    <div class="banner6 list-image-static"><a href="#"><img src="../themes/sp_paradise/img/cms/banner3-1.jpg" alt="" /></a></div>

    display CustomHTML14

    SP Custom HTML – Banner Top Layout 3
    Frontend Appearance:

    Backend Settings:

    Step 1: In the Pretashop Admin Panel, navigate to Modules and Services >> Modules and Services >> look for “SP Custom HTML” module >> click “Configure” button to configure.

    Step 2: In the “SP Custom HTML” configuration page, click button in the right corner to “ADD NEW MODULE”.

    Step 3: You could configure this module like the following image.


    Copy and paste the following code into the content:

    <div class="banner8">
    <div class="row">
    <ul>
    <li class="item-1 col-sm-4 col-xs-6 list-image-static"><a class="img1" href="#"><img src="../themes/sp_paradise/img/cms/banner3-2.jpg" alt="#" /></a></li>
    <li class="item-2 col-sm-4 col-xs-6 list-image-static"><a class="img2" href="#"><img src="../themes/sp_paradise/img/cms/banner3-3.jpg" alt="#" /></a></li>
    <li class="item-3 col-sm-4 col-xs-6 list-image-static"><a class="img3" href="#"><img src="../themes/sp_paradise/img/cms/banner3-4.jpg" alt="#" /></a></li>
    </ul>
    </div>
    </div>

    displayDeal2

    SP Deal
    Frontend Appearance:

    Backend Settings:

    Step 1: In the Pretashop Admin Panel, navigate to Modules and Services >> Modules and Services >> look for “SP Deal” module.

    Step 2: In the “SP Deal” configuration page, click button in the right corner to “ADD NEW MODULE”.

    Step 3: You could configure this module like the following image.

    displayExtraSlider4

    SP Extra Slider – New Arrivals
    Frontend Appearance:

    Backend Settings:

    Step 1: In the Pretashop Admin Panel, navigate to Modules and Services >> Modules and Services >> look for “SP Extra Slider” module.

    Step 2: In the “SP Extra Slider” configuration page, click button in the right corner to “ADD NEW MODULE”.

    Step 3: You could configure this module like the following image.

    display BannerVideo2

    SP Custom HTML – Video
    Frontend Appearance:

    Backend Settings:

    Step 1: In the Pretashop Admin Panel, navigate to Modules and Services >> Modules and Services >> look for “SP Custom HTML” module >> click “Configure” button to configure.

    Step 2: In the “SP Custom HTML” configuration page, click button in the right corner to “ADD NEW MODULE”.

    Step 3: You could configure this module like the following image.


    Copy and paste the following code into the content:

    <div class="banner-video">
    <div id="thumnail">
    <div class="image-thumnail"><a href="#"><img src="../themes/sp_paradise/img/cms/thumnail_video_2.jpg" alt="#" /></a></div>
    <div id="des">
    <h3 class="tittle">Flower wrapping</h3>
    <p>Video Instructions How to Pack for The Most Beautiful Flowers</p>
    <div class="button-video"> </div>
    </div>
    </div>
    <div id="video"><iframe src="http://www.youtube.com/embed/4Lz-3OhcC9w" width="300" height="410">
    								</div>
    								</iframe></div>
    </div>

    display CustomHTML12

    SP Custom HTML – Banner Left Layout3
    Frontend Appearance:

    Backend Settings:

    Step 1: In the Pretashop Admin Panel, navigate to Modules and Services >> Modules and Services >> look for “SP Custom HTML” module >> click “Configure” button to configure.

    Step 2: In the “SP Custom HTML” configuration page, click button in the right corner to “ADD NEW MODULE”.

    Step 3: You could configure this module like the following image.


    Copy and paste the following code into the content:

    <div class="banner7 list-image-static"><a href="#"><img src="../themes/sp_paradise/img/cms/banner3-5.jpg" alt="" /></a></div>

    display CustomHTML13

    SP Custom HTML – Testimonials
    Frontend Appearance:

    Backend Settings:

    Step 1: In the Pretashop Admin Panel, navigate to Modules and Services >> Modules and Services >> look for “SP Custom HTML” module >> click “Configure” button to configure.

    Step 2: In the “SP Custom HTML” configuration page, click button in the right corner to “ADD NEW MODULE”.

    Step 3: You could configure this module like the following image.


    Copy and paste the following code into the content:

    <div class="our_clients">
    <h3 class="title_block">Testimonials</h3>
    </div>
    <ul class="say_list">
    <li>
    <div class="content">
    <div class="image"><a href="#"><img src="../themes/sp_paradise/img/cms/client-1.png" alt=" alt=" width="100" height="100" /></a></div>
    <div class="text">
    <h4 class="client-name">Vanissa Hugo</h4>
    <p>It is a long established fact that a reader will be distracted by the in readable content of a page ...</p>
    </div>
    </div>
    </li>
    <li>
    <div class="content">
    <div class="image"><a href="#"><img src="../themes/sp_paradise/img/cms/client-1.png" alt="" width="100" height="100" /></a></div>
    <div class="text">
    <h4 class="client-name">Vanissa Hugo</h4>
    <p>It is a long established fact that a reader will be distracted by the in readable content of a page ...</p>
    </div>
    </div>
    </li>
    </ul>

    6.4 SP Paradise Layout 4

    home-layout4

    displaySlideShow4

    Sp slider for your homepage

    Frontend Appearance:

    Backend Settings:

    Step 1: In the Pretashop Admin Panel, navigate to Modules and Services >> Modules and Services >> look for “SP Home Slider” module >> click “Configure” button to configure.

    Step 2: In the “SP Slider For Your Homepage” configuration page, click button in the right corner to “ADD NEW MODULE”.

    Step 3: You could configure this module like the following image.

    Step 4: In the last part named Slides List of this configuration page, click button in the right corner to add new slide and edit slide’s information as follows:

    • Sample 10: Please click Here to view
      Copy and paste the following code into the source code field:
      <div class="box-text">
      <div class="title-top"><strong>Bring Your Special Days Wonderful</strong></div>
      <h3>Bring Your Special Days Wonderful</h3>
      </div>
      <div class="now"><a href="#">Shop now</a></div>
    • Sample 11: Please click Here to view

      Note: The code in the source code field of sample 11 could be the same as that of the sample 10

    • Sample 12: Please click Here to view

      Note: The code in the source code field of sample 12 could be the same as that of the sample 10

    content-v4.tpl

    Frontend Appearance:

    To edit the text in this position, please follow these steps:
    In your Website’s Directory, go to themes\sp_paradise folder. To change the text in this module, in this folder, you could open the file named content-v4.tpl by your editor program.
    Find and change the text you want to edit here, for example: You can choose Category from here

    displayDeal3

    SP Deal
    Frontend Appearance:

    Backend Settings:

    Step 1: In the Pretashop Admin Panel, navigate to Modules and Services >> Modules and Services >> look for “SP Deal” module.

    Step 2: In the “SP Deal” configuration page, click button in the right corner to “ADD NEW MODULE”.

    Step 3: You could configure this module like the following image.

    6.5 SP Paradise Layout 5

    home-layout5

    displaySlideShow5

    Sp slider for your homepage

    Frontend Appearance:

    Backend Settings:

    Step 1: In the Pretashop Admin Panel, navigate to Modules and Services >> Modules and Services >> look for “SP Home Slider” module >> click “Configure” button to configure.

    Step 2: In the “SP Slider For Your Homepage” configuration page, click button in the right corner to “ADD NEW MODULE”.

    Step 3: You could configure this module like the following image.

    Step 4: In the last part named Slides List of this configuration page, click button in the right corner to add new slide and edit slide’s information as follows:

    • Sample 13: Please click Here to view
      Copy and paste the following code into the source code field:
      <div class="box-text">
      <div class="title-top"><strong>Bring Your Special Days Wonderful</strong></div>
      <h3>Bring Your Special Days Wonderful</h3>
      </div>
      <div class="now"><a href="#">Shop now</a></div>
    • Sample 14: Please click Here to view

      Note: The code in the source code field of sample 14 could be the same as that of the sample 13

    • Sample 15: Please click Here to view

      Note: The code in the source code field of sample 15 could be the same as that of the sample 13

    display CustomHTML15

    SP Custom HTML – Banner Top Layout 5
    Frontend Appearance:

    Backend Settings:

    Step 1: In the Pretashop Admin Panel, navigate to Modules and Services >> Modules and Services >> look for “SP Custom HTML” module >> click “Configure” button to configure.

    Step 2: In the “SP Custom HTML” configuration page, click button in the right corner to “ADD NEW MODULE”.

    Step 3: You could configure this module like the following image.


    Copy and paste the following code into the content:

    <div class="row banner9">
    <div class="item col-sm-3 col-xs-6">
    <div class="content"><a class="img img1" href="#"> <img src="../themes/sp_paradise/img/cms/banner5-1.jpg" alt="#" /> <span class="one">Flower<br /> Party</span> </a>
    <div class="now"><a href="#">Shop Now</a></div>
    </div>
    </div>
    <div class="item col-sm-3 col-xs-6">
    <div class="content"><a class="img img2" href="#"> <img src="../themes/sp_paradise/img/cms/banner5-2.jpg" alt="#" /> <span class="one">Flower<br /> Party</span> </a>
    <div class="now"><a href="#">Shop Now</a></div>
    </div>
    </div>
    <div class="item col-sm-3 col-xs-6">
    <div class="content"><a class="img img3" href="#"> <img src="../themes/sp_paradise/img/cms/banner5-3.jpg" alt="#" /> <span class="one">Flower<br /> Party</span> </a>
    <div class="now"><a href="#">Shop Now</a></div>
    </div>
    </div>
    <div class="item col-sm-3 col-xs-6">
    <div class="content"><a class="img img4" href="#"><img src="../themes/sp_paradise/img/cms/banner5-4.jpg" alt="#" /> <span class="one">Flower<br /> Party</span> </a>
    <div class="now"><a href="#">Shop Now</a></div>
    </div>
    </div>
    </div>

    display CustomHTML16

    SP Custom HTML – Banner Bottom Layout 5
    Frontend Appearance:

    Backend Settings:

    Step 1: In the Pretashop Admin Panel, navigate to Modules and Services >> Modules and Services >> look for “SP Custom HTML” module >> click “Configure” button to configure.

    Step 2: In the “SP Custom HTML” configuration page, click button in the right corner to “ADD NEW MODULE”.

    Step 3: You could configure this module like the following image.


    Copy and paste the following code into the content:

    <div class="banner10 clearfix">
    <ul>
    <li class="item item-1 list-image-static col-lg-6 col-md-6 col-sm-6"><a class="first" href="#"> <img src="../themes/sp_paradise/img/cms/banner5-5.jpg" alt="image" /> </a> <a class="last" href="#"> <img src="../themes/sp_paradise/img/cms/banner5-6.jpg" alt="image" /> </a></li>
    <li class="item item-2 list-image-static col-lg-6 col-md-6 col-sm-6"><a class="first" href="#"> <img src="../themes/sp_paradise/img/cms/banner5-7.jpg" alt="image" /> </a></li>
    </ul>
    </div>

    7SUPPORT

    • SUPPORT – If you have any questions that are beyond the scope of this help file, please feel free to send us via: Support Tickets System
    • FAQs – Go to Here to view more the Frequently Asked Questions.

    SP Topshop

    $
    0
    0

    1GETTING STARTED

    1.1 Introduction

    Firstly, a huge thanks for purchasing this theme, your support is truly appreciated!

    This document covers the installation and use of this theme, reveals some answers to common problems and issues. We encourage you to read this document throughtly if you are experiencing any difficulties. If you have any questions that are beyond the scope of document, please feel free to contact us via our Support Tickets System.

    1.2 System Requirements

    Please make sure your hosting server meets the PrestaShop requirements:

    • Supported operating system: Windows, Mac and Linux.
    • Wamp (for Windows) or Xampp (for Windows and Mac)
    • Web server: Apache Web server 1.3 or later, Microsoft’s IIS Web server 6.0 or later.
    • PHP 5.2* or later.
    • MySQL 5.0 or later.
    • At least 32 Mb of RAM on your server (64 Mb is comfortable, the more the better).

    Note: If you can not import the theme/module file to your server due to the maximum upload and PHP memory limit, you need to increase the parameter “memory_limit=200M”; “max_execution_time=300″; “max_execution_time=1000″ & “upload_max_filesize=20M” in the file php.ini.

    1.3 PrestaShop Guide

    If you are not familiar with Prestashop, please read its guide first: http://doc.prestashop.com/display/PS16/Getting+Started

    2INSTALLATION

    There are two ways to install SP Topshop Theme

    • Quickstart Installation: By using this package, you will set the theme exactly like our Demo with sample data.
    • Manual Installation : Include of Theme layout Installation Packages. Please unzip the package and you would see the following folders:
      • module folder
      • override folder
      • sp_topshop_template_p16_v1.0.0.zip file

    2.1 Quickstart Installation

    We provide Quickstart package for each theme which aims to ease the installation for users. It will help you save much time of installing and configuring if you plan to start your site from the beginning. Please following steps below:

    • Step 1: Download the quickstart package of SP Topshop theme
    • Step 2: Extract the downloaded package named “sp_topshop_quickstart_p16_v1.0.0.zip” in your localhost (or your hosting) folder. In Quickstart folder you will see the extracted folder that include all sample data
    • Step 3: Start installation by opening browser and navigate to your URL (where the Quickstart uploaded) to load default Prestashop installer. Please follow these steps of the Installer so that the installation process can be set.
      • Installation Assistant (Choose your language)

    Please select the installation language

    Please note: The installation language option will not affect your store language. By default PrestaShop is offered in English. You can install additional localization packages to change the store language.

    When you are done, click the ‘Next’ button.

      • Installation Assistant (License agreements)

    Please check the license agreement.

    When you are done, click the ‘Next’ button.

      • System Compatibility

    Check the PHP settings and directory permissions. In case of any errors, please contact your hosting provider for further assistance.

    If everything is correct, click the ‘Next’ button.

      • Store Information

    Now add required information for your store: Shop name, Main activity, Country, Shop timezone and add the account info: first name, last name, email and password. Click “Next” to next step.

    When you are done, click the ‘Next’ button.

      • System Configuration

    Here is the database configuration panel, we need to create database first.

    Access your database panel and create database for your site. Add database name and then click “Create” button.

    When the database is created successfully, copy and paste its name into the “Database name” field, then click the “Test your database connection now!” button to make sure that the entered settings are correct. If they are, you will see a Database is connected message. After that, you could click the “Next” button to move to next steps.

      • Finish installation: This process could take a few minutes

    Note: For security reasons you need to delete the install/ directory on your hosting server.

    And finally, go to the Frontend or Backend as you want:

    2.2 Theme Installation

    Note: Before installing theme, you must disable the cache. In your back office, please go to ADVANCED PARAMETERS >> Performance >> find “Cache” parameter >> Set “No” to disable cache >> Click “Save”.

    SP Topshop Layout1 Theme Installation

    Note: Here we will introduce you How To Install SP Topshop Layout 1 Theme, with Layout 2, Layout 3, Layout 4, and Layout 5 do the same.

    Firstly, you must EXTRACT the “sp_topshop_layout1_theme_p16_v1.0.0.zip” package and open the extracted folder. Here you will see:

    • module folder: contain of the smartblog.zip file, smartblogcategories.zip file and themeinstallator.zip file.
    • override folder: contain of FrontController.php” file in the folder URL: \override\classes\controller\ .
    • and the sp_topshop_template_p16_v1.0.0.zip file.

    STEP 1: Install “smartblog.zip”, “smartbloghomelatestnews.zip” and“smartblogcategories.zip” Module.

    1. Login to your Prestashop admin panel and navigate to MODULES -> Modules. At the top of the page click the Add a new module button.

    2. Choose “smartblog.zip” file and click “Upload this module” button

    3. There is a message-box “The module was successfully downloaded.”

    4. Please find to the uploaded module and click “Install” button to run it.

    5. When a pop-up window displays, please click “Proceed with the installation” button.

    6. Finally, Module(s) installed successfully.

    Note: Do the same with the “smartblogcategories.zip” and “smartbloghomelatestnews.zip” module’s installation

    STEP 2: Install “themeinstallator” Module.

    1. Login to your Prestashop admin panel and navigate to MODULES -> Modules. At the top of the page click the Add a new module button.

    2. Select your file named “themeinstallator.zip” and click “Upload this module” button

    3. The uploading process will be started. You will see the message that the module has been successfully downloaded.

    4. The new module is located in the modules list, so you can Search its name and click Install button to start the module.

    5. Finally, you will see a notice message: "Module(s) installed successfully".


    STEP 3: Install the “sp_topshop_template_p16_v1.0.0.zip” file.

    1. In the your Prestashop admin panel and navigate to MODULES >> Modules. Find to the module that you have installed and clicked on Configure button to configure the module.

    2. Navigate to “Import from your computer>> choose the zip theme file as named “sp_topshop_template_p16_v1.0.0.zip>> Next.

    3. You will see a message that You are going to install the following theme SP Topshop version 1.0.0, please click “Next” button to continue.

    4. Select the module that you want to install/disable >> click “Next” button to continue the installation process.

    5. After that, a list of the installed/disabled modules will be showed out and you could click “Finish” button to finish the theme installation.

    STEP 4: Override folder: copy the "FrontController.php" file into the installation folder with the URL: override\classes\controller.

    3SP THEME CONFIGURATION

    3.1 General Settings

    1. In your Prestashop Admin Dashboard, navigate to Modules and Services >> Modules and Services >> go to MODULES LIST section, search for “SP Theme Configuration” module then click on Configure.

    2. In the SP Theme Settings, choose “General” to configure the parameters in this section. After finishing, you could go to the front-end to view the changes.

    3.2 Layout Settings

    1. In your Prestashop Admin Dashboard, navigate to Modules and Services >> Modules and Services >> go to MODULES LIST section, search for “SP Theme Configuration” module then click on Configure.

    2. In the SP Theme Settings, choose “Layout” to configure the parameters in this section. After finishing, you could go to the front-end to view the changes.

    3.3 Fonts

    1. In your Prestashop Admin Dashboard, navigate to Modules and Services >> Modules and Services >> go to MODULES LIST section, search for “SP Theme Configuration” module then click on Configure.

    2. In the SP Theme Settings, choose “Fonts” to configure the parameters in this section. After finishing, you could go to the front-end to view the changes.

    Note: Please copy and paste the following line into Font Selector tab:
    1.

    body, h5.product-name, .price-box, #attributes .attribute_list select, h1.product_name

    2.

    div.hot-deal h3.title_block,.product_list .price-box .price, .product_lists .price-box .price,.sphomepage-slider .owl-item.active .sphomeslider-description h2, .sphomepage-slider .owl-item.active .sphomeslider-description h3, .sphomepage-slider .owl-item.active .sphomeslider-description h4,#newsletter_block_popup .block_content .content-inner h3.title,.about-text h1,#smartblogcat .articleContent .sdsarticleHeader .bg_date,.block .title_block, .moduletable .title_block,.block .title_block, .moduletable .title_block,.ig-title-module,#layered_block_left #layered_form .layered_price .layered_filter_ul label, #layered_block_left #layered_form .layered_price .layered_filter_ul #layered_price_range,#layered_block_left #layered_form span.layered_subtitle,.breadcrumb a, .breadcrumb span,#newsletter_block_home .title,div.sp-sp-cat .spcat-tabs-container .spcat-tabs .spcat-tab span,div.lastestnews .post .post_content .post-date,div.lastestnews .post .post_content .post_title a,.footer-container #footer h3,.content_v2 #newsletter_block_home h3.title_block,.spcountdownproductslider-time .item-timer .time-item,.spcountdownproductslider-heading .spcountdownproductslider-time .title-time,.content_prices .our_price_display,.content_prices .old_price,div.upsell_product .price-box .price

    3.4 Category Pages

    1. In your Prestashop Admin Dashboard, navigate to Modules and Services >> Modules and Services >> go to MODULES LIST section, search for “SP Theme Configuration” module then click on Configure.

    2. In the SP Theme Settings, choose “Category Pages” to configure the parameters in this section. After finishing, you could go to the front-end to view the changes.

    3.5 Product Pages

    1. In your Prestashop Admin Dashboard, navigate to Modules and Services >> Modules and Services >> go to MODULES LIST section, search for “SP Theme Configuration” module then click on Configure.

    2. In the SP Theme Settings, choose “Product Pages” to configure the parameters in this section. After finishing, you could go to the front-end to view the changes.

    3.6 Bonus Pages

    1. In your Prestashop Admin Dashboard, navigate to Modules and Services >> Modules and Services >> go to MODULES LIST section, search for “SP Theme Configuration” module then click on Configure.

    2. In the SP Theme Settings, choose “Bonus Pages” to configure the parameters in this section. After finishing, you could go to the front-end to view the changes.

    3.7 Advanced Settings

    1. In your Prestashop Admin Dashboard, navigate to Modules and Services >> Modules and Services >> go to MODULES LIST section, search for “SP Theme Configuration” module then click on Configure.

    2. In the SP Theme Settings, choose “Advanced” to configure the parameters in this section. After finishing, you could go to the front-end to view the changes.

    3.8 Social Accounts

    1. In your Prestashop Admin Dashboard, navigate to Modules and Services >> Modules and Services >> go to MODULES LIST section, search for “SP Theme Configuration” module then click on Configure.

    2. In the SP Theme Settings, choose “Social Accounts” to configure the parameters in this section. After finishing, you could go to the front-end to view the changes.

    1. To configure Logo for your store, navigate to PREFERENCES > Themes in your Prestashop Admin Dashboard. Go to Logo tab to set up your logo. Click “Add File” to upload the logo image as you want and “Save”.

    2. Please check the front-end to view the changes.

    3.10 Image Size Adjustment

    In your Prestashop admin dashboard, navigate to: PREFERENCES >> Images to configure the image size for category, manufacturer, supplier, product, etc that fit your layout best.

    1. Image size - You can choose the image size types that suit your products best.

    2. Image quality - You can set image quality in use on your site.

    3. Regenerate thumbnails - To see the changes after you update the image sizes, image quality; you need to re-generate the images used in your site. Select option then click Regenerate thumbnails button.

    Frontend Appearance:

    To edit Copyright, please follow these steps:
    1. In your Prestashop Admin Dashboard, navigate to Modules and Services >> Modules and Services >> go to MODULES LIST section, search for “SP Theme Configuration” module then click on Configure.

    2. In the SP Theme Settings, choose “General” to configure the parameter named “Copyright”in this section. After finishing, you could go to the front-end to see the changes.

    3.12 Edit Payment

    Frontend Appearance:

    To edit Payment, please follow these steps:
    1. In your Prestashop Admin Dashboard, navigate to Modules and Services >> Modules and Services >> go to MODULES LIST section, search for “SP Theme Configuration” module then click on Configure.

    2. In the SP Theme Settings, choose “General” to configure the parameter named “Upload your own payment image” in this section. After finishing, you could go to the front-end to see the changes.

    3.13 Edit Pop-up

    Frontend Appearance:

    To edit this pop-up, please follow these steps:
    1. Change the image:
    In your Website’s Directory, go to themes\sp_topshop\img\icon folder. To change the image in this pop-up, you could replace our sample image named bg_popup.jpg by your image with the same name as our sample image.

    2. Change the text:
    In your Website’s Directory, go to themes\sp_topshop\modules\spblocknewsletter folder. To change the text in this pop-up, in this folder, you could open the file named spblocknewsletterpopup.tpl by your editor program.
    Find and change the following text in this file as you want:

    Subscribe to the Topshop mailing list to receive updates on new arrivals, special offers and other discount information.


    3. After finishing, you could go to the front-end to see the changes.

    4SP MEGA MENU CONFIGURATION

    displayMenu: SP Mega Menu


    1. Navigate to Modules -> Modules >> look for SP Mega Menu >> Click the Configure button to access the module configuration page.

    2. In the SP Mega Menu Panel, you could configure Add New Module by click on the button like the following image:

    3. In the configuration page of new module, you could configure General Options as follows

    4. In the configuration page of new module, you could configure Menu Information as follows

    5. In order to add menu items, to add items as you want, you need to click this button.

    6. Menu list of Mega Menu You need to look at the menu list to configure easily.

    7. To configure each item, you need to click “Edit” button as follows:

    Go Here to readmore about the SP Mega Menu module.

    Note: In the next steps, when editing items in the menus, the items (in a menu) having same level could have same configuration. Therefore, we encourage you read throughtly and find out the item’s level to configure it without any errors.

    Shop
    Frontend Appearance

    • Backend Settings : Please click Here to view.
    • Backend Settings of Item ‘Bags’: Please click Here to view.

    Note: The items named ‘Smartphones’, ‘Chairs’, ‘Light’ having same menu level as item ‘Bags’could have same configuration

    Women
    Frontend Appearance

    • Backend Settings : Please click Here to view.
    • Backend Settings of Item ‘Bags’: Please click Here to view.

    Note: The items named ‘Jackets’, ‘Accessories’ having same menu level as item ‘Bags’ could have same configuration

    • Backend Settings of Item ‘Featured product’: Please click Here to view.

    Men
    Frontend Appearance

    • Backend Settings : Please click Here to view.
    • Backend Settings of Item ‘Bags’: Please click Here to view.

    Note: The items named ‘Shoes’ having same menu level as item ‘Bags’ could have same configuration

    • Backend Settings of Item ‘Images cat’: Please click Here to view.

    Copy and paste the following code into the content:

    <div class="img-cat"><a href="#"><img src="../themes/sp_topshop/img/cms/img-m1.jpg" alt="" /></a></div>

    Kitchen
    Frontend Appearance

    • Backend Settings : Please click Here to view.

    Blog
    Frontend Appearance

    • Backend Settings : Please click Here to view.

    Copy and paste the following code into the URL Tab:

    index.php?fc=module&module=smartblog&controller=category

    About Us
    Frontend Appearance

    • Backend Settings : Please click Here to view.

    Contact Us
    Frontend Appearance

    • Backend Settings : Please click Here to view.
    • Copy and paste the following code into the URL Tab:

    index.php?controller=contact

    • Backend Settings of Item ‘Contact Page 1′ : Please click Here to view.
    • Copy and paste the following code into the URL Tab:

    index.php?controller=contact?SP_contactStyle=contact-v1

    Note: You could do the same with these items having same level in this menu: Contact Page 2, Contact Page 3, Contact Page 4. However, the items’ URLs are different.

    • Copy and paste the following code into the URL Tab of Contact Page 2:
      index.php?controller=contact?SP_contactStyle=contact-v2
    • Copy and paste the following code into the URL Tab of Contact Page 3:
      index.php?controller=contact?SP_contactStyle=contact-v3
    • Copy and paste the following code into the URL Tab of Contact Page 4:
      index.php?controller=contact?SP_contactStyle=contact-v4

    5SP VERTICAL MEGA MENU CONFIGURATION

    displayVerticalMenu: SP Vertical MegaMenu

    Vertical-menu
    1. Navigate to Modules -> Modules >> look for SP Vertical Megamenu >> Click the Configure button to access the module configuration page.

    2. In the SP Vertical Megamenu Panel, you could configure General Options as follows

    3. In the SP Vertical Megamenu Panel, you could configure Menu Information as follows

    4. In order to add menu items, to add items as you want, you need to click this button.

    5. Menu list of Vertical Megamenu You need to look at the menu list to configure easily.

    6. To configure each item, you need to click “Edit” button as follows:

    Go Here to readmore about the SP Vertical Megamenu module.

    Note: In the next steps, when editing items in the menus, the items (in a menu) having same level could have same configuration. Therefore, we encourage you read throughtly and find out the item’s level to configure it without any errors.

    Fashion
    Frontend Appearance

    • Backend Settings : Please click Here to view.
    • Backend Settings of Item ‘Sub cate’: Please click Here to view.
    • Backend Settings of Item ‘T-shirts’ in ‘Sub cate’: Please click Here to view.

    Note: The items named ‘Accessories’, ‘Bags’, ‘Jackets’, ‘Eyes’ , ‘Cras imperdiet’ having same menu level as item ‘T-shirts’ could have same configuration

    • Backend Settings of Item ‘Image Category’: Please click Here to view.
    • Copy and paste the following code into the content:

    <div class="img-cat"><a href="#"><img src="../themes/sp_topshop/img/cms/img-cat1.jpg" alt="" /></a></div>

    Computers
    Frontend Appearance

    • Backend Settings : Please click Here to view.
    • Backend Settings of Item ‘Smartphones’: Please click Here to view.

    Note: The items named ‘Computer Screen’, ‘Laptop’, ‘Notebook’ having same menu level as item ‘Smartphone’ could have same configuration

    • Backend Settings of Item ‘Poroduct Feature’: Please click Here to view.

    Furniture
    Frontend Appearance

    • Backend Settings : Please click Here to view.
    • Backend Settings of Item ‘Bags’: Please click Here to view.

    Note: The items named ‘Shoes’, ‘T-shirt’, ‘Jackets’ having same menu level as item ‘Bags’ could have same configuration

    • Backend Settings of Item ‘Image cate’: Please click Here to view.
    • Copy and paste the following code into the content:

    <div class="images_cat"><a class="img img1" href="#"><img src="../themes/sp_topshop/img/cms/image_cat1.jpg" alt="" /> </a><a class="img img2" href="#"><img src="../themes/sp_topshop/img/cms/image_cat2.jpg" alt="" /> </a></div>

    Smartphone
    Frontend Appearance

    • Backend Settings : Please click Here to view.
    • Backend Settings of Item ‘Sub cate’: Please click Here to view.
    • Backend Settings of Item ‘T-Shirt’ in ‘Sub cate’: Please click Here to view.

    Note: The other items having same menu level as item ‘T-Shirt’ could have same configuration

    Health & Beauty
    Frontend Appearance

    • Backend Settings : Please click Here to view.

    Sport Clothing
    Frontend Appearance

    • Backend Settings : Please click Here to view.

    Note: The other items having same menu level as item ‘Sport Clothing’ could have same configuration

    6EXTENSIONS CONFIGURATION

    6.1 SP Topshop Layout 1

    home-default

    display CustomHTML1

    SP Custom HTML – Call Support
    Frontend Appearance:

    Backend Settings:

    Step 1: In the Pretashop Admin Panel, navigate to Modules and Services >> Modules and Services >> look for “SP Custom HTML” module >> click “Configure” button to configure.

    Step 2: In the “SP Custom HTML” configuration page, click button in the right corner to “ADD NEW MODULE”.

    Step 3: You could configure this module like the following image.


    Copy and paste the following code into the content:

    <div class="call_sp">
    <p>Call Support for Free : (044) 6789 839</p>
    </div>

    displayUserinfo

    SP User Info Block

    Frontend Appearance:

    Backend Settings:

    In the Pretashop Admin Panel, navigate to Modules and Services >> Modules and Services >> look for “SP User Info Block” module >> click “Enable” button to enable this module.

    displayTopNav

    1. SP Block Currencies

    Frontend Appearance:

    Backend Settings:

    In the Pretashop Admin Panel, navigate to Modules and Services >> Modules and Services >> look for “SP Currency Block>> click “Enable” button to enable this module.

    2. SP Block Languages

    Frontend Appearance:

    Backend Settings:

    Step 1: To add language as you want. For example: To add “Arabic” language, in your Admin Panel >> navigate to LOCALIZATION >> Languages >> click button in the right corner to “ADD NEW”.

    Step 2: Fill information into the required field (*) as below:

    Step 3: Click “Save” button and view shop to see the changes.

    Note: When you add any language as you want, for example: Arabic language as above. At the frontend , some images will display “?” image as following:

    .

    To resolve this error, please make the steps following:

    1. In your administator, please find to position of this module, for example: Position – displayHtml4: Fashion; Module: SP Custom HTML.

    .

    2. And click source code to add “../” at before the image url >> Click “OK”.

    .

    3. Click “Save” button and go to the frontend to view the changes.

    display Customhtml2

    SP Custom HTML – Banner Top
    Frontend Appearance:

    Backend Settings:

    Step 1: In the Pretashop Admin Panel, navigate to Modules and Services >> Modules and Services >> look for “SP Custom HTML” module >> click “Configure” button to configure.

    Step 2: In the “SP Custom HTML” configuration page, click button in the right corner to “ADD NEW MODULE”.

    Step 3: You could configure this module like the following image.


    Copy and paste the following code into the content:

    <div class="banner_adv"><a href="#"><img class="mfvwivdixpanpwoszxls" src="http://your-website.yourdomain/themes/sp_topshop/img/cms/adv1.jpg" alt="" /></a></div>

    SP Search Block

    Frontend Appearance:

    Backend Settings:

    Step 1: In the Pretashop Admin Panel, navigate to Modules and Services >> Modules and Services >> look for “SP Search Pro” module >> click “Configure” button to configure.

    Step 2: In the “SP Search Pro” configuration page, click button in the right corner to “ADD NEW MODULE”.

    Step 3: You could configure this module like the following image.

    displayCart

    SP Cart Block

    Frontend Appearance:

    Backend Settings:

    Step 1: In the Pretashop Admin Panel, navigate to Modules and Services >> Modules and Services >> look for “SP Cart Block” module >> click “Configure” button to configure.

    Step 2: In the “SP Cart Block” configuration page, click button in the right corner to “ADD NEW MODULE”.

    Step 3: You could configure this module like the following image.

    displayDeal

    SP Deal – hot deals
    Frontend Appearance:


    Backend Settings:

    Step 1: In the Pretashop Admin Panel, navigate to Modules and Services >> Modules and Services >> look for “SP Deal” module.

    Step 2: In the “SP Deal” configuration page, click button in the right corner to “ADD NEW MODULE”.

    Step 3: You could configure this module like the following image.

    display Customhtml3

    SP Custom HTML – Icon deal
    Frontend Appearance:

    Backend Settings:

    Step 1: In the Pretashop Admin Panel, navigate to Modules and Services >> Modules and Services >> look for “SP Custom HTML” module >> click “Configure” button to configure.

    Step 2: In the “SP Custom HTML” configuration page, click button in the right corner to “ADD NEW MODULE”.

    Step 3: You could configure this module like the following image.


    Copy and paste the following code into the content:

    <div class="deal-posttext">
    <ul>
    <li><a href="#"><img src="../themes/sp_topshop/img/cms/plicy-1.png" alt="" /></a></li>
    <li><a href="#"><img src="../themes/sp_topshop/img/cms/plicy-2.png" alt="" /></a></li>
    <li><a href="#"><img src="../themes/sp_topshop/img/cms/plicy-3.png" alt="" /></a></li>
    </ul>
    </div>

    displaySlideShow1

    Sp slider for your homepage

    Frontend Appearance:

    Backend Settings:

    Step 1: In the Pretashop Admin Panel, navigate to Modules and Services >> Modules and Services >> look for “SP Home Slider” module >> click “Configure” button to configure.

    Step 2: In the “SP Slider For Your Homepage” configuration page, click button in the right corner to “ADD NEW MODULE”.

    Step 3: You could configure this module like the following image.

    Step 4: In the last part named Slides List of this configuration page, click button in the right corner to add new slide and edit slide’s information as follows:

    • Sample 1: Please click Here to view
      Copy and paste the following code into the source code field:
      <h3>THE new</h3>
      <h2>handbags <em> shapes</em></h2>
      <h4>FREE SHIPPING FOR THIS PRODUCT</h4>
      <div class="button-slider"><a href="#">shop new handbag</a></div>
    • Sample 2: Please click Here to view

      Note: The code in the source code field of sample 2 could be the same as that of the sample 1

    • Sample 3: Please click Here to view

      Note: The code in the source code field of sample 3 could be the same as that of the sample 1

    display Customhtml4

    SP Custom HTML – Icon deal
    Frontend Appearance:

    Backend Settings:

    Step 1: In the Pretashop Admin Panel, navigate to Modules and Services >> Modules and Services >> look for “SP Custom HTML” module >> click “Configure” button to configure.

    Step 2: In the “SP Custom HTML” configuration page, click button in the right corner to “ADD NEW MODULE”.

    Step 3: You could configure this module like the following image.


    Copy and paste the following code into the content:

    <div class="trending"><a href="#"><img src="../themes/sp_topshop/img/cms/banner01.jpg" alt="" /></a></div>

    display Customhtml5

    SP Custom HTML – Fashion2
    Frontend Appearance:

    Backend Settings:

    Step 1: In the Pretashop Admin Panel, navigate to Modules and Services >> Modules and Services >> look for “SP Custom HTML” module >> click “Configure” button to configure.

    Step 2: In the “SP Custom HTML” configuration page, click button in the right corner to “ADD NEW MODULE”.

    Step 3: You could configure this module like the following image.


    Copy and paste the following code into the content:

    <div class="trending2"><a href="#"><img src="../themes/sp_topshop/img/cms/banner02.jpg" alt="" /></a></div>

    display Newsletter

    SP Newsletter Block
    Frontend Appearance:

    Backend Settings:

    Step 1: In the Pretashop Admin Panel, navigate to Modules and Services >> Modules and Services >> look for “SP Newsletter Block” module.

    Step 2: You could configure its settings like the following image.


    To edit the text in this module, please follow these steps:
    In your Website’s Directory, go to themes\sp_topshop\modules\spblocknewsletter folder. To change the text in this module, in this folder, you could open the file named blocknewsletter.tpl by your editor program.
    Find and change the text you want to edit, such as: SUBCRIBE EMAIL, Lorem Ipsum is simply dummy text of the printing and typesetting industry dummy, Enter your email address …

    display Customhtml6

    SP Custom HTML – Fashion3
    Frontend Appearance:

    Backend Settings:

    Step 1: In the Pretashop Admin Panel, navigate to Modules and Services >> Modules and Services >> look for “SP Custom HTML” module >> click “Configure” button to configure.

    Step 2: In the “SP Custom HTML” configuration page, click button in the right corner to “ADD NEW MODULE”.

    Step 3: You could configure this module like the following image.


    Copy and paste the following code into the content:

    <div class="trending3"><a href="#"><img src="../themes/sp_topshop/img/cms/banner03.jpg" alt="" /></a></div>

    displaySuperCategory1

    SP Super Category – Super layout1 (1)
    Frontend Appearance:

    Backend Settings:

    Step 1: In the Pretashop Admin Panel, navigate to Modules and Services >> Modules and Services >> look for “SP Super Category” module.

    Step 2: In the “SP Super Category” configuration page, click button in the right corner to “ADD NEW MODULE”.

    Step 3: You could configure this module like the following image.

    display Customhtml7

    SP Custom HTML – Banner Center
    Frontend Appearance:

    Backend Settings:

    Step 1: In the Pretashop Admin Panel, navigate to Modules and Services >> Modules and Services >> look for “SP Custom HTML” module >> click “Configure” button to configure.

    Step 2: In the “SP Custom HTML” configuration page, click button in the right corner to “ADD NEW MODULE”.

    Step 3: You could configure this module like the following image.


    Copy and paste the following code into the content:

    <div class="banner_center"><a href="#"><img src="../themes/sp_topshop/img/cms/banner04.jpg" alt="" /></a></div>

    display Customhtml12

    SP Custom HTML – Banner Super 1 left
    Frontend Appearance:

    Backend Settings:

    Step 1: In the Pretashop Admin Panel, navigate to Modules and Services >> Modules and Services >> look for “SP Custom HTML” module >> click “Configure” button to configure.

    Step 2: In the “SP Custom HTML” configuration page, click button in the right corner to “ADD NEW MODULE”.

    Step 3: You could configure this module like the following image.


    Copy and paste the following code into the content:

    <div class="banner-c-brand">
    <div class="banner"><a class="first-image" title="Static Image" href="#"><img class="img-static" src="../themes/sp_topshop/img/cms/cate_left_1.jpg" alt="Static Image" /></a></div>
    <div class="brand">
    <ul>
    <li><a class="first-image" title="Static Image" href="#"><img class="img-static" src="../themes/sp_topshop/img/cms/brand-c-1.jpg" alt="Static Image" /></a></li>
    <li><a class="first-image" title="Static Image" href="#"><img class="img-static" src="../themes/sp_topshop/img/cms/brand-c-2.jpg" alt="Static Image" /></a></li>
    <li><a class="first-image" title="Static Image" href="#"><img class="img-static" src="../themes/sp_topshop/img/cms/brand-c-3.jpg" alt="Static Image" /></a></li>
    <li><a class="first-image" title="Static Image" href="#"><img class="img-static" src="../themes/sp_topshop/img/cms/brand-c-4.jpg" alt="Static Image" /></a></li>
    </ul>
    </div>
    </div>

    display Customhtml11

    SP Custom HTML – Banner Super 1 center
    Frontend Appearance:

    Backend Settings:

    Step 1: In the Pretashop Admin Panel, navigate to Modules and Services >> Modules and Services >> look for “SP Custom HTML” module >> click “Configure” button to configure.

    Step 2: In the “SP Custom HTML” configuration page, click button in the right corner to “ADD NEW MODULE”.

    Step 3: You could configure this module like the following image.


    Copy and paste the following code into the content:

    <div class="image"><a href="#"><img src="../themes/sp_topshop/img/cms/cate01.jpg" alt="" /></a></div>

    displaySuperCategory2

    SP Super Category – Fashion & accessories
    Frontend Appearance:

    Backend Settings:

    Step 1: In the Pretashop Admin Panel, navigate to Modules and Services >> Modules and Services >> look for “SP Super Category” module.

    Step 2: In the “SP Super Category” configuration page, click button in the right corner to “ADD NEW MODULE”.

    Step 3: You could configure this module like the following image.

    display Customhtml13

    SP Custom HTML – Banner Super 2 left
    Frontend Appearance:

    Backend Settings:

    Step 1: In the Pretashop Admin Panel, navigate to Modules and Services >> Modules and Services >> look for “SP Custom HTML” module >> click “Configure” button to configure.

    Step 2: In the “SP Custom HTML” configuration page, click button in the right corner to “ADD NEW MODULE”.

    Step 3: You could configure this module like the following image.


    Copy and paste the following code into the content:

    <div class="banner-c-brand">
    <div class="banner"><a class="first-image" title="Static Image" href="#"><img class="img-static" src="../themes/sp_topshop/img/cms/cate_left_2.jpg" alt="Static Image" /></a></div>
    <div class="brand">
    <ul>
    <li><a class="first-image" title="Static Image" href="#"><img class="img-static" src="../themes/sp_topshop/img/cms/brand-c-1.jpg" alt="Static Image" /></a></li>
    <li><a class="first-image" title="Static Image" href="#"><img class="img-static" src="../themes/sp_topshop/img/cms/brand-c-2.jpg" alt="Static Image" /></a></li>
    <li><a class="first-image" title="Static Image" href="#"><img class="img-static" src="../themes/sp_topshop/img/cms/brand-c-3.jpg" alt="Static Image" /></a></li>
    <li><a class="first-image" title="Static Image" href="#"><img class="img-static" src="../themes/sp_topshop/img/cms/brand-c-4.jpg" alt="Static Image" /></a></li>
    </ul>
    </div>
    </div>

    display Customhtml14

    SP Custom HTML – Banner Super 2 center
    Frontend Appearance:

    Backend Settings:

    Step 1: In the Pretashop Admin Panel, navigate to Modules and Services >> Modules and Services >> look for “SP Custom HTML” module >> click “Configure” button to configure.

    Step 2: In the “SP Custom HTML” configuration page, click button in the right corner to “ADD NEW MODULE”.

    Step 3: You could configure this module like the following image.


    Copy and paste the following code into the content:

    <div class="image"><a href="#"><img src="../themes/sp_topshop/img/cms/cate02.jpg" alt="" /></a></div>

    displaySuperCategory3

    SP Super Category – Furniture
    Frontend Appearance:

    Backend Settings:

    Step 1: In the Pretashop Admin Panel, navigate to Modules and Services >> Modules and Services >> look for “SP Super Category” module.

    Step 2: In the “SP Super Category” configuration page, click button in the right corner to “ADD NEW MODULE”.

    Step 3: You could configure this module like the following image.

    display Customhtml15

    SP Custom HTML – Banner Super 3 left
    Frontend Appearance:

    Backend Settings:

    Step 1: In the Pretashop Admin Panel, navigate to Modules and Services >> Modules and Services >> look for “SP Custom HTML” module >> click “Configure” button to configure.

    Step 2: In the “SP Custom HTML” configuration page, click button in the right corner to “ADD NEW MODULE”.

    Step 3: You could configure this module like the following image.


    Copy and paste the following code into the content:

    <div class="banner-c-brand">
    <div class="banner"><a class="first-image" title="Static Image" href="#"><img class="img-static" src="../themes/sp_topshop/img/cms/cate_left_3.jpg" alt="Static Image" /></a></div>
    <div class="brand">
    <ul>
    <li><a class="first-image" title="Static Image" href="#"><img class="img-static" src="../themes/sp_topshop/img/cms/brand-c-1.jpg" alt="Static Image" /></a></li>
    <li><a class="first-image" title="Static Image" href="#"><img class="img-static" src="../themes/sp_topshop/img/cms/brand-c-2.jpg" alt="Static Image" /></a></li>
    <li><a class="first-image" title="Static Image" href="#"><img class="img-static" src="../themes/sp_topshop/img/cms/brand-c-3.jpg" alt="Static Image" /></a></li>
    <li><a class="first-image" title="Static Image" href="#"><img class="img-static" src="../themes/sp_topshop/img/cms/brand-c-4.jpg" alt="Static Image" /></a></li>
    </ul>
    </div>
    </div>

    display Customhtml16

    SP Custom HTML – Banner Super 3 center
    Frontend Appearance:

    Backend Settings:

    Step 1: In the Pretashop Admin Panel, navigate to Modules and Services >> Modules and Services >> look for “SP Custom HTML” module >> click “Configure” button to configure.

    Step 2: In the “SP Custom HTML” configuration page, click button in the right corner to “ADD NEW MODULE”.

    Step 3: You could configure this module like the following image.


    Copy and paste the following code into the content:

    <div class="image"><a href="#"><img src="../themes/sp_topshop/img/cms/cate03.jpg" alt="" /></a></div>

    displaySuperCategory4

    SP Super Category – Computer & Accessories
    Frontend Appearance:

    Backend Settings:

    Step 1: In the Pretashop Admin Panel, navigate to Modules and Services >> Modules and Services >> look for “SP Super Category” module.

    Step 2: In the “SP Super Category” configuration page, click button in the right corner to “ADD NEW MODULE”.

    Step 3: You could configure this module like the following image.

    display Customhtml17

    SP Custom HTML – Banner Super 4 left
    Frontend Appearance:

    Backend Settings:

    Step 1: In the Pretashop Admin Panel, navigate to Modules and Services >> Modules and Services >> look for “SP Custom HTML” module >> click “Configure” button to configure.

    Step 2: In the “SP Custom HTML” configuration page, click button in the right corner to “ADD NEW MODULE”.

    Step 3: You could configure this module like the following image.


    Copy and paste the following code into the content:

    <div class="banner-c-brand">
    <div class="banner"><a class="first-image" title="Static Image" href="#"><img class="img-static" src="../themes/sp_topshop/img/cms/cate_left_4.jpg" alt="Static Image" /></a></div>
    <div class="brand">
    <ul>
    <li><a class="first-image" title="Static Image" href="#"><img class="img-static" src="../themes/sp_topshop/img/cms/brand-c-1.jpg" alt="Static Image" /></a></li>
    <li><a class="first-image" title="Static Image" href="#"><img class="img-static" src="../themes/sp_topshop/img/cms/brand-c-2.jpg" alt="Static Image" /></a></li>
    <li><a class="first-image" title="Static Image" href="#"><img class="img-static" src="../themes/sp_topshop/img/cms/brand-c-3.jpg" alt="Static Image" /></a></li>
    <li><a class="first-image" title="Static Image" href="#"><img class="img-static" src="../themes/sp_topshop/img/cms/brand-c-4.jpg" alt="Static Image" /></a></li>
    </ul>
    </div>
    </div>

    display Customhtml18

    SP Custom HTML – Banner Super 4 center
    Frontend Appearance:

    Backend Settings:

    Step 1: In the Pretashop Admin Panel, navigate to Modules and Services >> Modules and Services >> look for “SP Custom HTML” module >> click “Configure” button to configure.

    Step 2: In the “SP Custom HTML” configuration page, click button in the right corner to “ADD NEW MODULE”.

    Step 3: You could configure this module like the following image.


    Copy and paste the following code into the content:

    <div class="image"><a href="#"><img src="../themes/sp_topshop/img/cms/cate04.jpg" alt="" /></a></div>

    displaySuperCategory5

    SP Super Category – Computer & Accessories
    Frontend Appearance:

    Backend Settings:

    Step 1: In the Pretashop Admin Panel, navigate to Modules and Services >> Modules and Services >> look for “SP Super Category” module.

    Step 2: In the “SP Super Category” configuration page, click button in the right corner to “ADD NEW MODULE”.

    Step 3: You could configure this module like the following image.

    display Home News

    SP SmartBlog Home Lastest
    Frontend Appearance:

    Backend Settings:

    Step 1: In the Pretashop Admin Panel, navigate to Modules and Services >> Modules and Services >> look for “SmartBlog Home Lastest” module.

    Step 2: You could configure this module like the following image.

    displayManufacturer

    SP Manufacture Slider – Manufacturers
    Frontend Appearance:

    Backend Settings:

    Step 1: In the Pretashop Admin Panel, navigate to Modules and Services >> Modules and Services >> look for “SP Manufacture Slider” module.

    Step 2: In the “SP Deal” configuration page, click button in the right corner to “ADD NEW MODULE”.

    Step 3: You could configure this module like the following image.

    display Customhtml8

    SP Custom HTML – Logo info footer
    Frontend Appearance:

    Backend Settings:

    Step 1: In the Pretashop Admin Panel, navigate to Modules and Services >> Modules and Services >> look for “SP Custom HTML” module >> click “Configure” button to configure.

    Step 2: In the “SP Custom HTML” configuration page, click button in the right corner to “ADD NEW MODULE”.

    Step 3: You could configure this module like the following image.


    Copy and paste the following code into the content:

    <div class="logo_bgr">
    <div class="img_logo"></div>
    <div class="pre_text">There are many variations of passages of Lorem Ipsum available, but the majority have suffered alteration in some form, by injected humour, or randomised words which dont look even slightly believable. If you are going to use a passage of Lorem Ipsum, you need to be sure there isnt anything embarrassing hidden in the middle of text.</div>
    </div>

    SP Theme Configuration

    Frontend Appearance:

    Backend Settings: Go Here to see the backend settings.

    Contact Information Block
    Frontend Appearance:

    Backend Settings:

    Step 1: In the Pretashop Admin Panel, navigate to Modules and Services >> Modules and Services >> look for “Contact Information Block” module.

    Step 2: You could configure this module like the following image.

    display Customhtml9

    SP Custom HTML – Information
    Frontend Appearance:

    Backend Settings:

    Step 1: In the Pretashop Admin Panel, navigate to Modules and Services >> Modules and Services >> look for “SP Custom HTML” module >> click “Configure” button to configure.

    Step 2: In the “SP Custom HTML” configuration page, click button in the right corner to “ADD NEW MODULE”.

    Step 3: You could configure this module like the following image.


    Copy and paste the following code into the content:

    <ul>
    <li><a href="#">About Us</a></li>
    <li><a href="#">Jobs</a></li>
    <li><a href="#">Delivery Information</a></li>
    <li><a href="#">Privacy Policy</a></li>
    <li><a href="#">Term and Conditions</a></li>
    </ul>

    display Customhtml10

    SP Custom HTML – My Account
    Frontend Appearance:

    Backend Settings:

    Step 1: In the Pretashop Admin Panel, navigate to Modules and Services >> Modules and Services >> look for “SP Custom HTML” module >> click “Configure” button to configure.

    Step 2: In the “SP Custom HTML” configuration page, click button in the right corner to “ADD NEW MODULE”.

    Step 3: You could configure this module like the following image.


    Copy and paste the following code into the content:

    <ul>
    <li><a href="#">My Account</a></li>
    <li><a href="#">Log in</a></li>
    <li><a href="#">My Cart</a></li>
    <li><a href="#">My Wishlist</a></li>
    <li><a href="#">My Compare</a></li>
    </ul>

    displayTag

    SP Tags Block
    Frontend Appearance:

    Backend Settings:

    Step 1: In the Pretashop Admin Panel, navigate to Modules and Services >> Modules and Services >> look for “SP Tags Block” module.

    Step 2: You could configure this module like the following image.

    SP Custom HTML – Menu Footer
    Frontend Appearance:

    Backend Settings:

    Step 1: In the Pretashop Admin Panel, navigate to Modules and Services >> Modules and Services >> look for “SP Custom HTML” module >> click “Configure” button to configure.

    Step 2: In the “SP Custom HTML” configuration page, click button in the right corner to “ADD NEW MODULE”.

    Step 3: You could configure this module like the following image.


    Copy and paste the following code into the content:

    <div class="menu-footer"><a class="titile_cate" href="#">WATCHES :</a>
    <ul>
    <li><a href="#">Watches</a></li>
    <li><a href="#">Titan Watches</a></li>
    <li><a href="#">Casio Watches</a></li>
    <li><a href="#">Fastrack Watches</a></li>
    <li><a href="#">Timex Watches</a></li>
    <li><a href="#">Fossil Watches</a></li>
    <li><a href="#">Diesel Watches </a></li>
    <li><a href="#">Luxury Watches</a></li>
    <li><a href="#">View all</a></li>
    </ul>
    </div>
    <div class="menu-footer"><a class="titile_cate" href="#">CLOTHING :</a>
    <ul>
    <li><a href="#">Shirts</a></li>
    <li><a href="#">Jeans</a></li>
    <li><a href="#">T shirts</a></li>
    <li><a href="#">Kurtis</a></li>
    <li><a href="#">Sarees</a></li>
    <li><a href="#">Levis Jeans </a></li>
    <li><a href="#">Killer Jeans</a></li>
    <li><a href="#">Pepe Jeans</a></li>
    <li><a href="#">Arrow Shirts</a></li>
    <li><a href="#">Ethnic Wear</a></li>
    <li><a href="#">Formal Shirts</a></li>
    <li><a href="#">Peter England Shirts</a></li>
    <li><a href="#">View all</a></li>
    </ul>
    </div>
    <div class="menu-footer"><a class="titile_cate" href="#">FOOTWEAR :</a>
    <ul>
    <li><a href="#">Shoes</a></li>
    <li><a href="#">Casual Shoes</a></li>
    <li><a href="#">Adidas Shoes</a></li>
    <li><a href="#">Gas Shoes</a></li>
    <li><a href="#">Puma Shoes</a></li>
    <li><a href="#">Reebok Shoes</a></li>
    <li><a href="#">Woodland Shoes</a></li>
    <li><a href="#">Red tape Shoes</a></li>
    <li><a href="#">Nike Shoes</a></li>
    <li><a href="#">View all</a></li>
    </ul>
    </div>

    6.2 SP Topshop Layout 2

    home-layout2

    displaySlideShow2

    Sp slider for your homepage

    Frontend Appearance:

    Backend Settings:

    Step 1: In the Pretashop Admin Panel, navigate to Modules and Services >> Modules and Services >> look for “SP Home Slider” module >> click “Configure” button to configure.

    Step 2: In the “SP Slider For Your Homepage” configuration page, click button in the right corner to “ADD NEW MODULE”.

    Step 3: You could configure this module like the following image.

    Step 4: In the last part named Slides List of this configuration page, click button in the right corner to add new slide and edit slide’s information as follows:

    • Sample 4: Please click Here to view
    • Sample 5: Please click Here to view
    • Sample 6: Please click Here to view

    display CustomHTML19

    SP Custom HTML – Fashion4 layout2
    Frontend Appearance:

    Backend Settings:

    Step 1: In the Pretashop Admin Panel, navigate to Modules and Services >> Modules and Services >> look for “SP Custom HTML” module >> click “Configure” button to configure.

    Step 2: In the “SP Custom HTML” configuration page, click button in the right corner to “ADD NEW MODULE”.

    Step 3: You could configure this module like the following image.


    Copy and paste the following code into the content:

    <div class="trending2"><a href="#"><img src="../themes/sp_topshop/img/cms/banner05.jpg" alt="" /></a></div>

    6.3 SP Topshop Layout 3

    home-layout3

    displaySlideShow3

    Sp slider for your homepage

    Frontend Appearance:

    Backend Settings:

    Step 1: In the Pretashop Admin Panel, navigate to Modules and Services >> Modules and Services >> look for “SP Home Slider” module >> click “Configure” button to configure.

    Step 2: In the “SP Slider For Your Homepage” configuration page, click button in the right corner to “ADD NEW MODULE”.

    Step 3: You could configure this module like the following image.

    Step 4: In the last part named Slides List of this configuration page, click button in the right corner to add new slide and edit slide’s information as follows:

    • Sample 7: Please click Here to view
      Copy and paste the following code into the source code field:
      
      		
    • Sample 8: Please click Here to view

      Note: The code in the source code field of sample 8 could be the same as that of the sample 7

    • Sample 9: Please click Here to view

      Note: The code in the source code field of sample 9 could be the same as that of the sample 7

    display CustomHTML20

    SP Custom HTML – Banner right slider layout2
    Frontend Appearance:

    Backend Settings:

    Step 1: In the Pretashop Admin Panel, navigate to Modules and Services >> Modules and Services >> look for “SP Custom HTML” module >> click “Configure” button to configure.

    Step 2: In the “SP Custom HTML” configuration page, click button in the right corner to “ADD NEW MODULE”.

    Step 3: You could configure this module like the following image.


    Copy and paste the following code into the content:

    <div class="banner-slider">
    <div class="img1"><a href="#"><img src="../themes/sp_topshop/img/cms/banner06.jpg" alt="" /></a></div>
    <div class="img2"><a href="#"><img src="../themes/sp_topshop/img/cms/banner07.jpg" alt="" /></a></div>
    </div>

    displayExtraSlider

    SP Extra Slider – Featured Products
    Frontend Appearance:

    Backend Settings:

    Step 1: In the Pretashop Admin Panel, navigate to Modules and Services >> Modules and Services >> look for “SP Extra Slider” module.

    Step 2: In the “SP Extra Slider” configuration page, click button in the right corner to “ADD NEW MODULE”.

    Step 3: You could configure this module like the following image.

    displayDeal2

    SP Deal – hot deals
    Frontend Appearance:

    Backend Settings:

    Step 1: In the Pretashop Admin Panel, navigate to Modules and Services >> Modules and Services >> look for “SP Deal” module.

    Step 2: In the “SP Deal” configuration page, click button in the right corner to “ADD NEW MODULE”.

    Step 3: You could configure this module like the following image.

    displayExtraSlider2

    SP Extra Slider – Bestseller
    Frontend Appearance:

    Backend Settings:

    Step 1: In the Pretashop Admin Panel, navigate to Modules and Services >> Modules and Services >> look for “SP Extra Slider” module.

    Step 2: In the “SP Extra Slider” configuration page, click button in the right corner to “ADD NEW MODULE”.

    Step 3: You could configure this module like the following image.

    displaySuperCategory6

    SP Super Category – Fashion & accessories
    Frontend Appearance:

    Backend Settings:

    Step 1: In the Pretashop Admin Panel, navigate to Modules and Services >> Modules and Services >> look for “SP Super Category” module.

    Step 2: In the “SP Super Category” configuration page, click button in the right corner to “ADD NEW MODULE”.

    Step 3: You could configure this module like the following image.

    display CustomHTML21

    SP Custom HTML – Banner left layout3
    Frontend Appearance:

    Backend Settings:

    Step 1: In the Pretashop Admin Panel, navigate to Modules and Services >> Modules and Services >> look for “SP Custom HTML” module >> click “Configure” button to configure.

    Step 2: In the “SP Custom HTML” configuration page, click button in the right corner to “ADD NEW MODULE”.

    Step 3: You could configure this module like the following image.


    Copy and paste the following code into the content:

    <div class="banner-left"><a href="#"><img src="../themes/sp_topshop/img/cms/banner08.jpg" alt="" /></a></div>

    displaySuperCategory7

    SP Super Category – Furniture
    Frontend Appearance:

    Backend Settings:

    Step 1: In the Pretashop Admin Panel, navigate to Modules and Services >> Modules and Services >> look for “SP Super Category” module.

    Step 2: In the “SP Super Category” configuration page, click button in the right corner to “ADD NEW MODULE”.

    Step 3: You could configure this module like the following image.

    displayExtraSlider3

    SP Extra Slider – New Products
    Frontend Appearance:

    Backend Settings:

    Step 1: In the Pretashop Admin Panel, navigate to Modules and Services >> Modules and Services >> look for “SP Extra Slider” module.

    Step 2: In the “SP Extra Slider” configuration page, click button in the right corner to “ADD NEW MODULE”.

    Step 3: You could configure this module like the following image.

    display CustomHTML21

    SP Custom HTML – Banner left 2 layout3
    Frontend Appearance:

    Backend Settings:

    Step 1: In the Pretashop Admin Panel, navigate to Modules and Services >> Modules and Services >> look for “SP Custom HTML” module >> click “Configure” button to configure.

    Step 2: In the “SP Custom HTML” configuration page, click button in the right corner to “ADD NEW MODULE”.

    Step 3: You could configure this module like the following image.


    Copy and paste the following code into the content:

    <div class="banner-left"><a href="#"><img src="../themes/sp_topshop/img/cms/banner09.jpg" alt="" /></a></div>

    displaySuperCategory8

    SP Super Category – Furniture
    Frontend Appearance:

    Backend Settings:

    Step 1: In the Pretashop Admin Panel, navigate to Modules and Services >> Modules and Services >> look for “SP Super Category” module.

    Step 2: In the “SP Super Category” configuration page, click button in the right corner to “ADD NEW MODULE”.

    Step 3: You could configure this module like the following image.

    displayManufacturer

    SP Manufacture Slider – Manufacturers
    Frontend Appearance:

    Backend Settings:

    Step 1: In the Pretashop Admin Panel, navigate to Modules and Services >> Modules and Services >> look for “SP Manufacture Slider” module.

    Step 2: In the “SP Deal” configuration page, click button in the right corner to “ADD NEW MODULE”.

    Step 3: You could configure this module like the following image.

    6.4 SP Topshop Layout 4

    home-layout4

    display CustomHTML23

    SP Custom HTML – Banner Top layout4
    Frontend Appearance:

    Backend Settings:

    Step 1: In the Pretashop Admin Panel, navigate to Modules and Services >> Modules and Services >> look for “SP Custom HTML” module >> click “Configure” button to configure.

    Step 2: In the “SP Custom HTML” configuration page, click button in the right corner to “ADD NEW MODULE”.

    Step 3: You could configure this module like the following image.


    Copy and paste the following code into the content:

    <div class="banner_adv"><a href="#"><img class="mfvwivdixpanpwoszxls" src="http://www.your-website.yourdomain/themes/sp_topshop/img/cms/adv2.jpg" alt="" /></a></div>

    displaySlideShow4

    Sp slider for your homepage

    Frontend Appearance:

    Backend Settings:

    Step 1: In the Pretashop Admin Panel, navigate to Modules and Services >> Modules and Services >> look for “SP Home Slider” module >> click “Configure” button to configure.

    Step 2: In the “SP Slider For Your Homepage” configuration page, click button in the right corner to “ADD NEW MODULE”.

    Step 3: You could configure this module like the following image.

    Step 4: In the last part named Slides List of this configuration page, click button in the right corner to add new slide and edit slide’s information as follows:

    • Sample 10: Please click Here to view
      Copy and paste the following code into the source code field:
      <h3>THE new</h3>
      <h2>handbags <em> shapes</em></h2>
      <h4>FREE SHIPPING FOR THIS PRODUCT</h4>
      <div class="button-slider"><a href="#">shop new handbag</a></div>
    • Sample 11: Please click Here to view

      Note: The code in the source code field of sample 11 could be the same as that of the sample 10

    • Sample 12: Please click Here to view

      Note: The code in the source code field of sample 12 could be the same as that of the sample 10

    display CustomHTML24

    SP Custom HTML – Fashion3 layout4
    Frontend Appearance:

    Backend Settings:

    Step 1: In the Pretashop Admin Panel, navigate to Modules and Services >> Modules and Services >> look for “SP Custom HTML” module >> click “Configure” button to configure.

    Step 2: In the “SP Custom HTML” configuration page, click button in the right corner to “ADD NEW MODULE”.

    Step 3: You could configure this module like the following image.


    Copy and paste the following code into the content:

    <div class="trending3"><a href="#"><img src="../themes/sp_topshop/img/cms/banner10.jpg" alt="" /></a></div>

    displayCountdownProduct

    SP Countdown Products Slider – Hot deals
    Frontend Appearance:

    Backend Settings:

    Step 1: In the Pretashop Admin Panel, navigate to Modules and Services >> Modules and Services >> look for “SP Countdown Products Slider” module.

    Step 2: In the “SP Extra Slider” configuration page, click button in the right corner to “ADD NEW MODULE”.

    Step 3: You could configure this module like the following image.

    display CustomHTML25

    SP Custom HTML – Adv Women
    Frontend Appearance:

    Backend Settings:

    Step 1: In the Pretashop Admin Panel, navigate to Modules and Services >> Modules and Services >> look for “SP Custom HTML” module >> click “Configure” button to configure.

    Step 2: In the “SP Custom HTML” configuration page, click button in the right corner to “ADD NEW MODULE”.

    Step 3: You could configure this module like the following image.


    Copy and paste the following code into the content:

    <div class="adv_content"><a href="#"><img src="../themes/sp_topshop/img/cms/cate05.jpg" alt="" /></a></div>

    displaySuperCategory9

    SP Super Category – Women
    Frontend Appearance:

    Backend Settings:

    Step 1: In the Pretashop Admin Panel, navigate to Modules and Services >> Modules and Services >> look for “SP Super Category” module.

    Step 2: In the “SP Super Category” configuration page, click button in the right corner to “ADD NEW MODULE”.

    Step 3: You could configure this module like the following image.

    displaySuperCategory10

    SP Super Category – Men
    Frontend Appearance:

    Backend Settings:

    Step 1: In the Pretashop Admin Panel, navigate to Modules and Services >> Modules and Services >> look for “SP Super Category” module.

    Step 2: In the “SP Super Category” configuration page, click button in the right corner to “ADD NEW MODULE”.

    Step 3: You could configure this module like the following image.

    display CustomHTML26

    SP Custom HTML – Adv Men
    Frontend Appearance:

    Backend Settings:

    Step 1: In the Pretashop Admin Panel, navigate to Modules and Services >> Modules and Services >> look for “SP Custom HTML” module >> click “Configure” button to configure.

    Step 2: In the “SP Custom HTML” configuration page, click button in the right corner to “ADD NEW MODULE”.

    Step 3: You could configure this module like the following image.


    Copy and paste the following code into the content:

    <div class="adv_content"><a href="#"><img src="../themes/sp_topshop/img/cms/cate06.jpg" alt="" /></a></div>

    display CustomHTML27

    SP Custom HTML – Shoe & Accessories
    Frontend Appearance:

    Backend Settings:

    Step 1: In the Pretashop Admin Panel, navigate to Modules and Services >> Modules and Services >> look for “SP Custom HTML” module >> click “Configure” button to configure.

    Step 2: In the “SP Custom HTML” configuration page, click button in the right corner to “ADD NEW MODULE”.

    Step 3: You could configure this module like the following image.


    Copy and paste the following code into the content:

    <div class="adv_content"><a href="#"><img src="../themes/sp_topshop/img/cms/cate07.jpg" alt="" /></a></div>

    displaySuperCategory11

    SP Super Category – Shoe & Accessories
    Frontend Appearance:

    Backend Settings:

    Step 1: In the Pretashop Admin Panel, navigate to Modules and Services >> Modules and Services >> look for “SP Super Category” module.

    Step 2: In the “SP Super Category” configuration page, click button in the right corner to “ADD NEW MODULE”.

    Step 3: You could configure this module like the following image.

    display CustomHTML28

    SP Custom HTML – banner bottom layout4
    Frontend Appearance:

    Backend Settings:

    Step 1: In the Pretashop Admin Panel, navigate to Modules and Services >> Modules and Services >> look for “SP Custom HTML” module >> click “Configure” button to configure.

    Step 2: In the “SP Custom HTML” configuration page, click button in the right corner to “ADD NEW MODULE”.

    Step 3: You could configure this module like the following image.


    Copy and paste the following code into the content:

    <div class="bannerbottom">
    <div class="col-sm-6"><a href="#"><img src="../themes/sp_topshop/img/cms/banner11.jpg" alt="" /></a></div>
    <div class="col-sm-6"><a href="#"><img src="../themes/sp_topshop/img/cms/banner12.jpg" alt="" /></a></div>
    </div>

    6.5 SP Topshop Layout 5

    home-layout5

    displaySlideShow5

    Sp slider for your homepage

    Frontend Appearance:

    Backend Settings:

    Step 1: In the Pretashop Admin Panel, navigate to Modules and Services >> Modules and Services >> look for “SP Home Slider” module >> click “Configure” button to configure.

    Step 2: In the “SP Slider For Your Homepage” configuration page, click button in the right corner to “ADD NEW MODULE”.

    Step 3: You could configure this module like the following image.

    Step 4: In the last part named Slides List of this configuration page, click button in the right corner to add new slide and edit slide’s information as follows:

    • Sample 13: Please click Here to view
    • Sample 14: Please click Here to view
    • Sample 15: Please click Here to view

    display CustomHTML29

    SP Custom HTML – banner slider layout5
    Frontend Appearance:

    Backend Settings:

    Step 1: In the Pretashop Admin Panel, navigate to Modules and Services >> Modules and Services >> look for “SP Custom HTML” module >> click “Configure” button to configure.

    Step 2: In the “SP Custom HTML” configuration page, click button in the right corner to “ADD NEW MODULE”.

    Step 3: You could configure this module like the following image.


    Copy and paste the following code into the content:

    <div class="banerslider"><a href="#"><img src="../themes/sp_topshop/img/cms/banner13.jpg" alt="" /></a></div>

    display CustomHTML30

    SP Custom HTML – Custom service layout5
    Frontend Appearance:

    Backend Settings:

    Step 1: In the Pretashop Admin Panel, navigate to Modules and Services >> Modules and Services >> look for “SP Custom HTML” module >> click “Configure” button to configure.

    Step 2: In the “SP Custom HTML” configuration page, click button in the right corner to “ADD NEW MODULE”.

    Step 3: You could configure this module like the following image.


    Copy and paste the following code into the content:

    <div class="static-service-1-index5">
    <div class="row">
    <div class="col-lg-4 col-md-4 col-sm-4 col-xs-4 item-service">
    <div class="icon1"></div>
    <div class="info">
    <p class="title">Free Shipping</p>
    <p class="desc">On orders over $99.99</p>
    </div>
    </div>
    <div class="col-lg-4 col-md-4 col-sm-4 col-xs-4  item-service">
    <div class="icon2"></div>
    <div class="info">
    <p class="title">Money Back 100%</p>
    <p class="desc">Within 30 Days after delivery</p>
    </div>
    </div>
    <div class="col-lg-4 col-md-4 col-sm-4 col-xs-4  item-service">
    <div class="icon3"></div>
    <div class="info">
    <p class="title">Support 24/7</p>
    <p class="desc">Support 100%</p>
    </div>
    </div>
    </div>
    </div>

    display CustomHTML32

    SP Custom HTML – banner layout5 (1)
    Frontend Appearance:

    Backend Settings:

    Step 1: In the Pretashop Admin Panel, navigate to Modules and Services >> Modules and Services >> look for “SP Custom HTML” module >> click “Configure” button to configure.

    Step 2: In the “SP Custom HTML” configuration page, click button in the right corner to “ADD NEW MODULE”.

    Step 3: You could configure this module like the following image.


    Copy and paste the following code into the content:

    <p><a href="#"><img src="../themes/sp_topshop/img/cms/banner15.jpg" alt="" /></a></p>

    display CustomHTML33

    SP Custom HTML – banner layout5 (2)
    Frontend Appearance:

    Backend Settings:

    Step 1: In the Pretashop Admin Panel, navigate to Modules and Services >> Modules and Services >> look for “SP Custom HTML” module >> click “Configure” button to configure.

    Step 2: In the “SP Custom HTML” configuration page, click button in the right corner to “ADD NEW MODULE”.

    Step 3: You could configure this module like the following image.


    Copy and paste the following code into the content:

    <p><a href="#"><img src="../themes/sp_topshop/img/cms/banner16.jpg" alt="" /></a></p>

    display CustomHTML31

    SP Custom HTML – banner layout5
    Frontend Appearance:

    Backend Settings:

    Step 1: In the Pretashop Admin Panel, navigate to Modules and Services >> Modules and Services >> look for “SP Custom HTML” module >> click “Configure” button to configure.

    Step 2: In the “SP Custom HTML” configuration page, click button in the right corner to “ADD NEW MODULE”.

    Step 3: You could configure this module like the following image.


    Copy and paste the following code into the content:

    <p><a href="#"><img src="../themes/sp_topshop/img/cms/banner14.jpg" alt="" /></a></p>

    displaySuperCategory12

    SP Super Category – Women
    Frontend Appearance:

    Backend Settings:

    Step 1: In the Pretashop Admin Panel, navigate to Modules and Services >> Modules and Services >> look for “SP Super Category” module.

    Step 2: In the “SP Super Category” configuration page, click button in the right corner to “ADD NEW MODULE”.

    Step 3: You could configure this module like the following image.

    displaySuperCategory13

    SP Super Category – Men
    Frontend Appearance:

    Backend Settings:

    Step 1: In the Pretashop Admin Panel, navigate to Modules and Services >> Modules and Services >> look for “SP Super Category” module.

    Step 2: In the “SP Super Category” configuration page, click button in the right corner to “ADD NEW MODULE”.

    Step 3: You could configure this module like the following image.

    displaySuperCategory14

    SP Super Category – Shoe & Accessories
    Frontend Appearance:

    Backend Settings:

    Step 1: In the Pretashop Admin Panel, navigate to Modules and Services >> Modules and Services >> look for “SP Super Category” module.

    Step 2: In the “SP Super Category” configuration page, click button in the right corner to “ADD NEW MODULE”.

    Step 3: You could configure this module like the following image.

    7SUPPORT

    • SUPPORT – If you have any questions that are beyond the scope of this help file, please feel free to send us via: Support Tickets System
    • FAQs – Go to Here to view more the Frequently Asked Questions.

    Where do I find Visual Composer License Key?

    $
    0
    0

    We provide license key of Visual Composer in download package. We bought extended license of this plugin but current have note solution for activate with this plugin, license key only can activate one time.

    Here is the license details of WPbakery:

    It is not possible for theme buyer to activate the license (and hence to auto-update the Visual Composer) as they have not purchased the license directly from us, but has received it in-directly from the theme. In this case, you must update the version in the theme and must release a theme update which the buyers can download and hence in-turn will receive the latest version of Visual Composer.

    We’re sorry about this inconvenience but we will update our themes to run follow Visual Composer updates.

    Why doesn’t your site display products at all in search result?

    $
    0
    0

    Because your products haven’t indexed in your site. So, when you search, only some products that have been indexed display. In this case, please try go to your admin, then open Preferences >> Search >> Check Indexing field:

    - Make sure all your products have been indexed

    - If not, you can click 2 links: ‘Add missing products to the index’  and ‘Re-build the entire index’

    You can refer the image:

    XfoxGL9

    Opencart: error 404 in Simple Blog when enable Use SEO URLs

    $
    0
    0

    Bug description:

    - When you enable Use SEO URLs (Admin: Settings >> Server >> Use SEO URLs), if you click on blog page in frontend, you get error 404.

    ief29Ue

    Solution: This is the bug of Simple Blog

    In this case, please go to the file vqmod/xml/simple_blog_catalog.xml and find:

    <file name=”catalog/controller/common/seo_url.php”>

    <operation>
    <search position=”replace” offset=”2″><![CDATA[$this->request->get['route'] = ‘error/not_found’;]]></search>
    <add><![CDATA[
    /*if($this->db->escape($part) == ‘simple-blog’) {

    } else {
    $this->request->get['route'] = ‘error/not_found’;

    break;
    }*/

    if(($this->config->has(‘simple_blog_seo_keyword’)) && ($this->db->escape($part) == $this->config->get(‘simple_blog_seo_keyword’))) {

    } else if($this->db->escape($part) == ‘simple-blog’) {

    } else {
    $this->request->get['route'] = ‘error/not_found’;

    break;
    }

    ]]></add>
    </operation>

    => Please add the code following append to the above code:

    <operation>
    <search position=”replace”><![CDATA[if ($query->row['query'] && $url[0] != ‘information_id’ && $url[0] != ‘manufacturer_id’ && $url[0] != ‘category_id’ && $url[0] != ‘product_id’) {]]></search>
    <add><![CDATA[
    if ($query->row['query'] && $url[0] != ‘information_id’ && $url[0] != ‘manufacturer_id’ && $url[0] != ‘category_id’ && $url[0] != ‘product_id’ && $url[0] != ‘simple_blog_article_id’ && $url[0] != ‘simple_blog_category_id’ && $url[0] != ‘simple_blog_author_id’) {
    ]]></add>
    </operation>

    You can refer the screenshot:

    Screenshot_1

    Thanks

    Viewing all 239 articles
    Browse latest View live